

Homemade Cream Puffs are the kind of dessert I used to think only fancy bakeries could pull off. Then I tried making them at home on a random weekend when I wanted something light, creamy, and just a little impressive. If you have ever stared at a tray of flat puffs and thought, why did that happen to me, you are not alone. The good news is the whole thing is way more doable than it sounds, and you do not need special tools. Once you nail the basic dough and a simple filling, you will want to make them for every party and also for no reason at all. 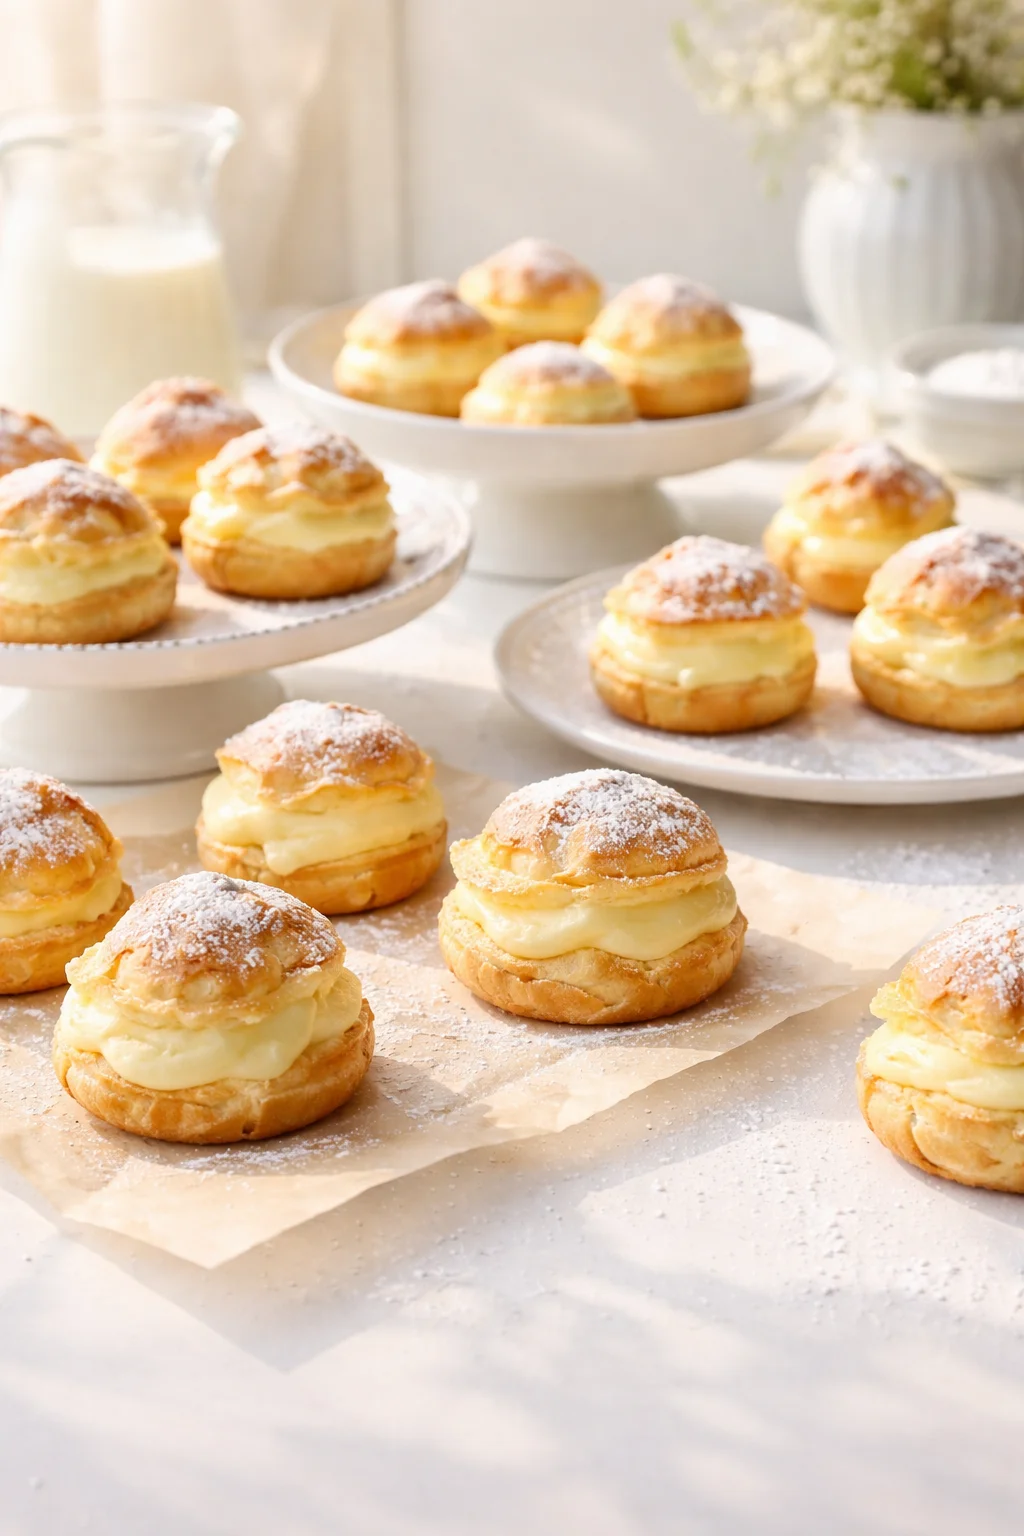
The Story Behind This Recipe
Here’s why I love this Homemade Cream Puffs: it uses pantry staples and it tastes like a bakery treat. Homemade Cream Puffs are the kind of dessert I used to think only fancy bakeries could pull off. Then I tried making them at home on…
Perfect Cream Puffs From Scratch
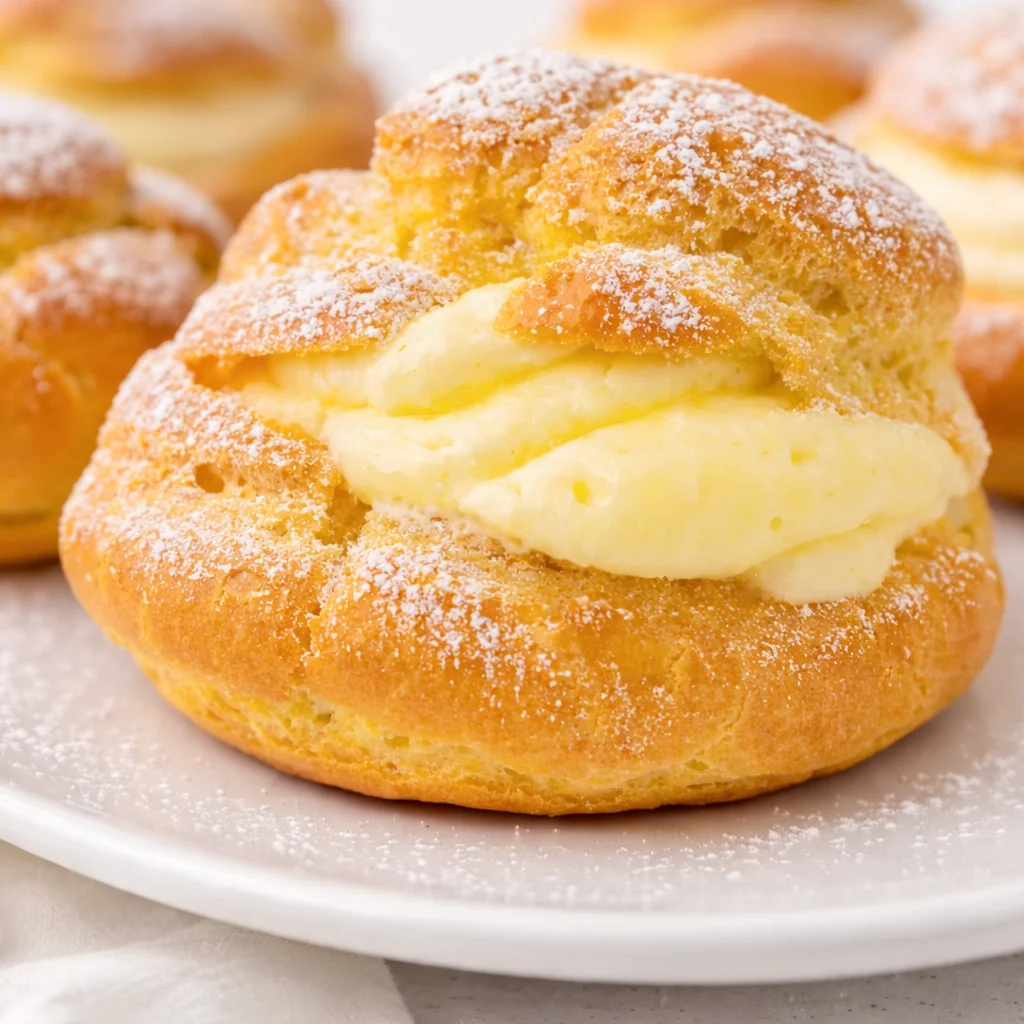
I love Homemade Cream Puffs because they feel like a magic trick. You start with a simple stovetop dough, bake it, and somehow it turns into these golden little shells with a hollow center just begging for vanilla cream. The first time I got a batch that puffed up tall, I honestly stood in front of the oven like a proud parent.
The secret is not secret at all. It is about a few small habits: measure carefully, do not rush the egg step, and let the puffs dry out a bit so they stay crisp. If you are serving them for guests, you can fill them right before serving so the shells do not soften too soon.
Also, if you are into other puff style snacks, I have a serious soft spot for cream cheese spinach puffs. Totally different vibe, but it scratches the same flaky, pop in your mouth craving when you want something savory.
One more little note from my kitchen: I always make a few extra because someone will absolutely “taste test” one or three. That someone is usually me.
What You Need
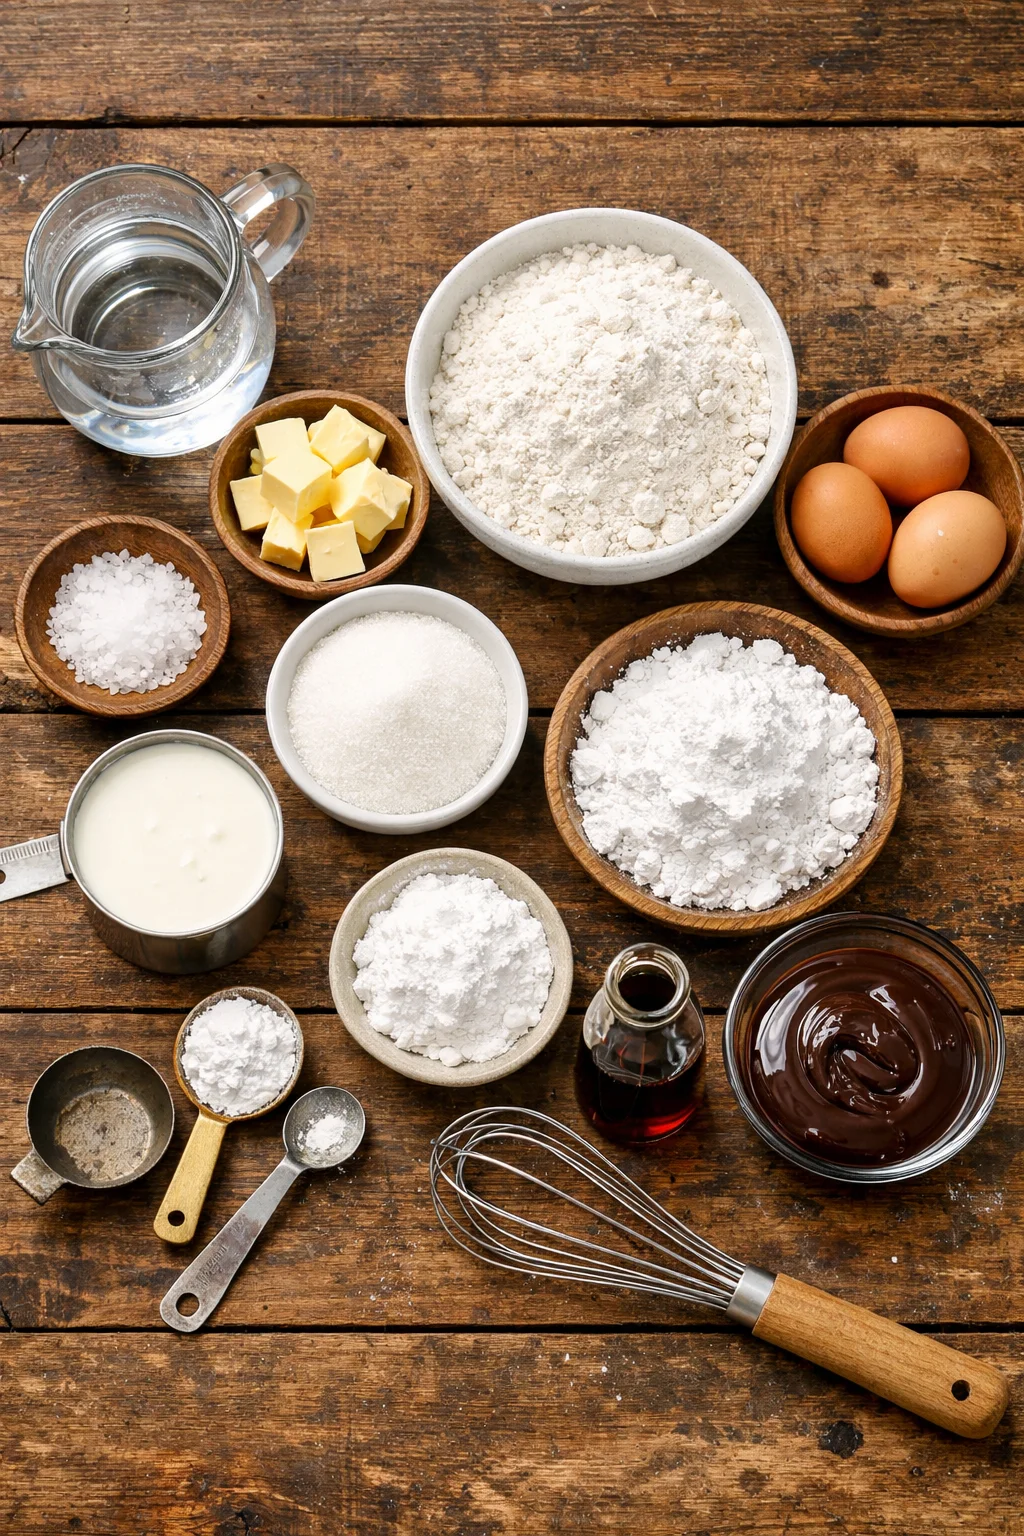
Let us keep this simple and realistic. You do not need a stand mixer, but it helps. A hand mixer works too, and in a pinch you can even mix by hand with some patience. Here is what I typically use when I make Homemade Cream Puffs.
Ingredients and basic tools
- Water and butter for the base
- All purpose flour
- Eggs (room temp helps a lot)
- Salt and a tiny bit of sugar (optional, but I like it)
- For filling: heavy cream, powdered sugar, vanilla (or pastry cream if you want)
- For topping: powdered sugar or a quick chocolate drizzle
Tools I grab: a saucepan, a sturdy spoon, a mixing bowl, a baking sheet, parchment paper, and either a piping bag or a zip top bag with the corner snipped. A small knife for slicing or poking holes is handy, and a cooling rack helps keep bottoms from getting soggy.
If you are building a dessert table and want more sweet options that are low effort, these 3 ingredient homemade Mounds bars are a lifesaver. You can make them while the puffs bake and cool.
How to Make Choux Pastry
Choux pastry is the dough that makes the puff shell. It looks a little odd at first because you cook the flour on the stove before you add eggs. But that is what gives it structure and helps it puff up in the oven. Once you do it once, it feels totally normal.
My step by step method
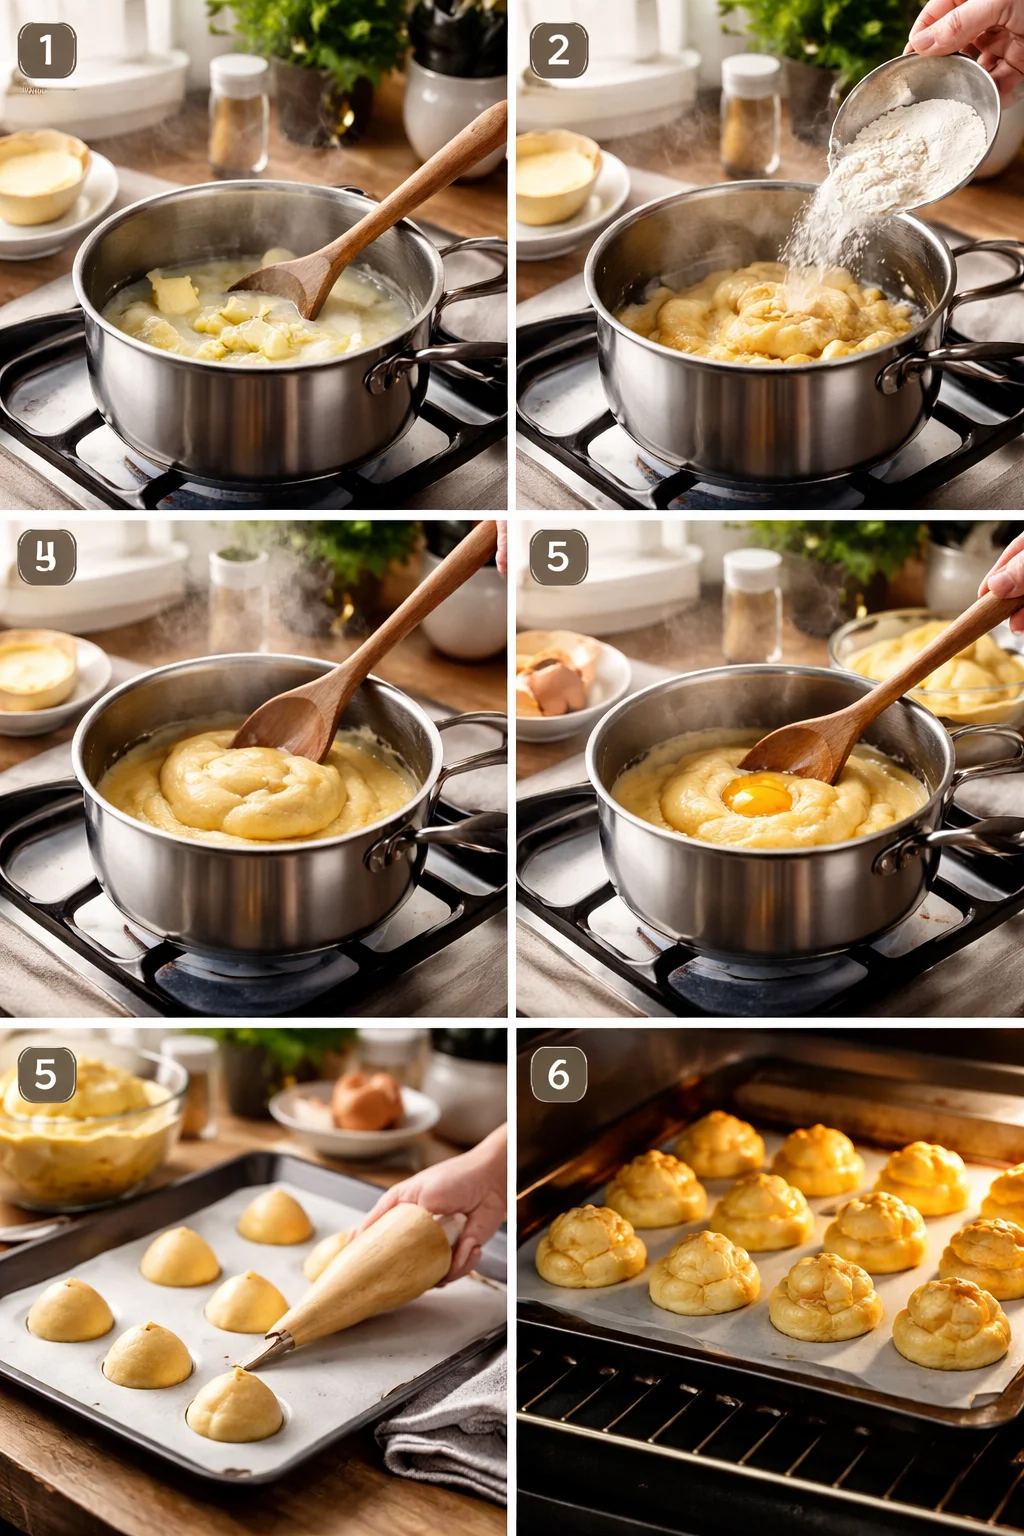
1) Heat the base: In a medium saucepan, add water, butter, salt, and a pinch of sugar if you want. Bring it to a gentle boil so the butter melts fully.
2) Add the flour: Dump in the flour all at once and stir like your life depends on it. It will clump up fast, then turn into a smooth ball. Keep stirring for about 1 to 2 minutes. You are drying it out a bit so the eggs absorb properly.
3) Cool it slightly: Move the dough to a bowl and let it sit for a few minutes. If it is too hot, it will cook your eggs, and nobody wants scrambled egg dough.
4) Add eggs gradually: Add eggs one at a time, mixing well after each. The dough will look broken and weird halfway through. Keep going. You are looking for dough that is smooth, shiny, and thick but pipeable. When you lift your spoon, it should fall in a soft V shape.
5) Pipe and bake: Pipe mounds on parchment, leaving space. Bake at a hot temperature first (usually around 400°F), then reduce slightly (often around 375°F) and continue baking until deeply golden. Do not open the oven early, it can mess with the rise.
6) Dry them out: When they are done, turn off the oven, crack the door, and let them sit for 10 minutes. I also poke a small hole in the side of each puff to let steam out. This helps keep them crisp.
Filling options: I often do sweetened whipped cream with vanilla. If I am feeling extra, I make a quick pudding style filling. You can even fold in a spoonful of cream cheese for a tangy twist. Speaking of cream cheese, if you like cute bite sized sweets, these homemade cream cheese mints are adorable for showers and holidays.
“I tried your method with the cracked oven door step, and my puffs finally stayed crisp inside. I filled them right before serving and they vanished in minutes.”
Why do Cream Puffs Deflate?
This is the heartbreak moment, right? You see a tray of tall puffs, you get excited, and then they sink like sad little balloons. It happens, and it is usually fixable.
The most common reasons (and easy fixes)
They were underbaked. This is the big one. Cream puffs need time to set their structure. If they look pale, give them more time. You want a deeper golden brown than you think.
You opened the oven too early. The sudden temp change can stop the steam lift. Try not to peek for at least the first 20 minutes.
Too much moisture trapped inside. If steam stays in the shell, it softens and collapses. Poke a small hole after baking and let them dry a bit in the turned off oven.
Egg ratio got off. Eggs are what make choux rise, but too many can make it too wet. Measure and add them slowly, especially if your eggs are extra large.
Do not beat yourself up if your first batch is a little wonky. Mine were. I still filled them and ate them standing at the counter, and honestly they tasted great. Homemade Cream Puffs are forgiving like that.
Can I Freeze Cream Puffs?
Yes, and this is one of the reasons I make Homemade Cream Puffs for busy weeks or party seasons. You can freeze the shells and fill them later, which makes you look wildly prepared even if you are not.
Here is what works best in my kitchen:
Freeze unfilled shells: Bake them fully, cool completely, then freeze in a zip top freezer bag. They keep well for about 1 to 2 months.
Refresh before serving: Warm frozen shells in a 300°F oven for 5 to 8 minutes to crisp them back up. Cool, then fill.
Freeze filled cream puffs: You can, but the texture changes. Whipped cream fillings can get a little icy. If you do freeze them filled, thaw in the fridge and expect softer shells.
If you are planning a menu and want an easy savory side that does not demand attention while you bake, this 2 ingredient creamy pesto beans recipe is ridiculously simple and comforting.
When you are ready to serve, I love a quick powdered sugar dusting. Or drizzle melted chocolate and let it set for a few minutes. Either way, they feel like a treat.
Common Questions
1) Can I make the dough ahead of time?
I do not recommend it. Choux dough bakes best right after mixing. If you need to prep ahead, bake the shells and freeze them.
2) What is the best filling for beginners?
Sweetened whipped cream with vanilla. It is fast, stable enough for serving, and tastes like a dream.
3) Why are my cream puffs hollow but wet inside?
Usually they needed more bake time or a drying step. Bake until deeply golden, then poke a hole and let them sit in the turned off oven with the door cracked.
4) Can I use milk instead of water in the dough?
Yes, or do half water and half milk. Milk gives a little more color and richness, but water tends to give a slightly crispier shell.
5) How do I keep filled puffs from getting soggy?
Fill them right before serving. If you need to hold them, keep shells and filling separate, then assemble at the last minute.
A sweet little pep talk before you bake
If you have been nervous about making Homemade Cream Puffs, I hope this helped make them feel doable. They are simple ingredients, a few key steps, and a little patience while they bake and dry. If you want extra guidance, I like checking a solid reference like Homemade Cream Puffs – Sugar Spun Run or watching technique in action like Cream Puffs Recipe (VIDEO) – NatashasKitchen.com. Make a batch, fill them with whatever you love, and do not stress if the first tray is not perfect. They will still taste amazing, and your kitchen will smell like you did something special.
Homemade Cream Puffs
Ingredients
Method
- In a medium saucepan, combine water, butter, salt, and pinch of sugar. Bring to a gentle boil.
- Add flour all at once and stir vigorously for 1-2 minutes until a smooth ball forms.
- Transfer dough to a bowl and let it cool for a few minutes.
- Add eggs one at a time, mixing well after each addition until the dough is smooth and shiny.
- Pipe the dough onto a parchment-lined baking sheet, leaving space between mounds.
- Bake at 400°F for 15 minutes, then reduce temperature to 375°F and continue baking until golden.
- Once baked, turn off the oven, crack the door, and let them sit for 10 minutes.
- Whip heavy cream with powdered sugar and vanilla until soft peaks form.
- Poke small holes in the baked puffs to release steam, then fill with whipped cream.
- Dust with powdered sugar or drizzle melted chocolate before serving.