


Red White and Blue Trifle with Fresh Berries is my dessert when I need something that looks festive, feeds a crowd, and does not make me sweat in the kitchen. You know that moment when people are already showing up, the grill is going, and you realize you forgot dessert? Yep, this is for that moment. It feels a little fancy in the bowl, but it is honestly just layering a few good things and letting the fridge do the work. I also love it because you can adjust everything based on what you have, even if your berries are a little random. Let me walk you through how I make it so you can copy it without overthinking. 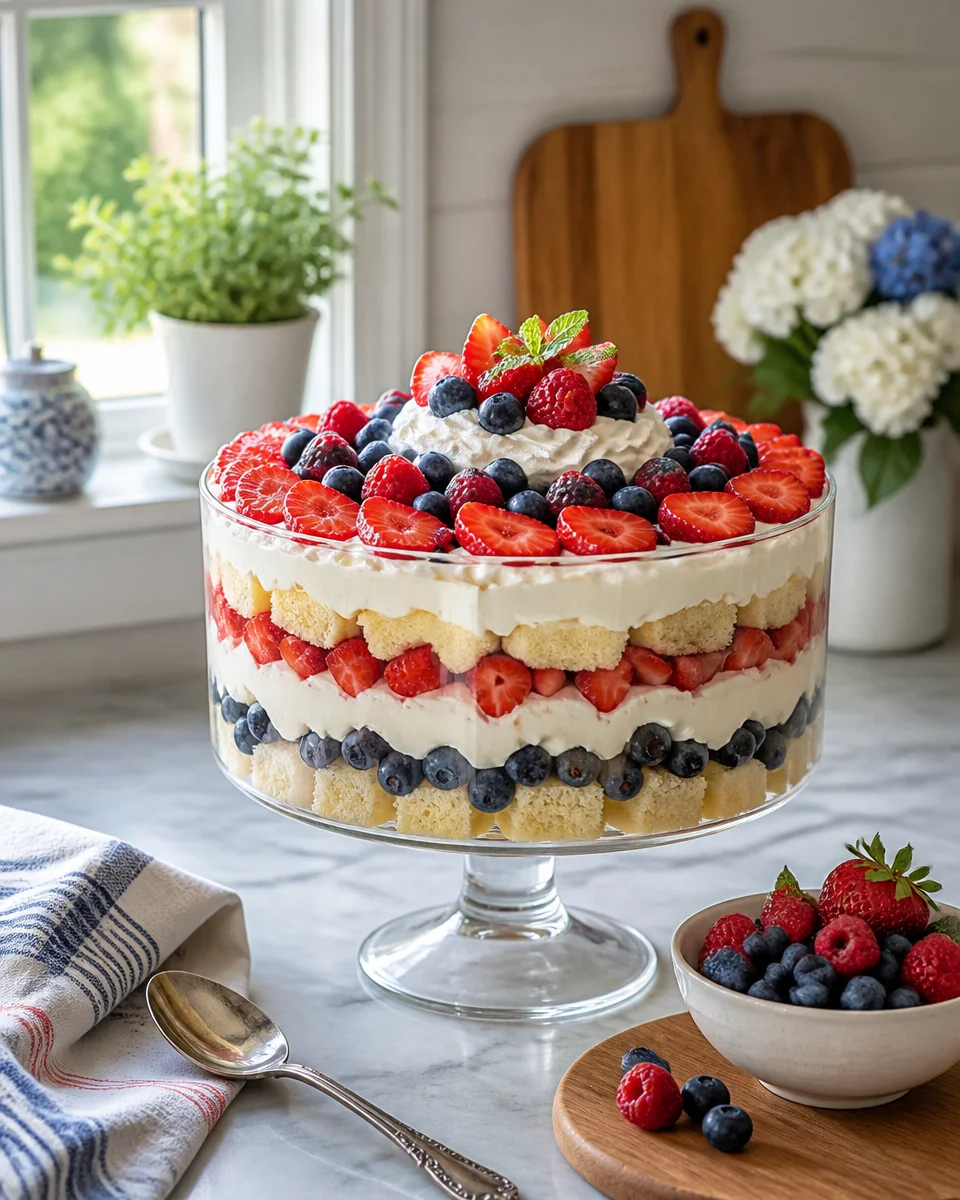
The Story Behind This Recipe
Hey, I’m Alexandraa! This Red White and Blue Trifle with Fresh Berries was built for family tables: simple steps, reliable results, and flavor that makes people ask for seconds. Red White and Blue Trifle with Fresh Berries is my dessert when I need something that looks festive, feeds a crowd, and does not make me…
What are the layers of a trifle?
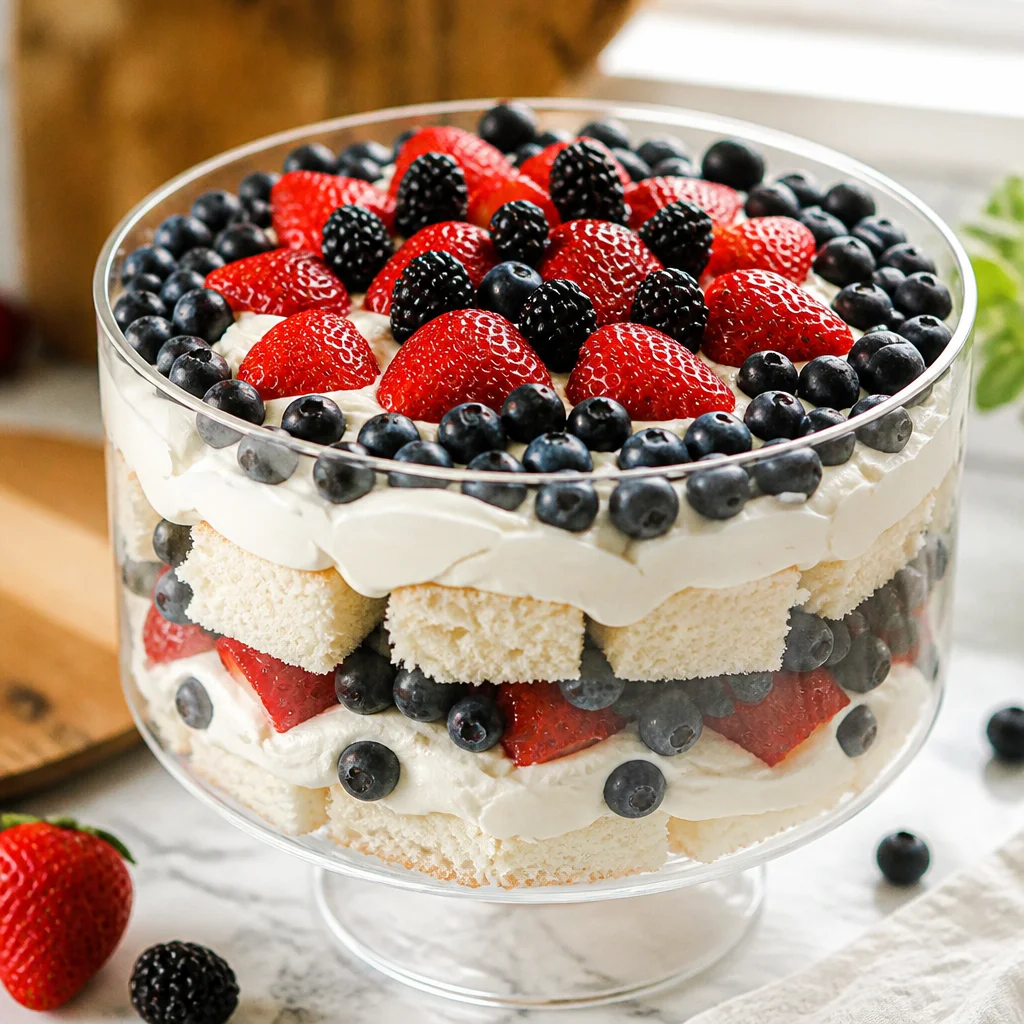
A trifle is basically a layered dessert that usually has cake, a creamy layer, and fruit. For a patriotic version, you want strong red, white, and blue layers so it looks bold and pretty through the glass. The best part is you can repeat the layers and make it as tall as you want.
The simple layer plan (and why it works)
Here is the combo I use most often for Red White and Blue Trifle with Fresh Berries. It hits that sweet spot of fluffy, juicy, and creamy in every scoop.
- Cake layer: cubed pound cake, angel food cake, or vanilla cupcakes
- White layer: whipped cream, vanilla pudding, or a cream cheese whipped filling
- Red layer: sliced strawberries or raspberries
- Blue layer: blueberries or blackberries
If you want a tiny upgrade without making it complicated, I like doing a cream cheese whipped layer: cream cheese plus powdered sugar plus vanilla, then fold in whipped topping or fresh whipped cream. It holds up better than plain whipped cream if your party is outside.
Also, if you are planning a full spread, I usually pair this dessert with something savory and easy like chicken and buttered noodles for a laid back family meal. It keeps the whole menu feeling comforting, not fussy.
Can you make the trifle the night before?
Yes, and honestly I think Red White and Blue Trifle with Fresh Berries is better when it has a little fridge time. The cake softens slightly, the flavors settle, and it scoops more cleanly. The only thing is you do not want it to turn watery, so a couple small habits really help.
My best advice is to wash and dry your berries really well. I mean really dry. Any extra water will slide down the bowl and make the bottom layer soggy. I usually rinse, then lay berries on paper towels, then dab the tops too.
Here is my schedule when I prep ahead:
- Night before: cube the cake and store airtight
- Night before: mix the white layer and refrigerate
- Morning of: slice strawberries and keep them chilled
- A few hours before serving: assemble the trifle and chill
If you are serving it the next day, consider keeping a little extra whipped topping aside and adding a fresh top layer right before guests arrive. It makes it look newly made even if you built it last night.
Random side note, but if you are also doing a big cleanup after hosting, this guide on 10 things to clean with lemon and salt is a lifesaver. I started doing the lemon and salt trick on my cutting boards after berry prep, and it really helps with stains and smells.
“I made this the night before our neighborhood cookout and it was the first dessert gone. Everyone kept asking if it was hard to make, and I laughed because it was just layering. The berries stayed bright and it was still perfect the next day.”
How do you make a trifle without a trifle bowl?
Do not let the lack of a trifle bowl stop you. I have made this in basically every container I own at some point. The goal is just to see those layers, but even if you cannot, it still tastes amazing.
Here are a few easy options:
Big glass salad bowl: probably the closest swap, and you still get the pretty sides.
9×13 baking dish: super practical for potlucks, easy to cover, easy to transport.
Individual cups or mason jars: great for portion control and zero messy scooping.
Clear plastic party cups: budget friendly, and kids love having their own.
If you go the jar route, it is adorable for picnics and parades. You can even set up a small assembly line and let people make their own. That is especially handy if someone is picky about fruit.
And if you want another fun party drink to match the red white and blue vibe, check out this red white and blue sherbet punch bowl. I have served it next to the trifle and it turns the whole table into a celebration.
How to Make a Red, White, & Blue Trifle for Memorial Day or 4th of July
This is my exact method. No complicated steps, no weird ingredients. It is the kind of recipe you can read once and then just do from memory, which is what I need on a busy holiday.
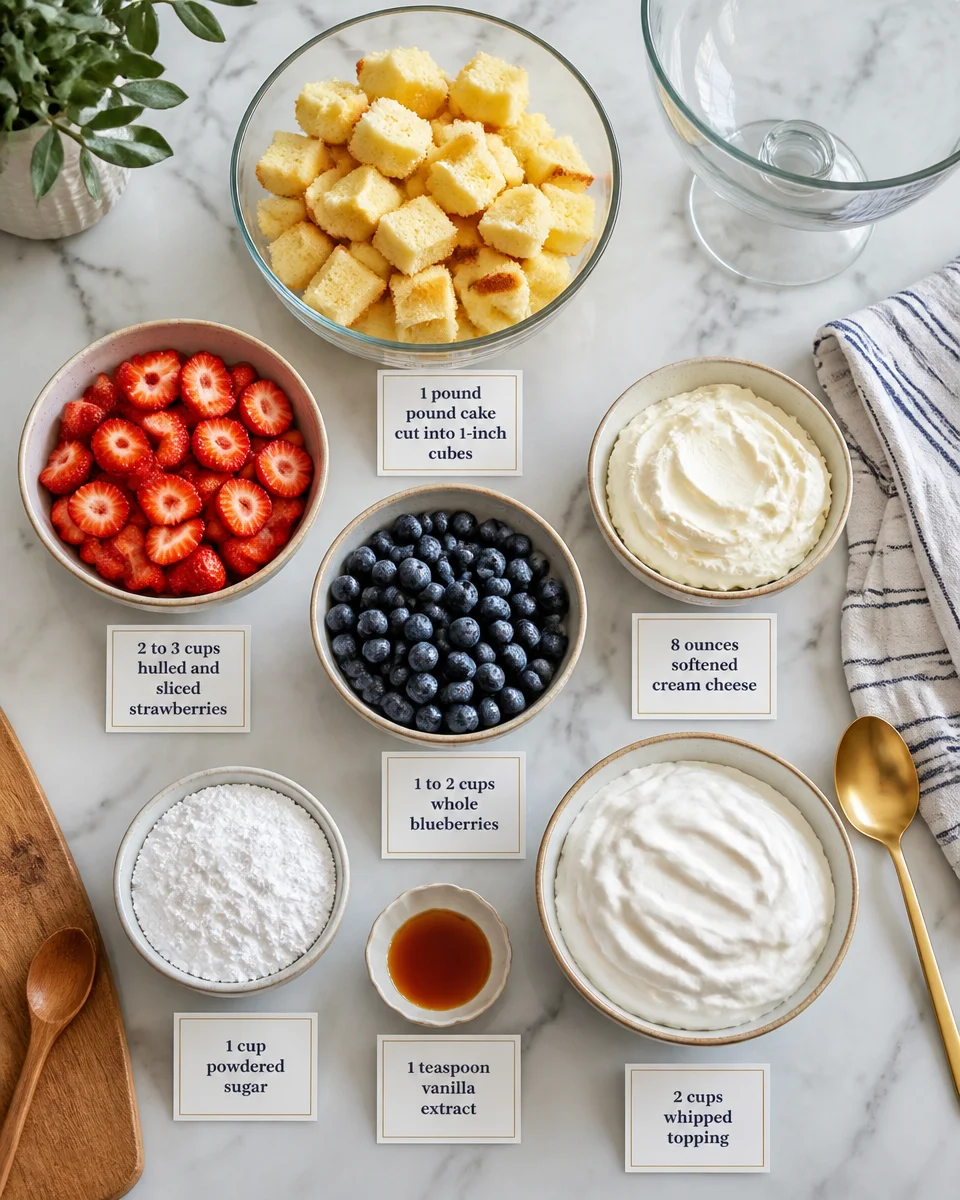
Ingredients and what I actually buy
- 1 pound cake or angel food cake, cut into 1 inch cubes
- 2 to 3 cups strawberries, hulled and sliced
- 1 to 2 cups blueberries
- 8 ounces cream cheese, softened
- 1 cup powdered sugar (add a bit less if you like it less sweet)
- 1 teaspoon vanilla extract
- 2 cups whipped topping or 2 cups heavy cream whipped to soft peaks
- Optional: lemon zest, a pinch of salt, or a spoon of strawberry jam for extra flavor
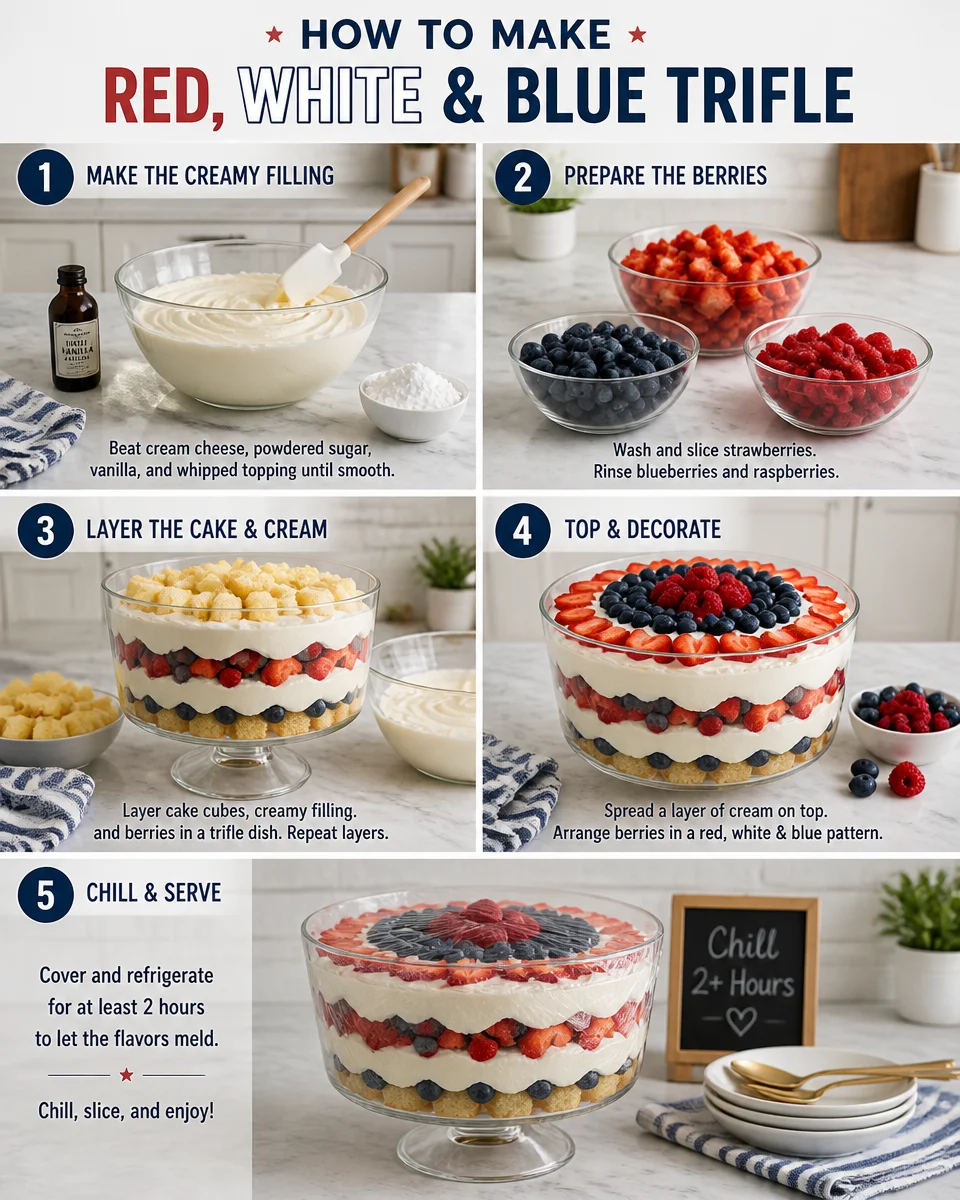
Directions (the no stress version)
1) Make the creamy layer. Beat the cream cheese, powdered sugar, and vanilla until smooth. Fold in the whipped topping or whipped cream. Taste it. If it needs a pinch of salt, add it. If you want it brighter, add a tiny bit of lemon zest.
2) Prep the berries. Slice the strawberries and keep the blueberries whole. If your strawberries are not super sweet, you can toss them with a teaspoon of sugar and let them sit for 10 minutes.
3) Start layering. Put a layer of cake cubes in the bottom. Add a layer of the creamy filling. Add strawberries, then blueberries. Repeat until you reach the top of your bowl.
4) Finish the top. I like ending with a thick white layer and then arranging berries in stripes or a loose flag look. It does not have to be perfect. People will still say wow.
5) Chill. Give it at least 2 hours in the fridge so it sets up and scoops nicely.
If you are feeding a crowd and want to round out the table with something that feels a little special but still easy, these blue cheese and pear tartlets are a great appetizer. Sweet and salty things just work together, especially with berry desserts.
And if you are doing a full holiday dinner, I love having a cozy pasta option like asiago tortelloni alfredo with grilled chicken for the people who want something hearty before dessert.
Tips For Success
This is a forgiving dessert, but these little tips make it come out cleaner, prettier, and more delicious.
Dry berries are everything. I know I already said it, but it is the number one difference between fresh and watery.
Use sturdy cake. Pound cake holds up really well. Angel food is lighter, but it can get soft faster. Both are good, just different.
Do not overmix the cream layer. Beat the cream cheese portion smooth first, then gently fold in whipped topping. That keeps it fluffy.
Keep the layers visible. Press the cake cubes against the glass on the outside edge so the sides look intentional.
Save a few berries for the top. The top layer is what everyone sees first. A handful of bright berries makes it look fresh even after chilling.
One more thing: if you are serving this outside in the heat, keep it chilled as long as possible. I will sometimes place the trifle bowl inside a larger bowl filled with ice. It is not glamorous, but it works.
Common Questions
1) How far in advance can I assemble it?
I like assembling Red White and Blue Trifle with Fresh Berries 2 to 8 hours ahead. Overnight is fine too, just expect a softer cake layer.
2) Can I use frozen berries?
You can, but thaw them first and drain well. Frozen berries release a lot of juice, so the layers will bleed and get messy. If you want the clean red and blue look, fresh is best.
3) What if I do not like cream cheese?
Use vanilla pudding mixed with whipped topping instead. It is sweeter and lighter, and kids usually love it.
4) How do I keep bananas or other fruit from turning brown if I add them?
Toss them with a little lemon juice first, then layer them in the middle, not on top.
5) What is the best way to serve it at a potluck?
Use a 9×13 dish with a tight lid, or make individual cups. Bring a big spoon and a small towel for drips.
A sweet, simple finish for your holiday table
If you want a dessert that feels festive without a lot of work, Red White and Blue Trifle with Fresh Berries is the one I come back to every summer. It is easy to prep, easy to serve, and the leftovers are honestly a great little breakfast moment the next day. If you like comparing recipes, I have also pulled ideas from Red, White and Blueberry Trifle – Skinnytaste, and for cute single servings take a peek at Red White and Blue Trifle in a Jar. Now grab those berries, clear a shelf in your fridge, and make it your signature holiday dessert.
Red White and Blue Trifle with Fresh Berries
Ingredients
Method
- Beat the cream cheese, powdered sugar, and vanilla until smooth.
- Fold in the whipped topping or whipped cream.
- Taste it. If it needs a pinch of salt, add it.
- If you want it brighter, add a tiny bit of lemon zest.
- Slice the strawberries and keep the blueberries whole.
- If strawberries are not super sweet, toss with a teaspoon of sugar and let them sit for 10 minutes.
- Put a layer of cake cubes in the bottom.
- Add a layer of the creamy filling.
- Add strawberries, then blueberries.
- Repeat until you reach the top of your bowl.
- End with a thick white layer and arrange berries in stripes or a loose flag look.
- Give it at least 2 hours in the fridge so it sets up and scoops nicely.