

HOMEMADE CHEEZ-ITS are my go to fix for that moment when you want something salty, crunchy, and cheesy, but the store box is either gone or just not hitting right. I started making them at home after one too many times grabbing a snack and realizing I had no idea what half the ingredients were. The good news is they are way easier than you would think, and your kitchen will smell like toasted cheese in the best way. Plus, you can make them extra sharp, extra salty, or even a little spicy if that is your thing. If you have ever wanted that classic cracker vibe but fresher, this is it. 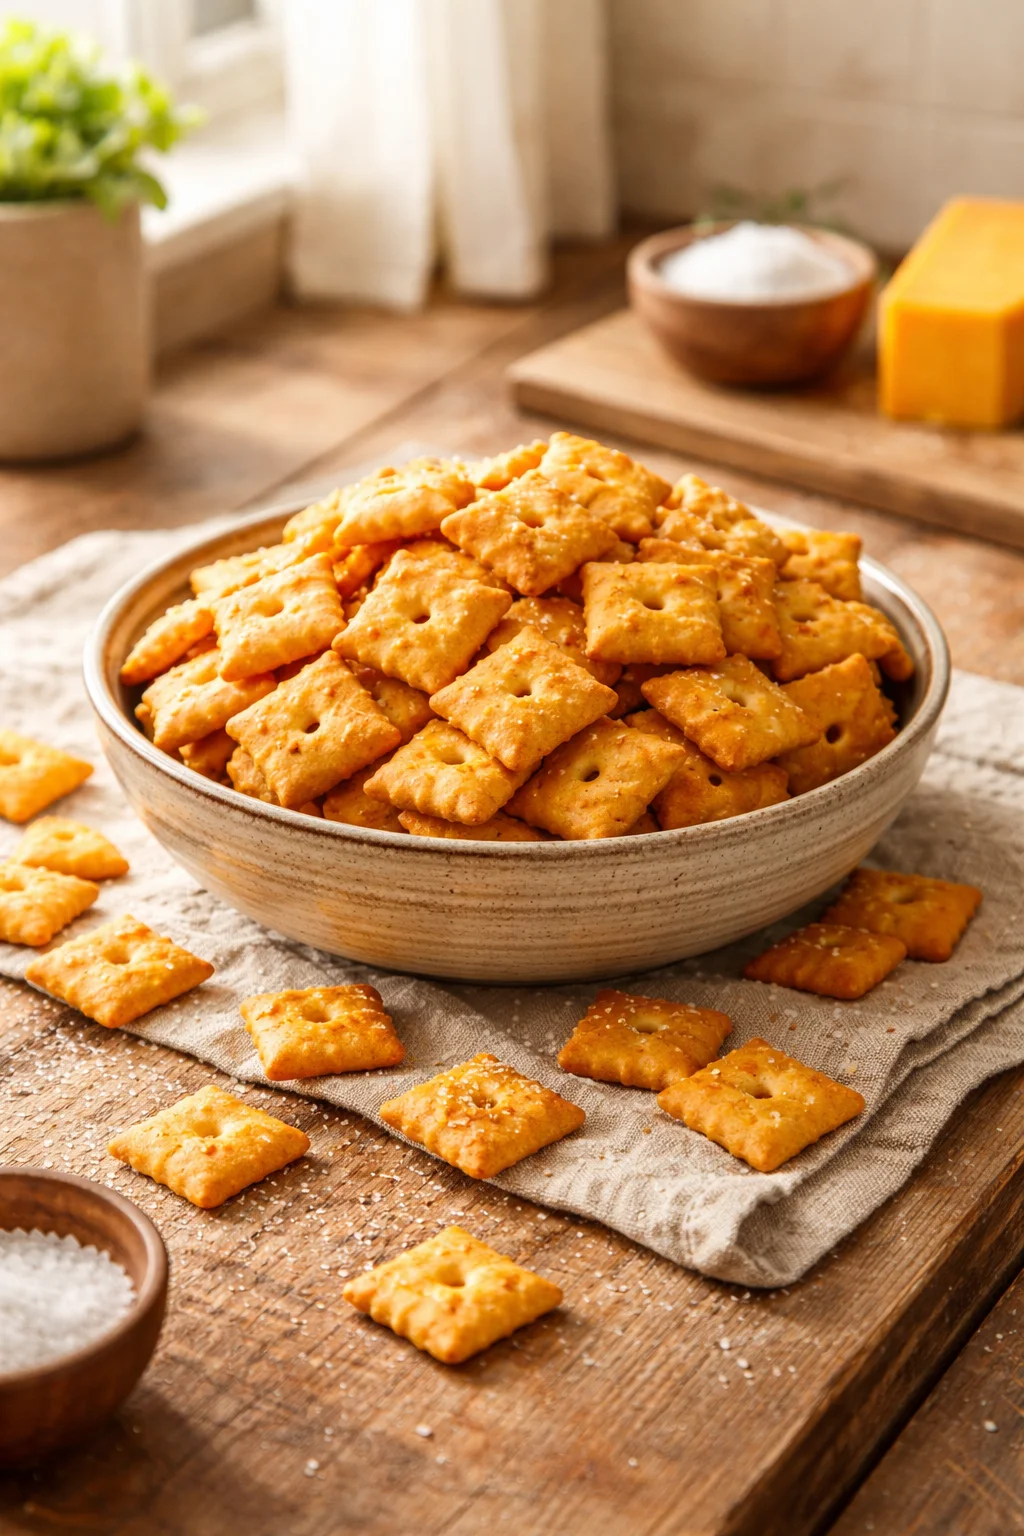
The Story Behind This Recipe
Hey, I’m Alexandraa! This HOMEMADE CHEEZ-ITS was built for real kitchens: simple steps, reliable results, and flavor that makes people ask for seconds. HOMEMADE CHEEZ-ITS are my go to fix for that moment when you want something salty, crunchy, and cheesy, but the store box is either gone or…
What are Cheez-Its?
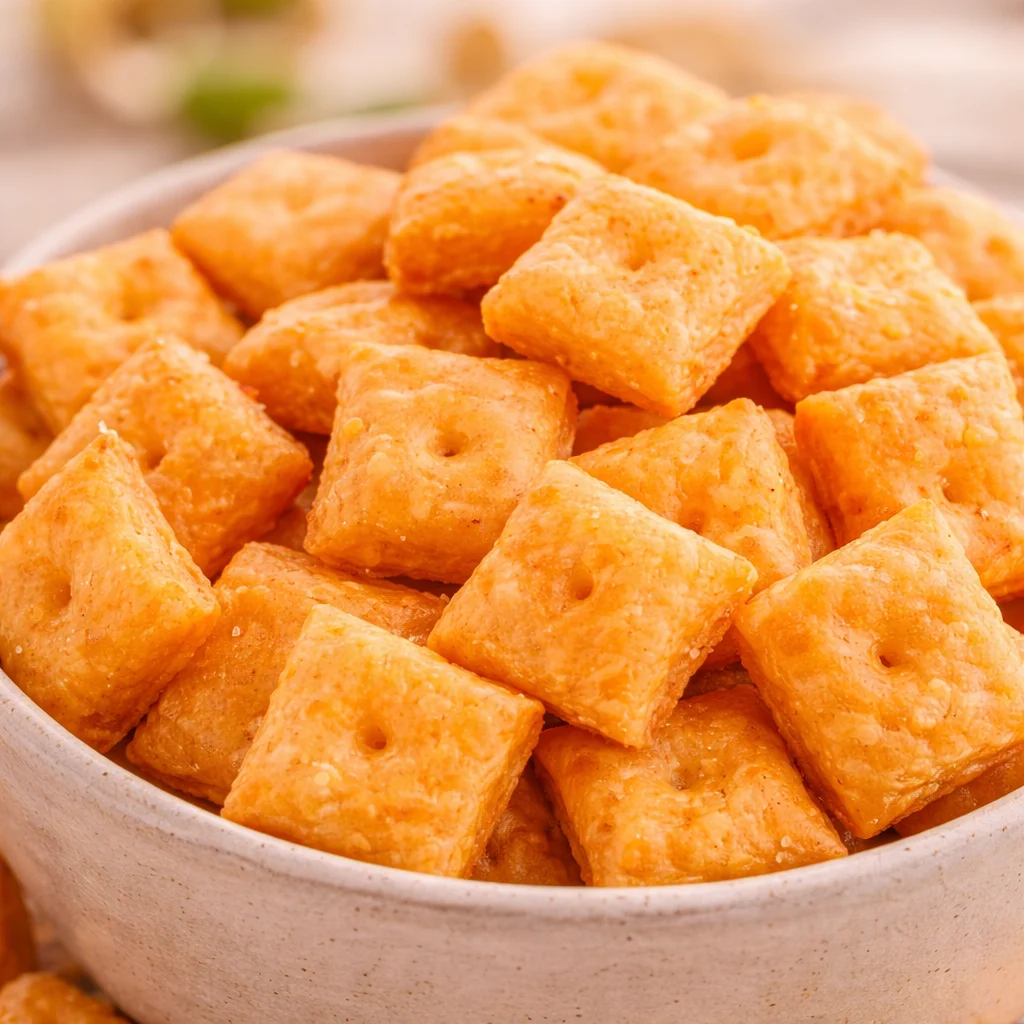
Cheez Its are those small square cheese crackers that are crisp, a little salty, and kind of dangerously snackable. The flavor is simple but specific: baked cheese, toasty edges, and that tiny punch of salt that keeps you reaching back into the bowl.
What makes them special is the texture. They are not puffy like some crackers. They are thin and snappy, with a clean bite. When you make them at home, you can keep that same vibe but with a more real cheese flavor, since you are using actual cheese you picked yourself.
Also, homemade versions let you control the size. I usually do the classic little squares, but sometimes I do messy rustic shapes when I am feeling lazy. They still taste amazing, and nobody complains.
Quick snack side note: if you are the kind of person who likes homemade treats in general, you might also love these 3-ingredient homemade Mounds bars for a super easy sweet option after the salty stuff.

Benefits of Making Cheez-Its at Home
I will be honest, I first tried this as a fun weekend project. Now I do it because it is actually worth it. Here is why.
Better flavor: You get real cheddar flavor, not just a hint of cheese. If you use sharp cheddar, you will taste it.
Simple ingredients: You know exactly what is going in, and it is stuff you probably already have.
Customize everything: More salt, less salt, spicy, garlicky, herby, you name it.
Fresh crunch: Fresh baked crackers have a lighter, cleaner crunch. When they cool, they get even snappier.
And if you are making snacks for parties or movie night, HOMEMADE CHEEZ-ITS are one of those things people keep picking at without realizing it. They disappear fast, which is why I almost always double the batch now.
“I made these for my kids and they ate the whole tray before dinner. They taste like the real thing, but cheesier. Now they request them every week.”
Key Ingredients for Cheez-Its
This is not a long grocery list, which is part of the magic. The main idea is cheese plus a basic dough, rolled thin and baked until crisp.
Here is what you will need:
- Sharp cheddar cheese (freshly shredded is best for flavor)
- All purpose flour
- Butter (cold, cut into small pieces)
- Salt (plus extra for sprinkling if you like)
- Cold water (just enough to bring the dough together)
Optional but really good: a tiny pinch of paprika, garlic powder, cayenne, or black pepper. If you want that classic orange snack color, paprika helps, but it is not required.
Cheese tip from my own trial and error: pre shredded bag cheese works in a pinch, but it does not melt the same because of the anti caking stuff. If you can, shred a block. It takes two minutes and the flavor payoff is real.
Also, if you like mixing flavors, try half sharp cheddar and half pepper jack. It is a fun twist and still tastes like a proper cheesy cracker.
Random but related: if you are building a homemade snack spread, I love adding a dip on the side. This homemade sweet chili sauce recipe is surprisingly easy and gives you that sweet spicy contrast that works with crunchy snacks.
Step-by-Step Instructions for Homemade Cheez-Its
I am going to walk you through it like I would if you were in my kitchen. No fancy techniques, just a few small details that make the crackers come out crisp and legit.
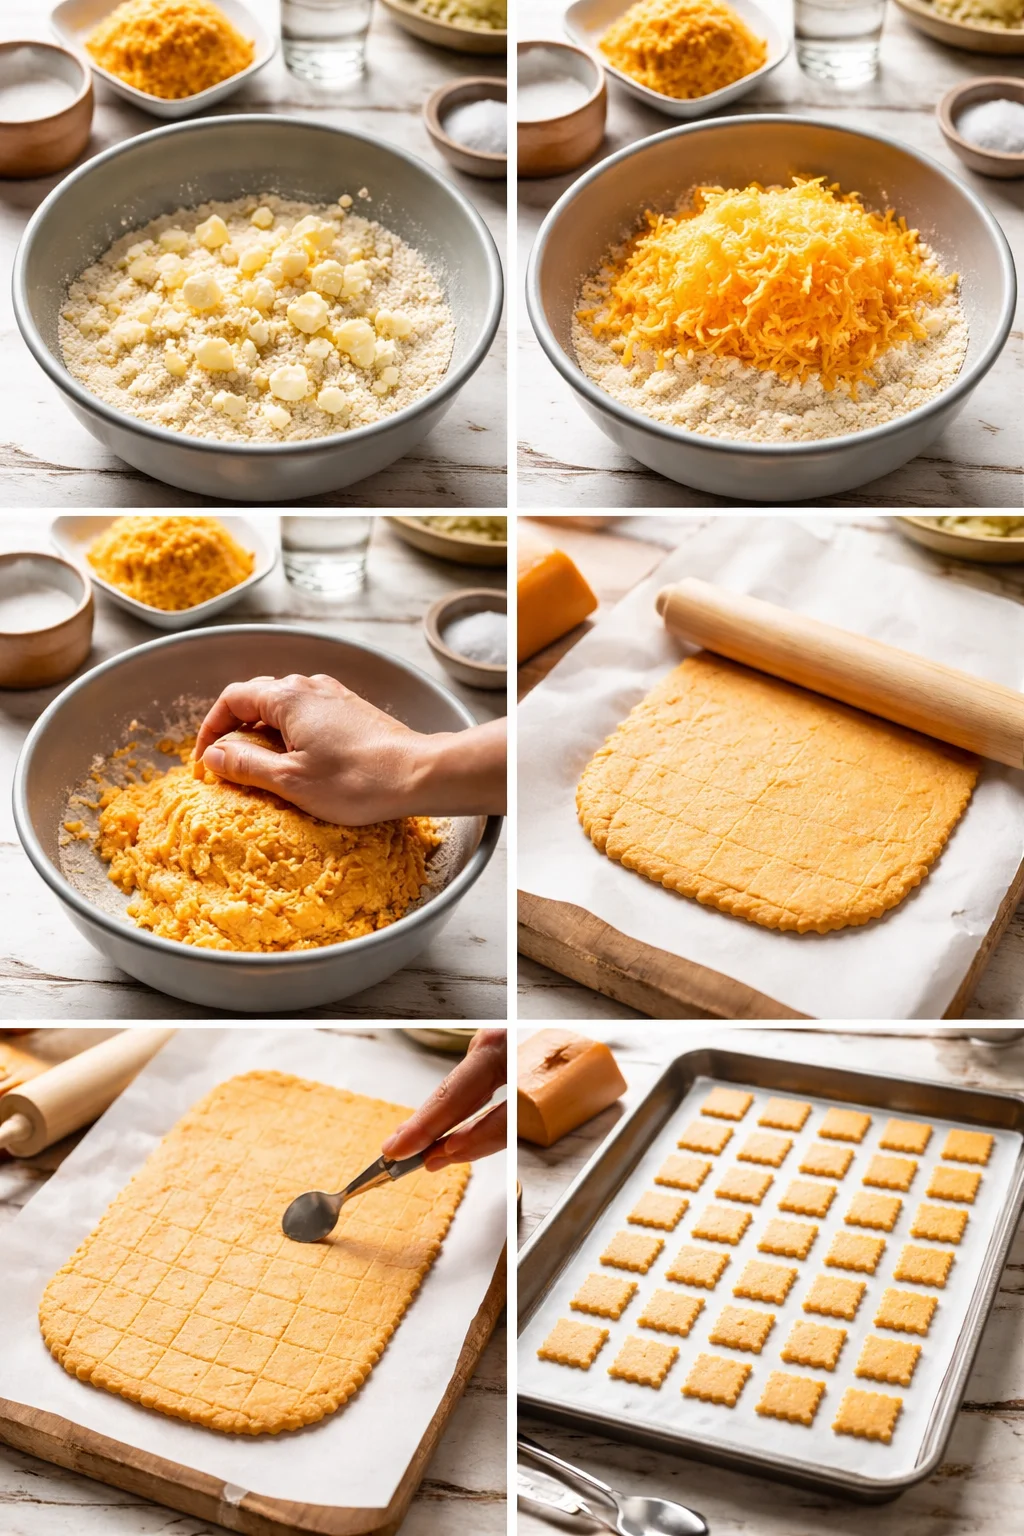
1) Make the dough
Add flour, salt, and cold butter to a bowl and rub it together with your fingertips until it looks like coarse crumbs. Then mix in the shredded cheddar. Add cold water a little at a time, just until the dough comes together. It should look like a dough, not a paste. If it feels sticky, add a tiny sprinkle of flour.
2) Chill for better rolling
Wrap the dough and chill it for about 20 to 30 minutes. This makes it easier to roll thin, and thin is what gives you that classic snap.
3) Roll thin and cut
Heat your oven to 350 F. Roll the dough between two pieces of parchment paper until it is very thin, like a couple of coins stacked thin. Cut into small squares with a knife or pizza cutter. If you want the little hole in the middle, poke each square with a skewer or the end of a chopstick.
4) Bake until crisp
Move the squares (still on parchment) to a baking sheet. Sprinkle with a little salt if you want. Bake about 12 to 16 minutes, depending on thickness. You want lightly browned edges. Rotate the pan halfway through if your oven has hot spots.
5) Cool completely
This part matters. They crisp up more as they cool. Let them sit on the baking sheet for a few minutes, then move to a rack if you have one.
If you are planning a full homemade comfort menu, these crackers are cute next to warm bread too. I have made them on the same day as homemade angel biscuits and it felt like the coziest kitchen day ever.
Tips for Perfecting Your Cheez-Its Recipe
When people tell me their crackers came out a little soft or uneven, it is almost always one of these things. Here is what helps the most.
Roll thinner than you think. Thick dough makes more of a biscuit cracker. Still good, just not that Cheez It snap. Thin dough equals crisp crackers.
Keep the butter cold. If the dough gets warm and greasy, it is harder to roll and the crackers can bake unevenly. If your kitchen is warm, pop the dough back in the fridge for 10 minutes.
Do not underbake. If they look pale, they will probably be soft. Look for lightly browned edges. If you are unsure, bake 1 to 2 minutes more. Just watch closely near the end.
Cut similar sizes. If some pieces are tiny and others are big, the small ones will brown too fast. I aim for rough one inch squares.
Let them cool fully before storing. Trapping steam makes them lose crunch. I leave them out until completely cool, then store.
Storage: Keep them in an airtight container for about 4 to 5 days. If they soften, spread them on a baking sheet and re crisp at 300 F for 4 to 6 minutes.
And if you are like me and love stocking the fridge with homemade snacky things, you might also want a minty treat tucked away for later. These homemade Andes mints are fun and super giftable too.
Common Questions
Can I make HOMEMADE CHEEZ-ITS without a food processor?
Yes. I usually do it by hand in a bowl. Just rub the butter into the flour, then stir in cheese and water. It takes a couple extra minutes, but it works.
Why did my crackers turn out soft?
Most likely they were rolled too thick or underbaked. Bake until you see golden edges, and cool them fully so they crisp up.
Can I use different cheese?
Totally. Cheddar is the classic, but you can try smoked cheddar, pepper jack, or a mix. Keep in mind that very oily cheeses can make the dough greasy, so start with a half and half blend if you are experimenting.
Do I have to poke the hole in the middle?
Nope. It is mostly for the classic look and it helps prevent bubbling. If you skip it, they still taste great. If they puff up, just press them down gently right after baking.
Can I freeze the dough?
Yes. Wrap it well and freeze up to 2 months. Thaw in the fridge overnight, then roll and bake as usual.
My favorite way to wrap this up
If you have been craving that cheesy, salty crunch, HOMEMADE CHEEZ-ITS are such a satisfying little kitchen win. Once you get the dough rolled thin and bake them until the edges turn golden, the rest is easy and honestly kind of relaxing. If you want to compare methods or pick up extra technique tips, I found it helpful to read Homemade Cheez-Its Recipe | Good. Food. Stories. and also Homemade Cheez-Its Recipe – Serious Eats for more testing notes. Make a batch, tweak the salt to your taste, and do not be surprised if you start making them instead of buying the box. Let me know if you go classic cheddar or if you try a spicy version.
Homemade Cheez-Its
Ingredients
Method
- Add flour, salt, and cold butter to a bowl and rub it together with your fingertips until it looks like coarse crumbs.
- Mix in the shredded cheddar.
- Add cold water a little at a time, just until the dough comes together.
- Wrap the dough and chill it for about 20 to 30 minutes.
- Heat your oven to 350°F.
- Roll the dough between two pieces of parchment paper until it is very thin.
- Cut into small squares with a knife or pizza cutter.
- Poke each square with a skewer or chopstick if you want the little hole in the middle.
- Move the squares to a baking sheet and sprinkle with a little salt if desired.
- Bake for about 12 to 16 minutes, until lightly browned around the edges.
- Let them cool for a few minutes on the baking sheet before transferring to a rack.