

baked pears with blue cheese are my favorite fix for that familiar party problem: you want something that feels a little fancy, but you do not want to babysit a complicated appetizer all night. They come out warm and soft, with that sweet pear flavor playing really nicely against the salty, tangy cheese. It tastes like you planned ahead, even if you threw it together between answering texts and setting out napkins. The best part is how simple it is to get a “wow” reaction with very normal grocery store ingredients. If you are hosting, bringing a dish, or just craving a cozy snack, this one checks all the boxes.
Why Baked Pears and Blue Cheese Work
There is a reason this combo keeps showing up on restaurant menus. Pears are naturally sweet and mellow, and when you bake them, they get even more tender and juicy. Blue cheese is the opposite in the best way: salty, creamy, and sharp enough to wake everything up. Put them together and you get contrast in every bite, like a tiny flavor conversation happening on your plate.
Texture matters too. The pear turns soft but still has some structure, while the cheese melts into a creamy little pocket. If you add a bit of crunch on top, it becomes one of those appetizers people keep circling back to. And if you are wondering where these land, appetizer or dessert, I think it depends on how you serve them. On a cheese board with nuts and cured meats, they feel like an appetizer. With a drizzle of honey and maybe a small cookie on the side, they can lean dessert without trying too hard.
Also, if you are a “cheese plus fruit” person already, you are going to love this. It scratches the same itch as a grape and cheddar snack, just dressed up for company. I get the same cozy vibe from creamy baked dishes too, like this baked cream cheese spaghetti casserole when I need comfort food that feels a little special.
Choosing Pears for Stuffing
The pears you pick can make or break the whole thing. You want them sweet, yes, but you also want them to hold their shape in the oven. The good news is you do not need some rare variety. Most grocery store pears can work as long as you choose wisely and do not overbake.
Best ripeness for pears that hold their shape
Look for pears that are ripe but still firm. If you press near the stem and it gives just slightly, you are in the sweet spot. If the pear feels squishy all over, it will likely collapse or turn mushy once baked. And if it is rock hard, it might stay bland and stiff even after baking.
If you only have very firm pears, you can still use them, just expect a slightly longer bake and a bit less “melt in your mouth” texture. If you only have very ripe pears, you can use them too, but treat them gently and shorten the bake time. I know, pears can be a little dramatic.
Blue cheese intensity and balanced flavor
Blue cheese can range from mild and creamy to very bold and funky. If you are serving a crowd, especially people who “think” they do not like blue cheese, choose a milder option. Something creamy and less sharp tends to win people over. If you personally love that strong tang, go for a bolder cheese, just do not overload the pears so the flavor does not steamroll everything else.
A little tip that helps: let the cheese sit at room temp for a few minutes before stuffing. It mixes and melts more smoothly, and you get that creamy center instead of a dry chunk.
Optional crunch and sweetness only if present in the recipe
If your recipe includes a crunchy topper like chopped nuts, it is worth using them. That little crunch is what makes these feel “complete” instead of just soft on soft. If your recipe includes honey or another sweet drizzle, keep it light. Pears are already sweet, and you want the blue cheese to stay noticeable.
If you are into fruit and creamy fillings in general, you might also like these cream cheese stuffed blueberry muffins for breakfast or brunch. Different vibe, but that same sweet plus creamy thing going on.
Texture and Flavor Tips
This is the section I wish someone had handed me the first time I made baked pears. Because yes, the idea is simple, but pears can go from perfect to watery and floppy fast. The goal is tender pears with a creamy, not oily, cheese center.
Here are the biggest little tips that help:
- Prevent watery pears: do not overcrowd the baking dish. When pears sit too close, they steam each other and get soggy instead of gently baking.
- Avoid overly soft fruit: start checking early. Pears do not announce when they are done. One minute they are firm, the next minute they are collapsing.
- Keep blue cheese from overpowering: use enough to taste it, but do not pack it in like you are stuffing a winter coat. A balanced filling tastes more elegant.
- Mind your oven: some ovens run hot, some run cool, and pears are sensitive. Trust how they look and feel more than the clock.
And do not skip the resting time after baking. Letting them sit for a few minutes helps the juices settle so they are not sliding everywhere the second you plate them.
If you are someone who loves creamy desserts but hates turning on the oven for them, keep this in your back pocket too: no-bake blueberry cheesecake. It is a totally different recipe, but it is another easy way to get that creamy payoff without stress.
Serving Blue Cheese Stuffed Pears
This is where you can really decide what mood you want. I like serving them warm when the cheese is soft and the pears smell like autumn. But they also taste great closer to room temp, when the flavors feel a bit more blended and mellow.
Warm vs room temperature is mostly about timing. If guests are arriving soon, bake them a bit before and let them sit. If you are serving right away, warm is amazing. If you are transporting them, room temp is easier and still super tasty.
For a simple appetizer platter, pair them with a few things that balance the sweet and salty:
- Toasted bread or crackers
- Salty nuts or any crunchy snack mix you already have
- Cured meat if you are doing a bigger board
- Fresh grapes or apple slices for extra fruit
For holiday dinners and small gatherings, I like placing the pears on a big platter and adding greens around them for color. It makes them look festive without extra work. If you want a cozy side that is also low effort, I am a big fan of an easy potato situation like this air fryer baked potato. It is not the same course, obviously, but it fits that “minimal effort, max comfort” hosting style.
Make-Ahead and Storage
If you are hosting, make-ahead details matter. You can prep parts of baked pears with blue cheese in advance, but there are a couple things to know so they do not turn brown or watery.
What you can usually do ahead:
Core and prep the pears a few hours early and keep them chilled, covered, until you are ready to bake. If your recipe uses a topping or mix-ins, you can have those ready in a small container so you are not rummaging during party time.
Refrigeration and gentle reheating:
Store leftovers in an airtight container in the fridge. To reheat, keep it gentle so you do not turn the pears mushy. A low oven works well, and you are mostly just warming them through.
Quality changes after storage:

They will still taste good the next day, but the pears soften more over time and the filling can lose a bit of that fresh melt. I still eat leftovers happily, just with slightly lower expectations for texture.
I served these at a small get-together and they disappeared so fast. Everyone asked what was in them, and one friend who swore she hated blue cheese went back for seconds.
Variations That Suit the Base Recipe
I like keeping baked pears with blue cheese close to the original idea because it is simple and works. But you can still change the presentation a little depending on the vibe.
Roasted vs baked presentation is mostly a wording thing for home cooks, but the main point is this: you want heat that softens the pears without blasting them into mush. If you slice the pears instead of halving them, they cook faster and look a bit more modern on a platter. If you keep them halved, they feel more classic and hearty.
If your recipe already includes honey or nuts, you can adjust the amounts to taste, but I would not add random extras that fight the blue cheese. This appetizer is about balance, not overload.
If you are in a playful snack mood and want something dessert-like for another day, these air fryer cherry cheesecake egg rolls are fun. Totally different from pears, but they hit that same sweet and creamy craving.
FAQs
Can you use ripe pears?
Yes, but keep a close eye on them. Very ripe pears can turn soft quickly, so you will want a shorter bake and gentler handling.
Which blue cheese is mildest?
Look for a creamy, mellow blue cheese and avoid the super aged, very pungent varieties if you are feeding a crowd. Mild blues tend to taste more buttery than sharp.
Can these be served cold?
They can, but they taste best warm or at room temperature. Cold pears and cold blue cheese feel firmer and the flavors do not pop as much.
Can stuffed pears be made ahead?
You can prep them ahead and bake closer to serving time. Fully baking ahead works too, but the texture is at its best fresh from the oven or shortly after.
Final Thoughts
If you want something that feels restaurant-y without the stress, baked pears with blue cheese are the move. Focus on pears that are ripe but still firm, do not overload the filling, and pull them before they get too soft. Serve them warm for the coziest flavor, or let them sit a bit if you are juggling guests. When you are ready, scroll down to the recipe card and make a batch, you might be surprised how quickly they disappear.
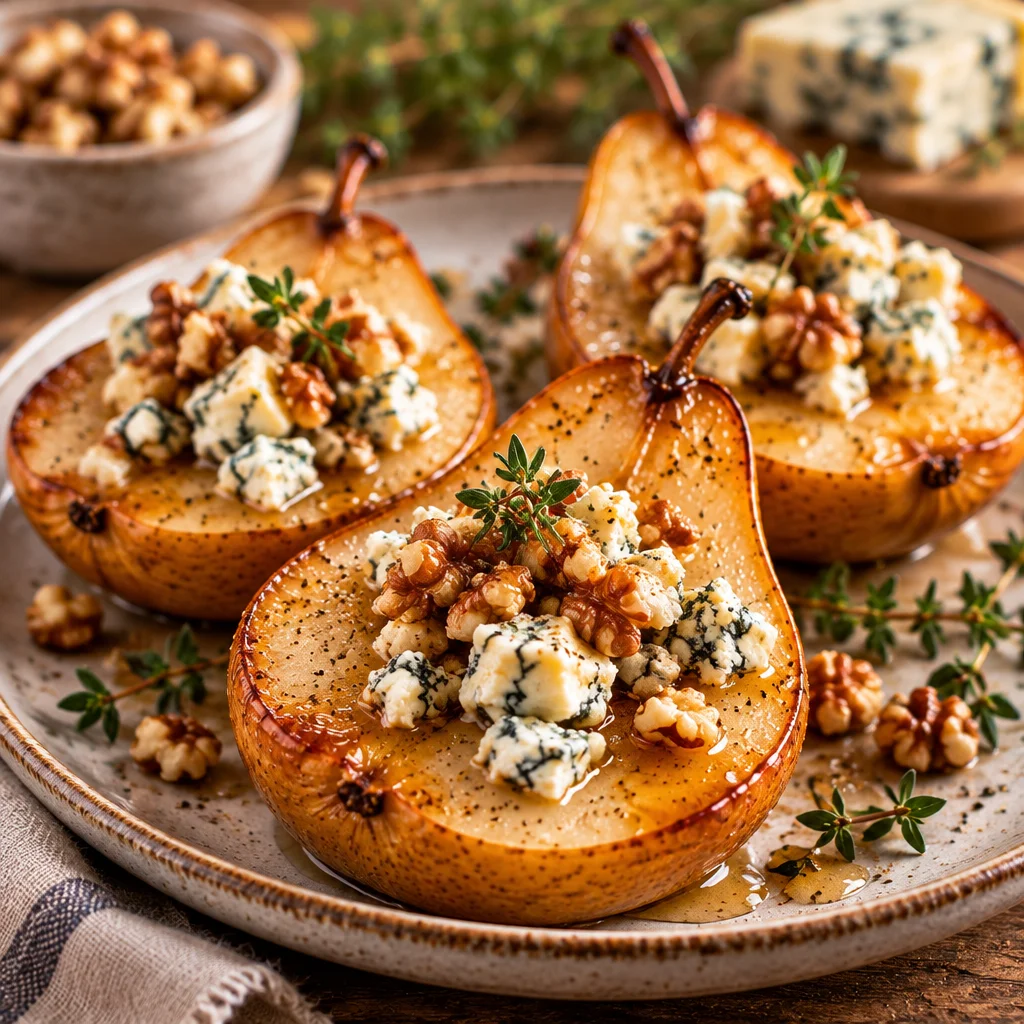
Baked Pears with Blue Cheese
Ingredients
Method
- Preheat your oven to 375°F (190°C).
- Core and halve the pears, then place them cut-side up in a baking dish.
- Stuff each pear half with a generous amount of blue cheese.
- If using, sprinkle chopped nuts on top of the blue cheese.
- Bake the pears in the preheated oven for about 25 minutes, or until the pears are tender.
- If desired, drizzle with honey right after removing from the oven.
- Let the pears rest for a few minutes before serving warm or at room temperature.
- Pair them with toasted bread, nuts, or fresh fruit for a complete appetizer experience.