

Butterfinger Balls are my go to treat when I need something sweet fast, but I do not feel like baking a whole cake or pulling out a mixer. You know those days when you want a dessert that feels fun and a little nostalgic, but you also want it to be easy enough to make while you are half watching a show? That is exactly where these come in. They are creamy, crunchy, and just the right kind of messy in the best way. I started making them for parties, and now I make them for random Tuesdays too. If you love that peanut butter and chocolate combo, you are in for a good time.
The Story Behind This Recipe
Here’s why I love this Butterfinger Balls: it bakes up beautifully and it tastes like a weekend dinner. Butterfinger Balls are my go to treat when I need something sweet fast, but I do not feel like baking a whole cake or pulling out…

Meet Your New Favorite Dessert Ball
Let me paint the picture. You pop one in your mouth and you get that smooth peanut buttery center, then little crunchy bits of Butterfinger, and then the snap of chocolate on the outside. It is the kind of bite that makes people stop mid sentence and go, wait, what is in this?
I also love that they are naturally portioned. No slicing, no serving utensils, no trying to pretend you only want a tiny piece. Just grab one and enjoy it. And if you are the person who likes to keep a secret stash in the fridge, these are perfect for that.
Since you are here for Butterfinger Balls, you might also be into other Butterfinger desserts when you want something a bit more dramatic. This Butterfinger bundt cake is a fun option when you actually do want to bake and show off a little.
One more thing, these make an adorable homemade gift. Toss them in a little box with parchment paper, and suddenly you look like the friend who has their life together.
Why You’ll Love This Butterfinger Balls Recipe
I have made a lot of no bake treats over the years, and this one sticks around for a reason. It is simple, it is forgiving, and it gets rave reviews even from people who claim they do not like sweets that much. Sure you do, buddy. You just have not had one of these yet.
Quick reasons this recipe works
- No oven needed, which is my favorite kind of dessert plan.
- Easy ingredients you can find at pretty much any grocery store.
- Great for parties because you can make them ahead.
- Freezer friendly for when you want treats on demand.
- That crunchy Butterfinger vibe that makes them taste like more effort than they are.
I also like that you can tweak them depending on your mood. Want more crunch? Add extra crushed candy. Want them smoother? Crush the candy finer and go heavy on the peanut butter mixture.
“I made these for game night and they disappeared in minutes. Even my friend who never eats dessert asked for the recipe. They taste like a candy shop treat but way easier.”
And if you are on a snack mix kick, you should check out this Butterfinger puppy chow sometime. It has the same flavor family, and it is dangerously snackable.
How To Make Butterfinger Balls
Okay, let us get into the actual how to. Butterfinger Balls are basically a stir, roll, chill situation. If you can make a peanut butter sandwich, you can make these.
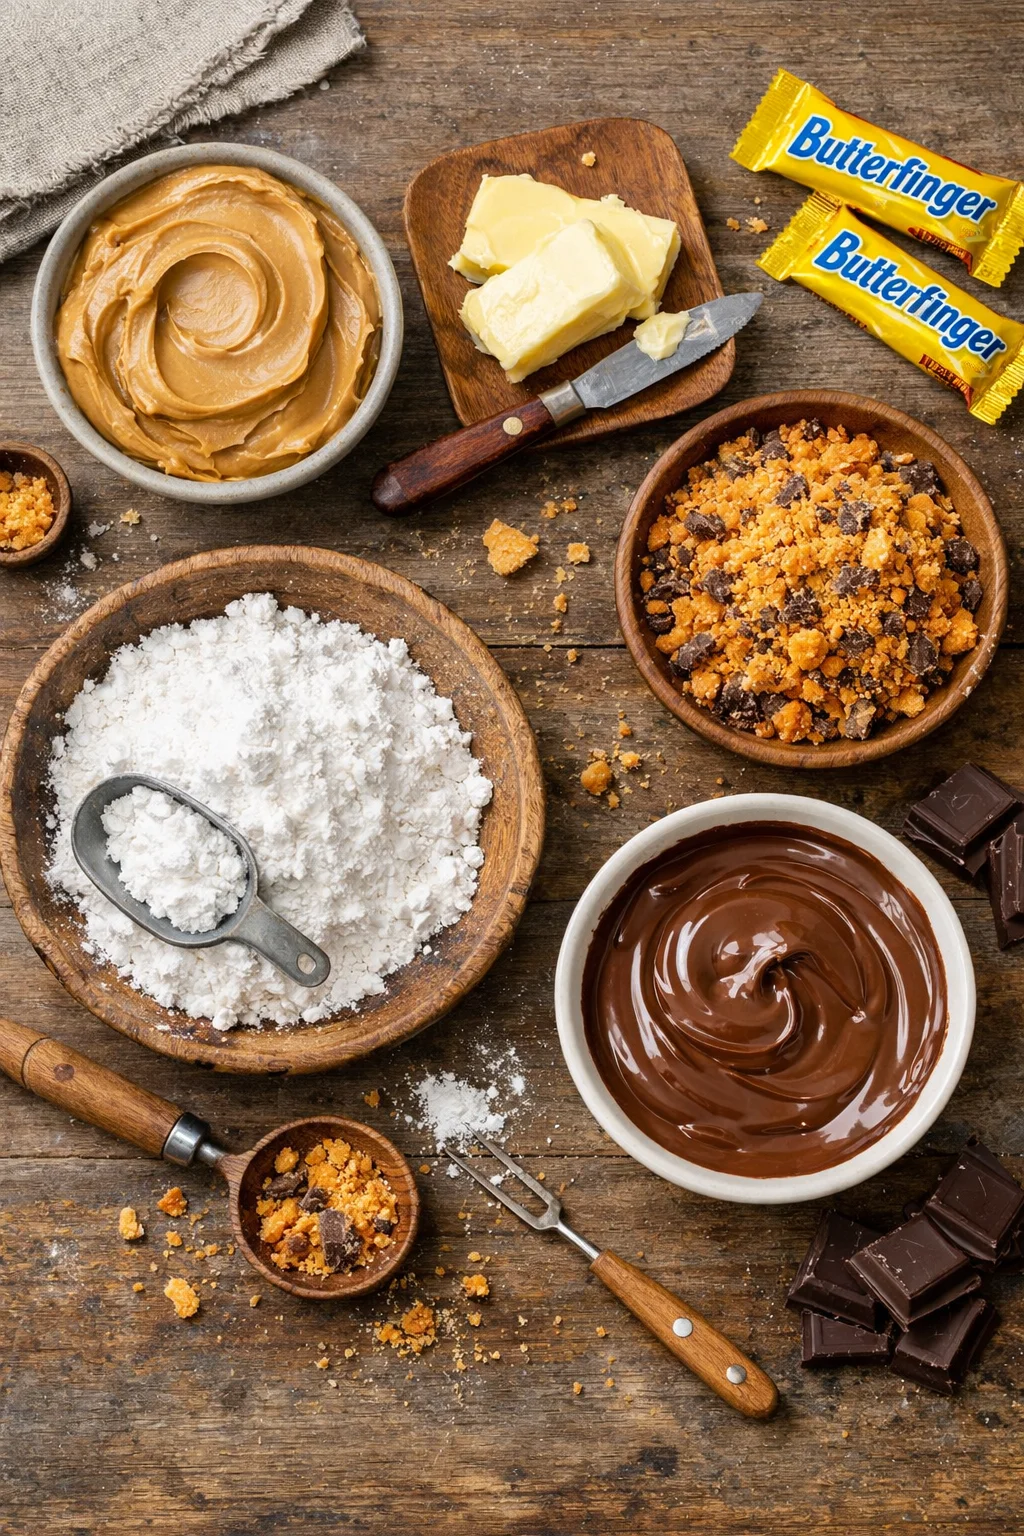
What you will need
- Peanut butter
- Softened butter
- Powdered sugar
- Crushed Butterfinger candy bars
- Chocolate for dipping (melting wafers or chocolate chips)
- Optional: a tiny bit of salt if your peanut butter is unsalted
Step by step directions
1) Crush the Butterfinger. I usually toss the candy bars in a zip top bag and smash them with a rolling pin. You want small pieces, not dust, unless you prefer a smoother bite.
2) Mix the filling. In a bowl, stir together peanut butter and softened butter until smooth. Then add powdered sugar and mix until it becomes a thick dough. Stir in the crushed Butterfinger bits.
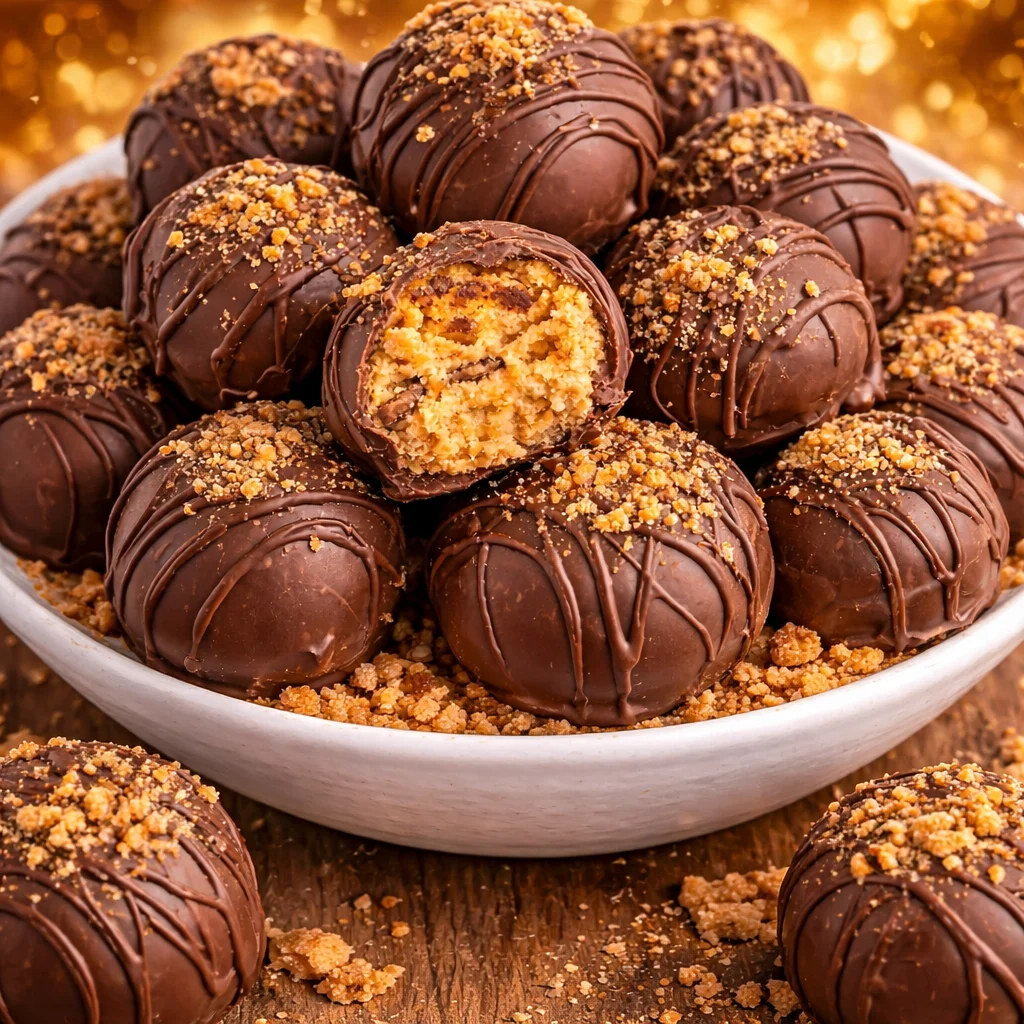
3) Roll into balls. Scoop and roll into bite sized balls. I aim for about 1 inch, but nobody is measuring at my house.
4) Chill. Put the balls on a lined tray and chill them for at least 30 minutes. This helps them hold together when you dip.
5) Dip in chocolate. Melt your chocolate, then dip each ball. Let the excess drip off, set them back on the tray, and chill until the chocolate is firm.
Little tip from my real life mess ups: if your mixture feels too sticky to roll, chill the bowl for 10 to 15 minutes and try again. If it feels too dry and crumbly, add a spoonful more peanut butter.
Also, here is the promised helpful info table so you can screenshot it or mentally file it away.
If you love the whole no bake ball situation, this is also in the same universe as no bake peanut butter cheesecake balls. Different vibe, still very snackable.
Ingredient Notes
This is where I save you from the little annoyances that can happen. The recipe is simple, but ingredients can behave differently depending on brand and temperature.
My practical notes for success
Peanut butter: Regular creamy peanut butter works best. Natural peanut butter can be a little oily or loose, which makes the mixture harder to roll. If you want to use natural, stir it really well and be ready to add extra powdered sugar if needed.
Butter: Softened is the key word. Not melted. Melted butter can make the filling too soft and you will be chasing sticky dough around your kitchen.
Powdered sugar: This is what makes the mixture firm and rollable. Add it gradually if you want more control over the texture.
Butterfinger candy bars: Fresh bars crush cleaner and taste better. If they are stale, the crunch is not the same. I like a mix of tiny bits and slightly bigger pieces for that perfect crunch.
Chocolate coating: Melting wafers are easiest because they melt smooth. Chocolate chips work too, but I recommend adding a small spoon of coconut oil or shortening to help it dip nicely.
Storage wise, I keep Butterfinger Balls in the fridge in a closed container. They taste amazing cold, and the center stays nice and firm.
Variations and Substitutions
Once you make these once, you will start thinking of all the little ways to switch them up. Here are a few ideas that actually work without making things weird.
Make them extra crunchy: Roll the dipped balls in more crushed Butterfinger before the chocolate sets. It looks pretty and adds a bigger crunch.
Try a different coating: Dark chocolate gives you that slightly grown up bite. White chocolate is super sweet and fun for holidays.
Mini version: Roll them smaller for dessert platters. People love tiny treats because they can “just try one” and then try six.
Swap the candy: If you cannot find Butterfinger, a similar peanut buttery crunchy candy can work. Just know the flavor will change. The classic is still my favorite.
Add a pinch of salt: If everything tastes a little flat, salt fixes it. I usually add a tiny pinch to the filling if I am using unsalted peanut butter.
And if you are in a full blown Butterfinger mood, you could also try something like this Butterfinger caramel crunch fudge for a richer, sliceable treat. Different texture, same happy flavor notes.

Common Questions
How long do Butterfinger Balls need to chill before dipping?
About 30 minutes in the fridge is usually enough. If your kitchen is warm, go 45 minutes. You want them firm so they do not fall apart in the chocolate.
Can I freeze them?
Yes. Freeze them in a single layer first, then move to a container. They keep well for about 2 months. Thaw in the fridge so the chocolate does not get sweaty.
Why is my mixture too sticky to roll?
Most likely the butter was too soft or your peanut butter is runny. Chill the mixture and add a bit more powdered sugar if needed.
Do I have to use melting wafers for the coating?
Nope. Chocolate chips work fine. Add a little coconut oil or shortening while melting to make the coating smoother and easier to dip.
How do I keep the chocolate from cracking?
Do not freeze the balls right before dipping, and do not over chill them. Extreme cold plus warm chocolate can cause cracking. Fridge cold is perfect.
A Sweet Little Wrap Up
If you want a dessert that feels like a candy store treat without the hassle, Butterfinger Balls are it. They are quick to mix, easy to roll, and the crunchy candy bits make every bite fun. If you want more ideas and another take on the method, I have also enjoyed reading Butterfinger Balls (Butterfinger Buckeye Balls) – Plain Chicken and Butterfinger Balls – Sugar and Soul when I am in comparison mode. Now go crush those candy bars and make a batch, because you deserve a little no bake joy this week.
Butterfinger Balls
Ingredients
Method
- Crush the Butterfinger candy bars in a zip top bag using a rolling pin until you have small pieces.
- In a bowl, stir together the peanut butter and softened butter until smooth.
- Add the powdered sugar to the mixture and mix until it forms a thick dough, then stir in the crushed Butterfinger bits.
- Scoop and roll the mixture into bite-sized balls, aiming for approximately 1 inch in diameter.
- Place the balls on a lined tray and chill in the refrigerator for at least 30 minutes.
- Melt the chocolate, then dip each ball into the chocolate and let the excess drip off.
- Return the dipped balls to the tray and chill until the chocolate is firm.