
Homemade Gravy from Turkey Drippings is the thing I look forward to almost as much as the turkey itself. You know that moment when the bird comes out, everyone is hungry, and you realize the store bought gravy packet is still sitting in the pantry? Been there. This is my cozy, reliable way to turn those tasty brown bits and pan juices into something silky, savory, and honestly kind of magical. It sounds fancy, but it is mostly just stirring and tasting. And once you do it a couple times, you will wonder why you ever bought the jarred stuff.
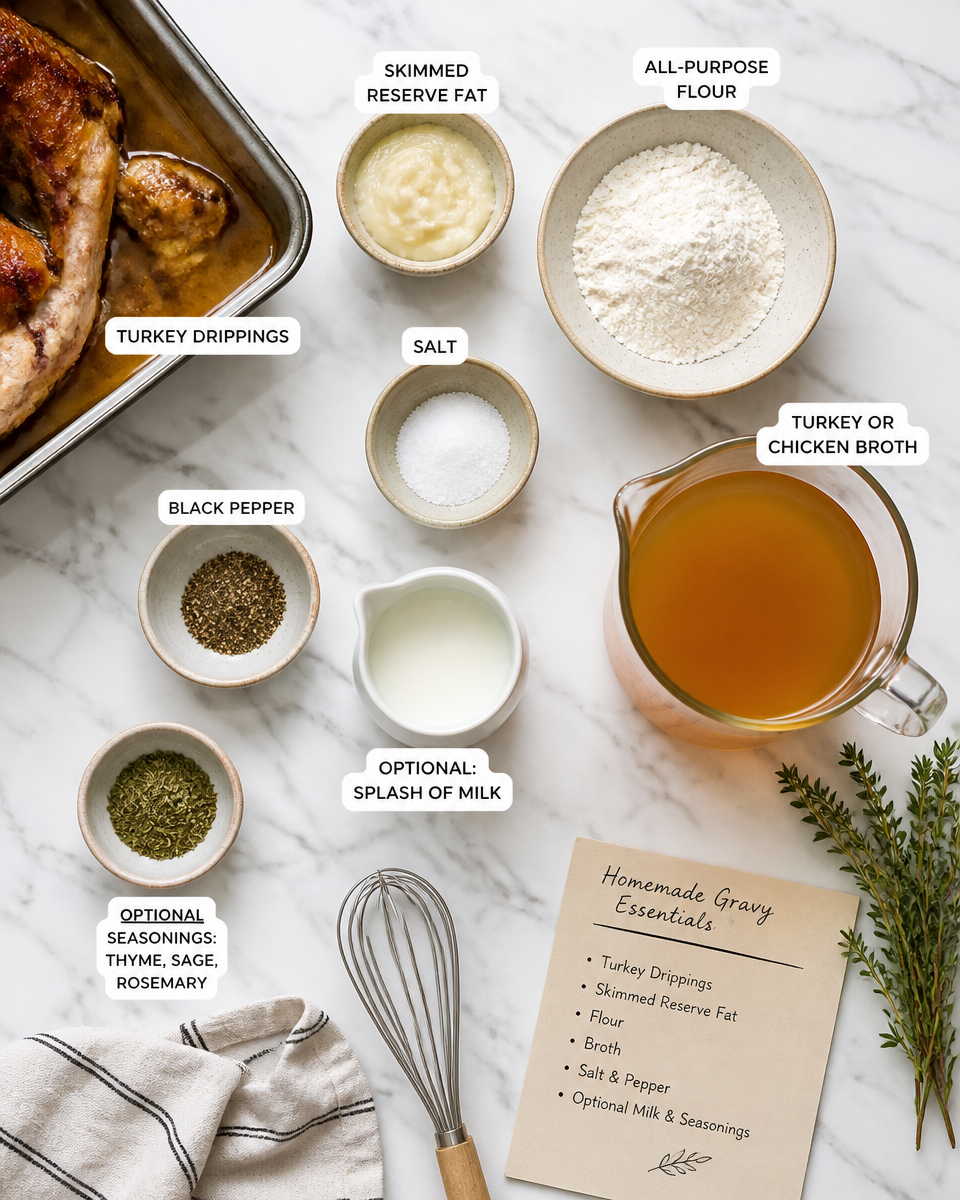
Ingredients for Turkey Gravy
The best part is you are already halfway there after roasting the turkey. The drippings are doing a lot of the heavy lifting for flavor. I like to keep the ingredient list short and practical, because nobody wants a complicated project when the kitchen is already busy.
- Turkey drippings from the roasting pan (skim fat, but save it)
- Fat for the roux: use the skimmed turkey fat, or butter if you do not have enough
- Flour (all purpose is perfect)
- Broth (turkey or chicken) to stretch the drippings into a full gravy
- Salt and black pepper
- Optional: a splash of milk or cream for a softer, creamy finish
- Optional: onion powder, garlic powder, or a tiny pinch of poultry seasoning
If you are building a full holiday plate, I really like pairing this gravy with a from scratch side like green bean casserole from scratch (no canned soup). That combo just feels like home to me.
Quick measuring note: the easiest ratio is about 2 tablespoons fat + 2 tablespoons flour for every 1 cup of liquid. Your liquid is usually some mix of drippings plus broth. It is not a law, just a solid starting point you can adjust.
;
Tips for Making Perfect Turkey Gravy
I have made this in a rush, I have made it calmly, and I have made it while someone is asking me five questions at once. These tips keep it smooth even when the kitchen is chaotic.
How I do it step by step
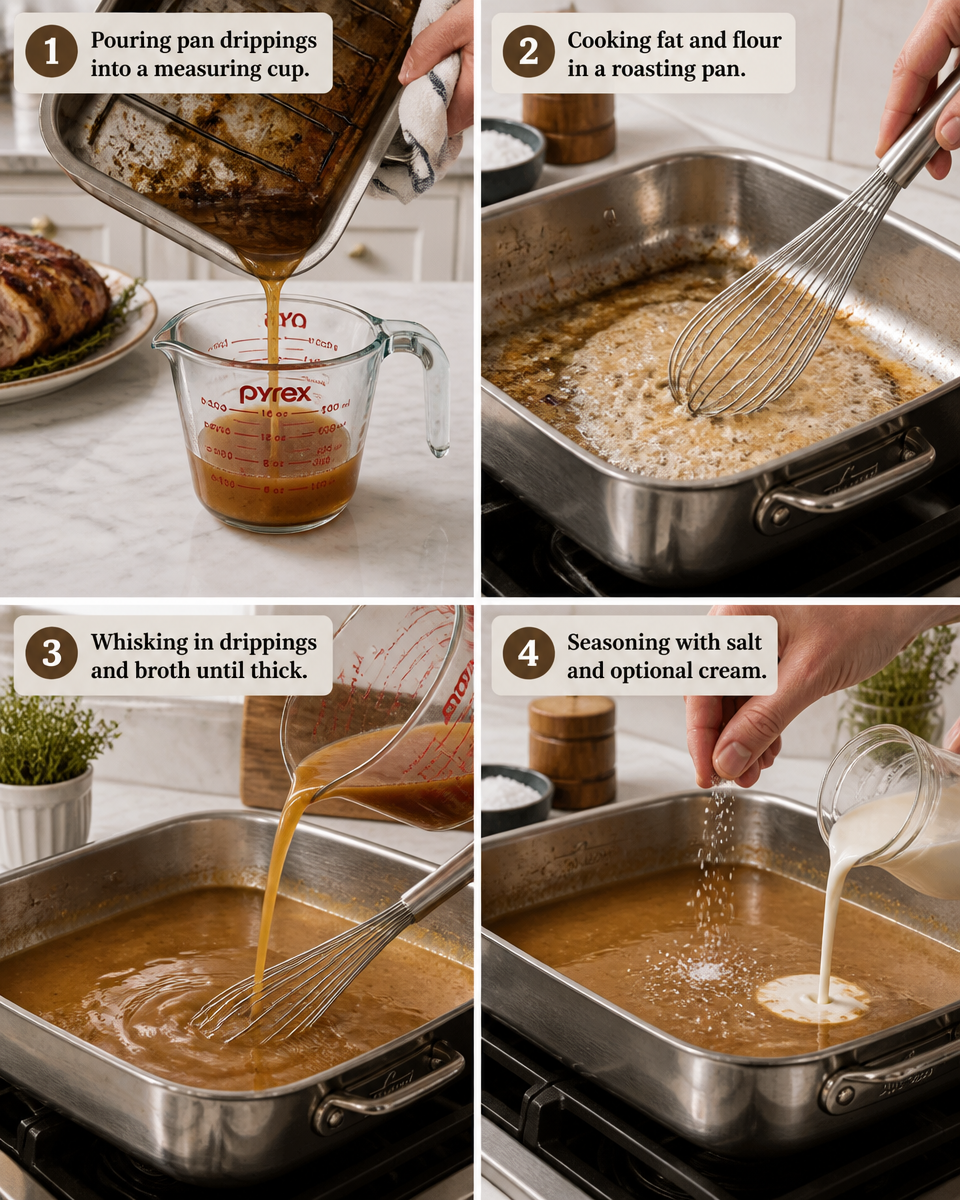
First, I pour the pan drippings into a measuring cup or fat separator. Let it sit for a minute so the fat floats. Spoon off the fat and set it aside. Do not toss it, because that is your flavor starter.
Next, put your roasting pan on the stove over medium heat (or use a saucepan if the roasting pan is too big). Add about 2 to 4 tablespoons of the reserved fat. Whisk in the same amount of flour. Keep whisking until it looks like a smooth paste, then let it cook for about 1 to 2 minutes. This cooks out the raw flour taste and gives your gravy a deeper color.
Now slowly whisk in the drippings plus broth. Go slow at first, like a little stream, whisking the whole time. Once it is smooth, you can add the rest more confidently. Let it bubble gently until it thickens, usually 3 to 6 minutes.
At the end, season with salt and pepper. Taste it before you add more salt, because drippings can be salty on their own. If you want it extra cozy, add a tiny splash of cream.
One more thing, if you are serving drinks too, a mug of something warm makes gravy making feel less stressful. I have been known to sip on homemade apple cider from scratch while I whisk like my life depends on it.
“I tried your method last Thanksgiving and my gravy came out smooth for the first time ever. No lumps, no panic, and everyone asked for seconds.”
Common Mistakes to Avoid
Turkey gravy is forgiving, but a few common slip ups can throw it off. Here is what I watch for, especially when I am multitasking.
Mistake 1: dumping in liquid too fast. This is the main reason people get lumps. When you add broth slowly while whisking, the flour mixture relaxes and blends instead of clumping.
Mistake 2: skipping the flour cook time. If you do not cook the flour in the fat for at least a minute, you can taste that raw, dusty flour vibe. Let it toast just a bit.
Mistake 3: seasoning too early. Drippings reduce and intensify. If you salt at the beginning, you might end up with a salty gravy. I season at the end after it thickens.
Mistake 4: not scraping the brown bits. Those stuck on bits in the roasting pan are pure flavor. Once you add liquid, whisk and scrape them up. That is basically free seasoning.
Mistake 5: overheating it. A hard boil can make gravy reduce too fast or turn too thick. Keep it at a gentle simmer and you will have more control.
And yes, if lumps happen anyway, do not spiral. Strain it through a fine mesh sieve, or hit it with an immersion blender for a few seconds. Dinner will still be great.
Variations of Turkey Gravy
Once you have the base down, you can tweak it to match your mood or your menu. I love having options, because leftovers deserve good gravy too.
Giblet gravy: If you cook the giblets separately (or simmer them in broth), chop them fine and stir them in at the end. It makes the gravy heartier.
Herby gravy: Add a little chopped sage or thyme right at the end. Keep it light so it does not turn bitter.

Onion and garlic gravy: Saute a little minced onion in the turkey fat before adding flour. A small spoon of roasted garlic also works if you have it.
Creamy gravy: Stir in a splash of cream or milk at the end. This one is extra good if your drippings are super roasty and intense, because dairy softens the edges.
Make ahead friendly gravy: If you want to reduce stress, you can make a simple broth based gravy earlier in the day, then whisk in a few spoonfuls of drippings right before serving to give it that real turkey flavor. It is not exactly the same, but it is very close and super practical.
Also, if you are already in a from scratch kind of mood, save your leftovers and make something cozy later. I am a big fan of leftover chicken soup from scratch, and the same idea works with leftover turkey too.
Serving Suggestions
Gravy is not just for the turkey slices, even though that is the classic move. I like to put it in a warm bowl with a spoon and let people go at it.
- Over mashed potatoes, obviously, with extra cracked pepper on top
- Drizzled on stuffing or dressing so it stays moist
- Poured over sliced turkey and a little puddle next to it for dipping
- On roasted carrots or green beans when you want veggies to feel exciting
- As the secret sauce in a leftover turkey sandwich
If your house is like mine, there is always a sweet treat hanging around too. The day after a big meal, I love an easy breakfast like air fryer cinnamon rolls from scratch, and yes, I fully support dessert for breakfast when the fridge is still full of leftovers.
And if you are doing coffee after dinner, a fun little topping makes it feel special without extra work. Try homemade strawberry cold foam on an iced coffee the next day. It is such a nice break from all the savory stuff.
Common Questions
What if I do not have enough drippings?
No problem. Use what you have and make up the rest with broth. The drippings are concentrated, so even a small amount still adds a lot of flavor.
How do I make Homemade Gravy from Turkey Drippings thicker?
Let it simmer a few more minutes first. If it is still too thin, whisk 1 tablespoon flour with 2 tablespoons cold broth or water, then whisk that slurry into the gravy and simmer again.
How do I make Homemade Gravy from Turkey Drippings thinner?
Whisk in a splash of warm broth until it is the consistency you like. Add it gradually so you do not overdo it.
Can I make it gluten free?
Yes. Swap the flour for a gluten free all purpose blend, or use cornstarch at the end as a slurry (cornstarch plus cold broth). Cornstarch gravy thickens fast, so go slow.
How long does Homemade Gravy from Turkey Drippings last in the fridge?
Usually 3 to 4 days in an airtight container. Reheat gently on the stove with a splash of broth, whisking to bring it back together.
A cozy finish and a little encouragement
If you take nothing else from this post, remember this: Homemade Gravy from Turkey Drippings is mostly about using what is already in the pan and tasting as you go. Once you get the hang of the simple whisk, simmer, season rhythm, it becomes second nature. If you want more detailed comparisons and extra pointers, I have also learned a lot from How to Make the Best Turkey Gravy – Damn Delicious and the super straightforward Simple Turkey Gravy Recipe – Allrecipes. Give it a try this year, even if you feel a little nervous. You will likely surprise yourself, and your plate will thank you.

Homemade Turkey Gravy
Ingredients
Method
- Pour the pan drippings into a measuring cup or fat separator. Let it sit so the fat floats.
- Spoon off the fat and set it aside. Do not toss it, as it is your flavor starter.
- Put your roasting pan on the stove over medium heat (or use a saucepan if the roasting pan is too big).
- Add about 2 to 4 tablespoons of the reserved fat.
- Whisk in the same amount of flour. Keep whisking until it looks like a smooth paste.
- Let it cook for about 1 to 2 minutes to cook out the raw flour taste.
- Slowly whisk in the drippings plus broth, starting with a little stream. Continue whisking until smooth.
- Let it bubble gently until it thickens, usually 3 to 6 minutes.
- Season with salt and pepper to taste. Add a splash of cream for extra coziness if desired.
