
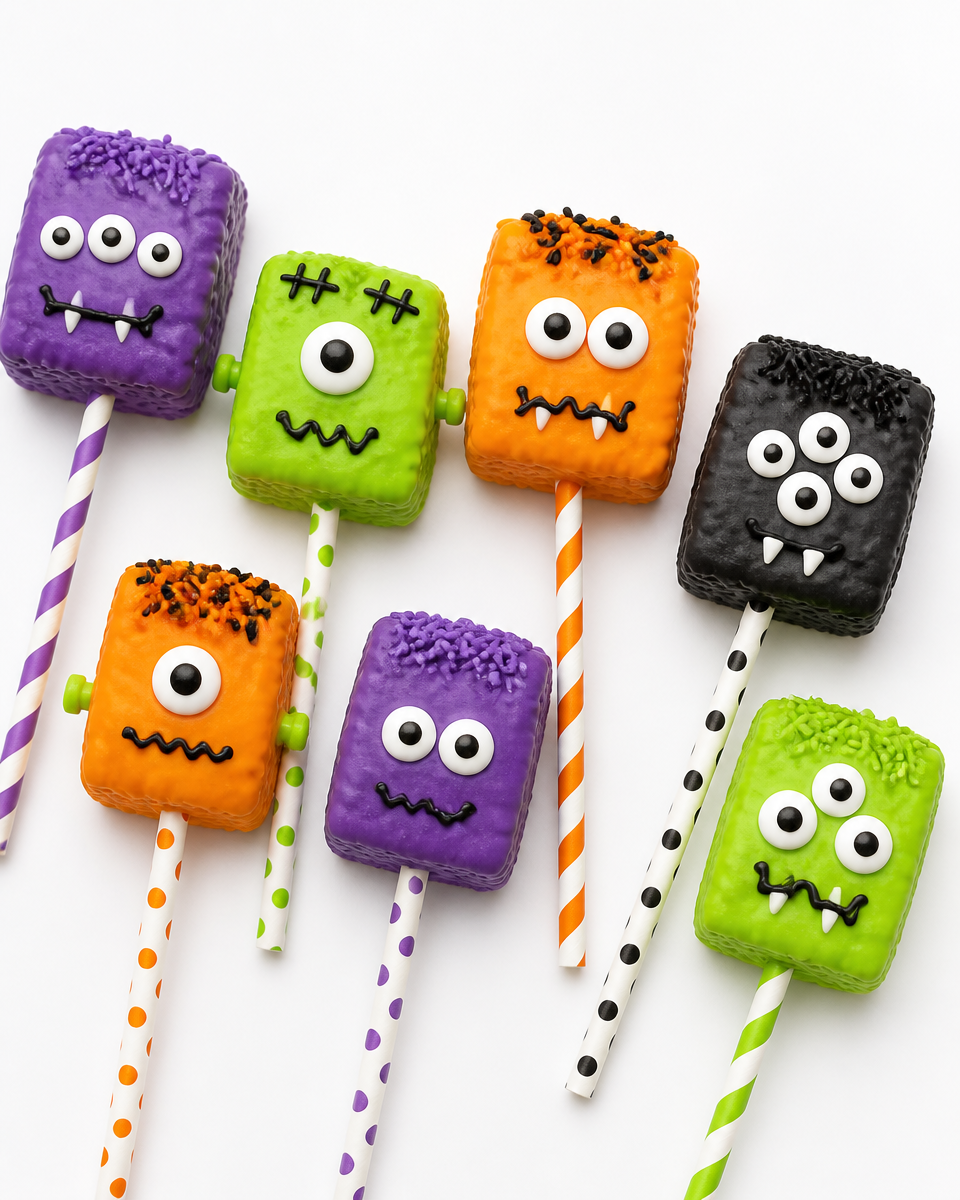
Halloween Monster Rice Krispie Treats are my go to solution when it is the night before a party and I suddenly remember I promised to bring something fun. You know that feeling where you want a cute Halloween treat, but you do not want to bake, chill, frost, or babysit anything? Same. These are quick, silly, and honestly kind of adorable in a wonky monster way. Plus, kids can help without it turning into a huge mess if you set things up first. Let me show you exactly how I make them and how you can tweak them for your own spooky crew.
Ingredients + Equipment
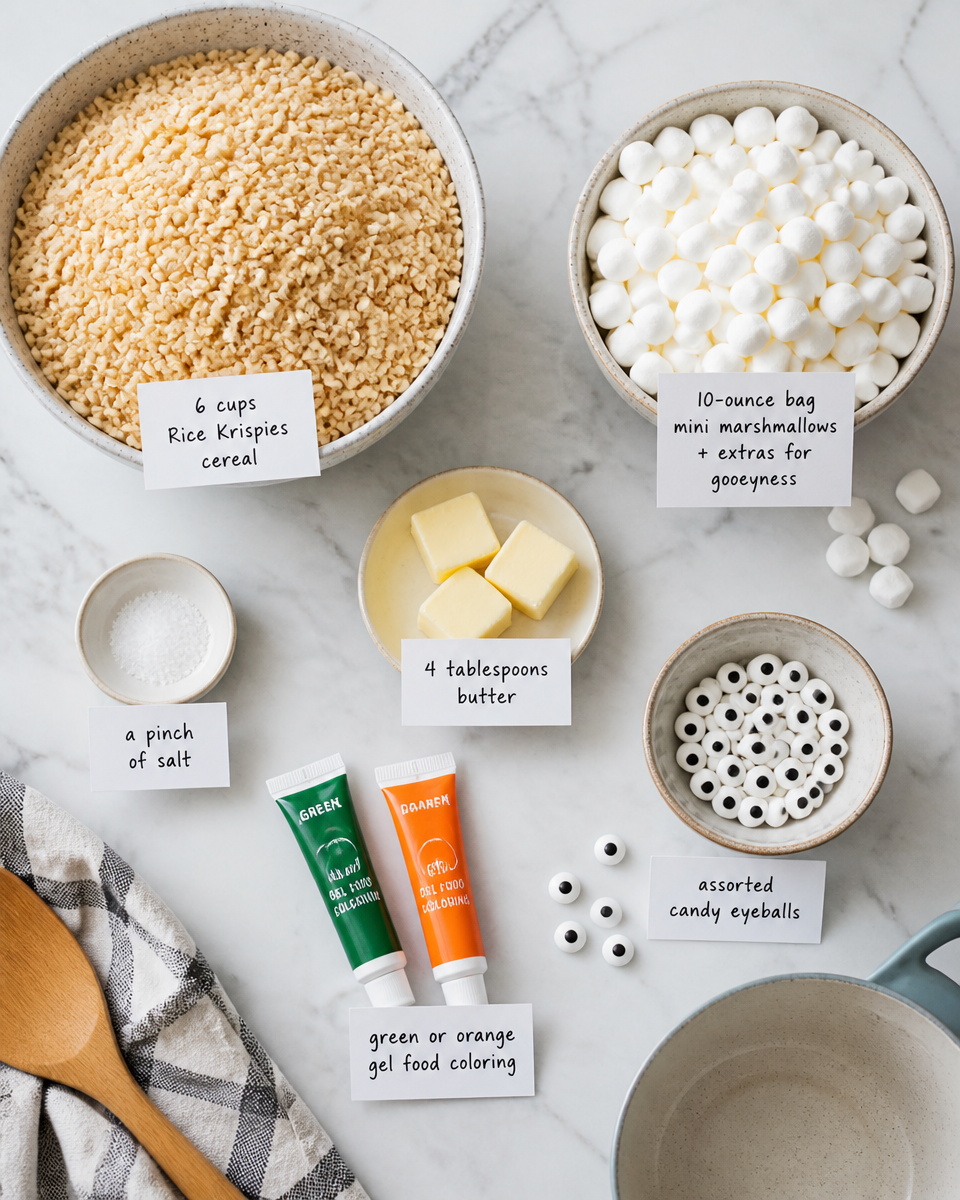
I like to lay everything out before I melt a single marshmallow. It keeps the process calm, and it also stops that classic moment where you realize you are out of something right as your marshmallows are melting.
Here is what you need for the treats:
- 6 cups Rice Krispies cereal
- 4 tablespoons butter
- 1 bag mini marshmallows (about 10 ounces), plus a handful extra if you like them extra gooey
- Green or orange gel food coloring (optional, but it screams monster)
- Pinch of salt (tiny, but it helps)
Here is what makes them look like monsters:
- Candy eyeballs (the more mismatched the better)
- Mini marshmallows or candy corn for horns or teeth
- Chocolate chips or mini M and Ms for details
- Melted chocolate or candy melts for “glue”
- Sprinkles (black, purple, or neon mixes look great)
Equipment I actually use:
- Big pot (nonstick helps)
- Rubber spatula
- 9×13 pan or a baking sheet
- Parchment paper or foil
- Nonstick spray or a little butter for your hands
If you love Rice Krispie treat ideas like I do, you might also want to peek at these no bake lemon cheesecake rice krispie treats when you want something bright and tangy after all the Halloween candy.
How to Make Monster Rice Krispie Treats
This is basically the classic Rice Krispie treat method, but with a little Halloween chaos added in. The secret is moving a little quickly once the cereal hits the marshmallow mixture, because that is your best window for shaping.
Quick overview before you start
I do this in two phases: make the slab, then decorate. You can shape them into squares, or you can do monster “blobs” that look extra goofy and fun.
Step by step:
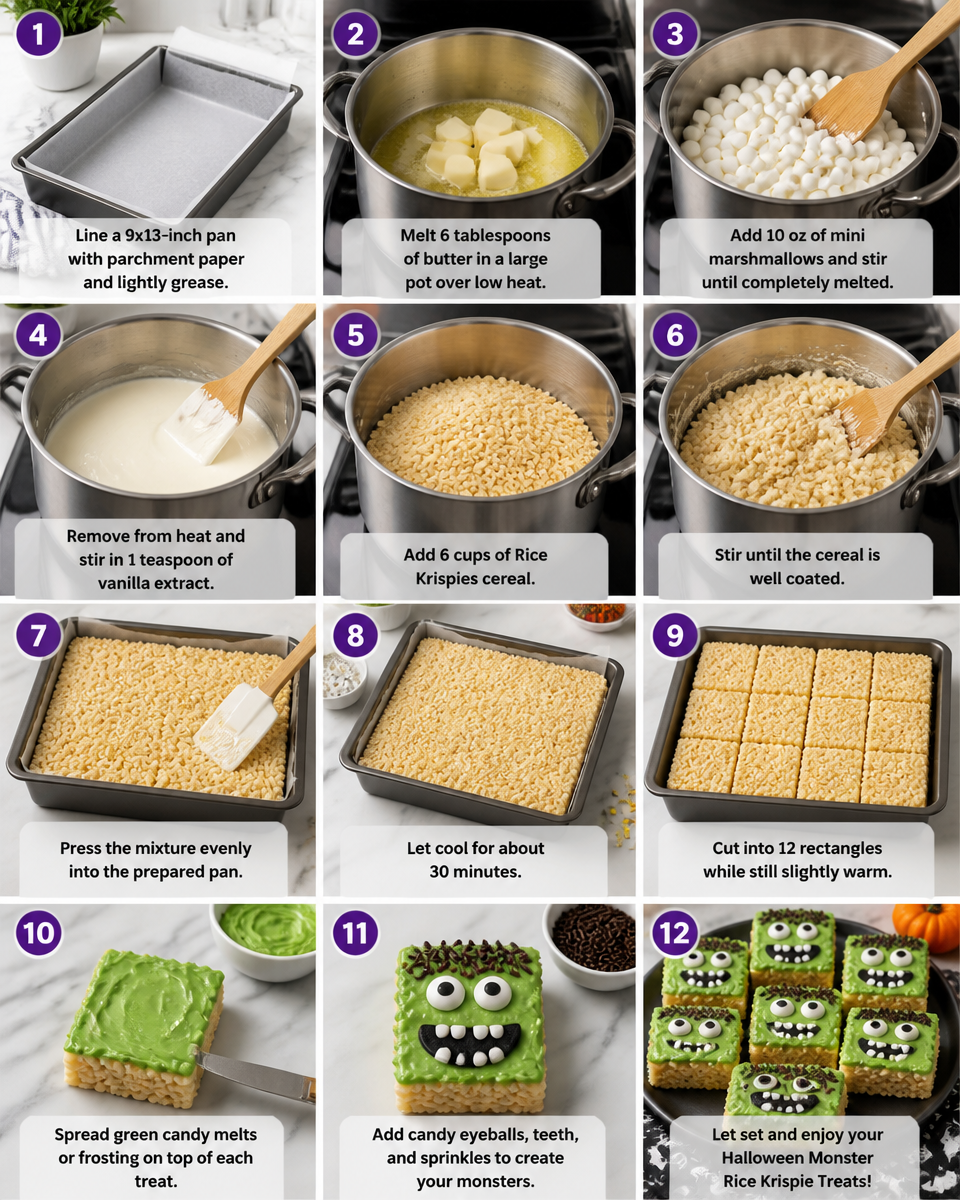
1) Prep your pan. Line it with parchment paper and lightly spray it. This makes removal so much easier.
2) Melt butter in a big pot on low heat. Add marshmallows and stir until smooth. Keep it low so nothing scorches.
3) Add a pinch of salt. If you want color, add a little gel food coloring now. Start small, you can always add more.
4) Stir in Rice Krispies cereal until everything is coated. It will look like a sticky mess at first, then it suddenly comes together.
5) Press into the pan. Use buttered hands or a buttered spatula. Press gently, not like you are packing cement, or the treats get tough.
6) Cool for about 20 to 30 minutes, then cut. Or skip cutting and pull off pieces to shape into monsters.
When I want a different vibe, I make themed batches like Peeps rice krispies treats. They are super colorful and they have that cute holiday look with basically no extra effort.
Easy Rice Krispie Monster Treats Recipe
Ok, now for the part that makes these Halloween Monster Rice Krispie Treats feel like a real Halloween treat and not just cereal squares. Decorating is where the personality happens, and you do not need to be “artsy” to make them look amazing.
My simple decorating method:
1) Make the base treats using the steps above and let them cool just enough to hold shape.
2) Decide on your monster shapes. I do a mix: some squares, some triangles, some weird lumpy ones. Monsters are not supposed to be perfect.
3) Melt a small bowl of chocolate chips in the microwave. Do 20 seconds at a time and stir. This becomes your edible glue.
4) Stick on candy eyeballs first. One eye, two eyes, three eyes, go wild.

5) Add mouths and teeth. A line of chocolate makes a mouth, then add candy corn or mini marshmallows as teeth.
6) Add horns or hair. Mini marshmallows, sprinkles, or even broken pretzel pieces can work.
My personal “monster lineup” that always gets compliments:
Green one with two eyes and candy corn teeth, orange one with one giant eye, and a chocolate drizzled one with sprinkle “fur.”
“I made these for my daughter’s class party and the kids lost it over the silly faces. They were gone before I even finished taking pictures.”
If you like sweet snack mixes too, you might want to try muddy buddy rice krispies another crunchy treat that disappears fast at parties.
One more thing: if you are feeding hungry people before the sugar starts, I like pairing this with something savory like baked onion beef fried rice for an easy dinner that feels cozy on a cold October night.
Tips, Variations + Storing Info
This is the part that saves you from the usual Rice Krispie treat headaches like hard squares, sticky hands, and decorations that fall off in the container.
My best tips for soft treats
Low heat is everything. High heat makes the sugar cook too much and that is when treats get hard. Also, do not press them down too firmly in the pan. Gentle pressing keeps them fluffy.
Fun variations for different monster moods
You can make Halloween Monster Rice Krispie Treats in a bunch of styles without changing the base recipe.
Try one of these:
1) Chocolate monsters: stir in 2 tablespoons cocoa powder with the marshmallows.
2) Peanut butter monsters: melt in 1 third cup peanut butter with the butter and marshmallows. Check for allergies first, of course.
3) Sprinkle confetti monsters: mix sprinkles into the cereal before pressing into the pan.
4) Sour candy monsters: add a few sour candies on top for a sweet and sour thing.
Storing and make ahead
Store them in an airtight container at room temperature. They are best in the first 2 days, but they are still totally fine for about 3 days. I do not recommend the fridge because they can get firmer. If you are stacking them, put parchment paper between layers so the faces do not smear.
If you want a super simple way to share these with kids, I also love sending a little printable style how to along with the treat. This web story for Peeps rice krispies treats is a good example of that quick visual step vibe, and it is great for busy weeks.
Watch How To Make Rice Krispie Monster Treats {video_youtube}
If you are more of a visual learner, watching the steps once makes the whole thing feel even easier. The key moments to watch for are the marshmallows turning smooth, the cereal getting coated evenly, and how lightly you press the mixture into the pan. When you decorate, it helps to see how little chocolate you actually need to hold the candy pieces in place.
Common Questions
Can I make Halloween Monster Rice Krispie Treats the day before?
Yes, and I often do. Make them, decorate them, then store them in a single layer in an airtight container if possible so the faces stay cute.
Why did my treats turn out hard?
Usually it is from heating the marshmallows too much or pressing the mixture down too firmly. Low heat and gentle pressing fixes most of it.
What can I use if I cannot find candy eyeballs?
You can use mini chocolate chips, white icing dots with a chocolate dot in the middle, or even little circles cut from marshmallows.
How do I keep the decorations from falling off?
Use melted chocolate or candy melts as glue and press the candy in gently. Let them sit for 10 minutes before moving them into a container.
Can I make them gluten free?
Yes, just use a gluten free crispy rice cereal and double check your candy and sprinkles labels. Many are fine, but it is worth a quick look.
A sweet little Halloween send off
Halloween Monster Rice Krispie Treats are one of those recipes that make people smile before they even take a bite, and that is kind of my favorite part. Keep the base simple, decorate with whatever candy you have, and let your monsters look a little weird on purpose. If you want more inspiration, I love browsing ideas like Rice Krispie Treat Monsters – One Little Project and also this super approachable guide, Easy Rice Krispie Monster Treats – Simply Sissom. Now go make a batch, snap a pic, and do not stress if one of them looks like a confused blob, that is still a monster.
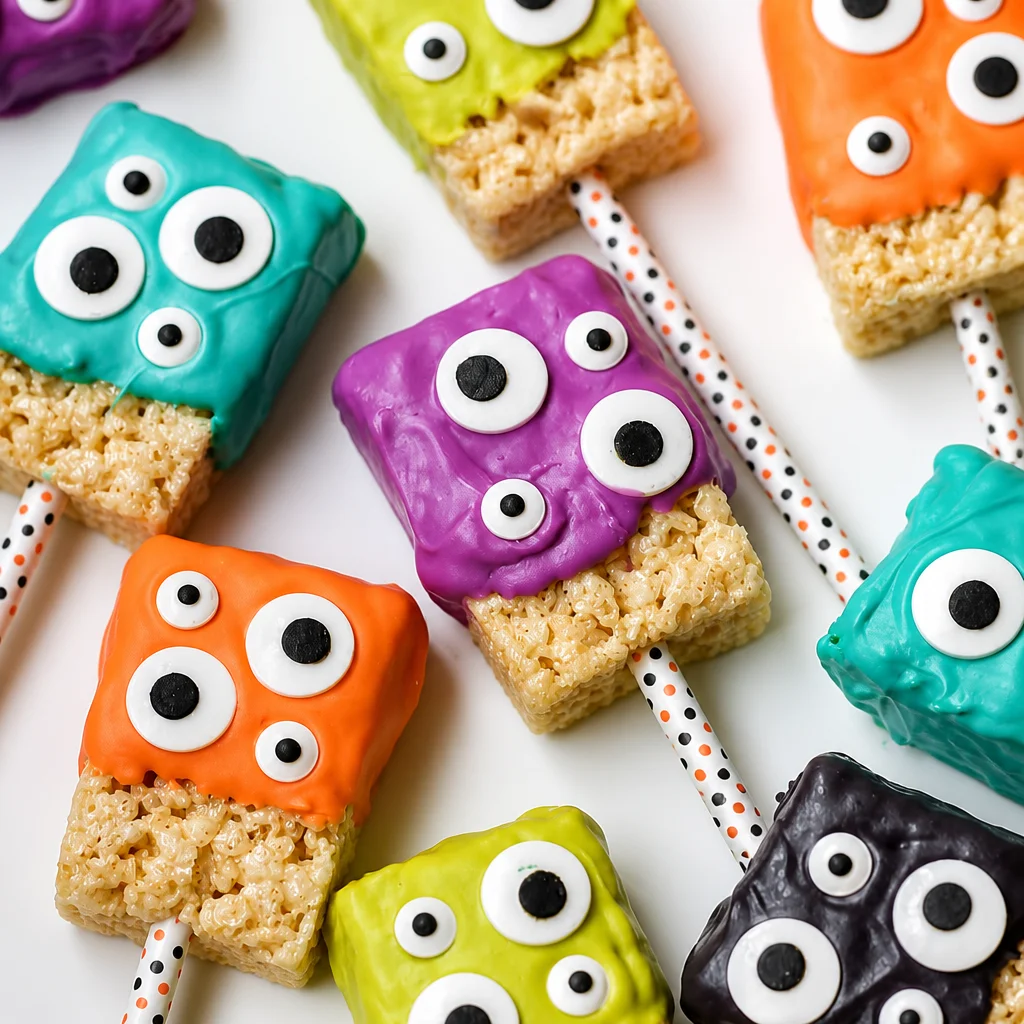
Halloween Monster Rice Krispie Treats
Ingredients
Method
- Line a 9×13 pan with parchment paper and lightly spray it.
- Melt butter in a big pot on low heat. Add marshmallows and stir until smooth.
- Add a pinch of salt and any gel food coloring if desired. Start with a small amount.
- Stir in Rice Krispies cereal until thoroughly coated.
- Press the mixture into the prepared pan using buttered hands or a spatula.
- Let cool for 20 to 30 minutes, then cut into shapes or pull off pieces to form monster figures.
- Melt a small bowl of chocolate chips in the microwave, stirring every 20 seconds.
- Use melted chocolate as glue to attach candy eyeballs to the treats.
- Create mouths and teeth using chocolate and candy corn or mini marshmallows.
- Add horns or hair with mini marshmallows, sprinkles, or pretzel pieces.
