


Polar Bear Paws Candy was the thing I kept buying at checkout like I had zero self control, especially around the holidays when gift boxes start showing up everywhere. You know that moment when you want something sweet, but not a whole cake, and not a crunchy cookie either? Yeah, that. I wanted a candy that feels special, looks cute on a plate, and tastes like you put in way more effort than you did. This is my at home version that hits the same cozy, chocolatey, nutty vibe without the fancy price tag. And the best part is you do not need any weird tools or candy thermometers to pull it off. 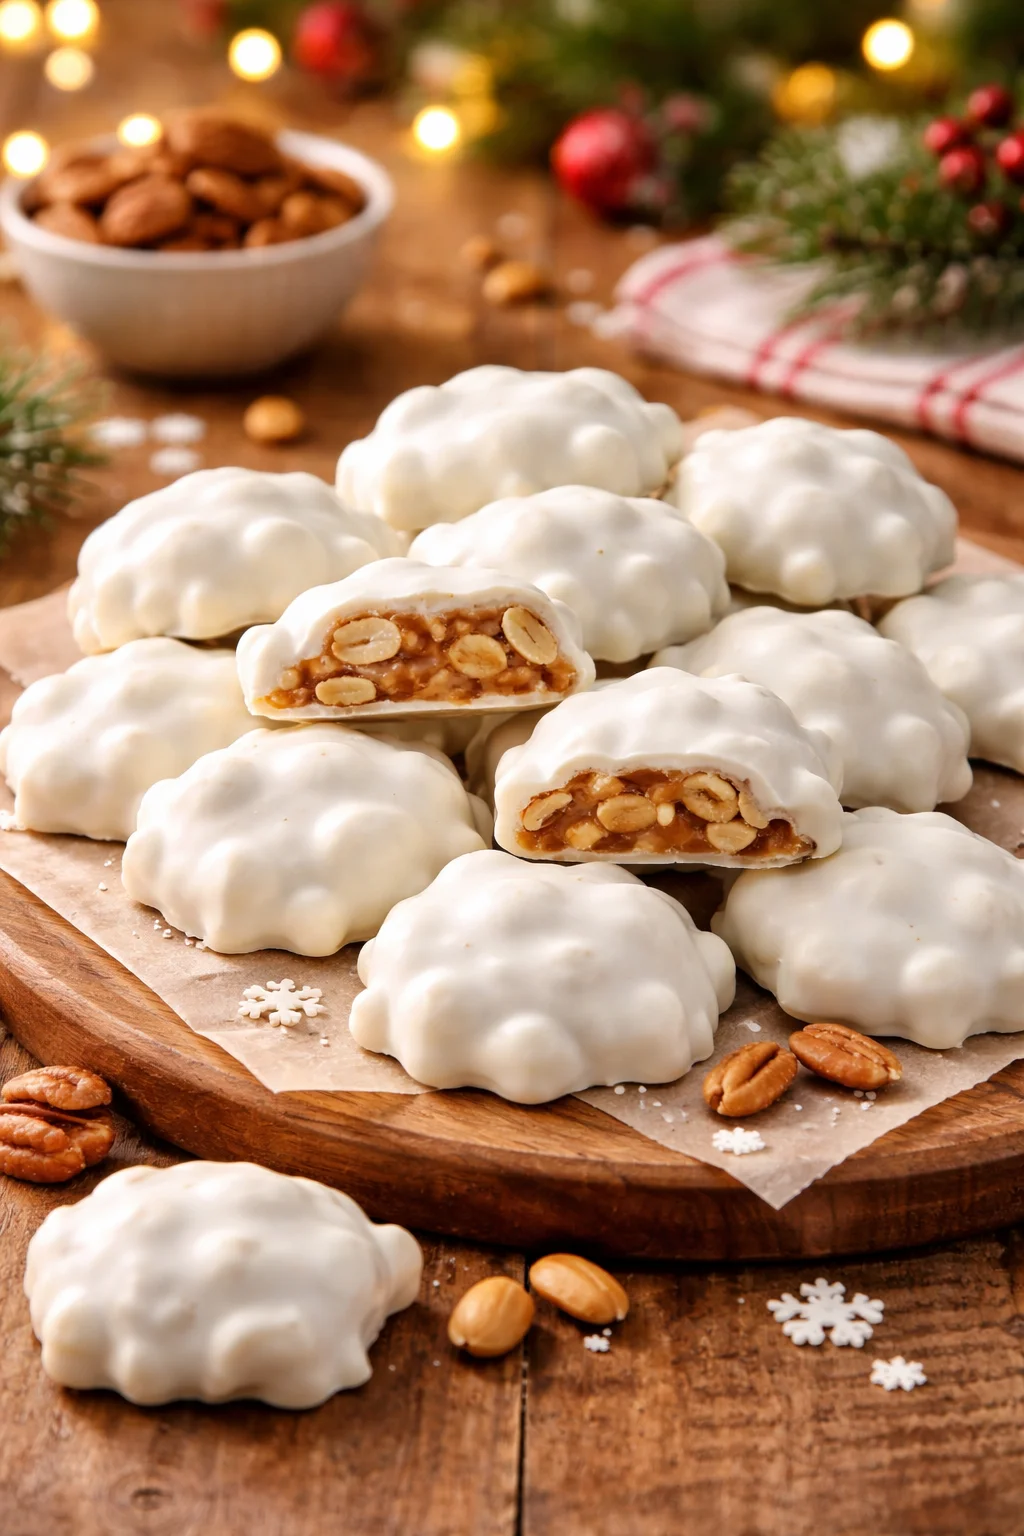
The Story Behind This Recipe
I’ve spent years testing recipes for Middle East Sector, and this Polar Bear Paws Candy is a keeper: crowd-pleasing with no weird tricks. Polar Bear Paws Candy was the thing I kept buying at checkout like I had zero self control, especially around the holidays when gift boxes start…
Sees Candy Polar Bear Paws Recipe
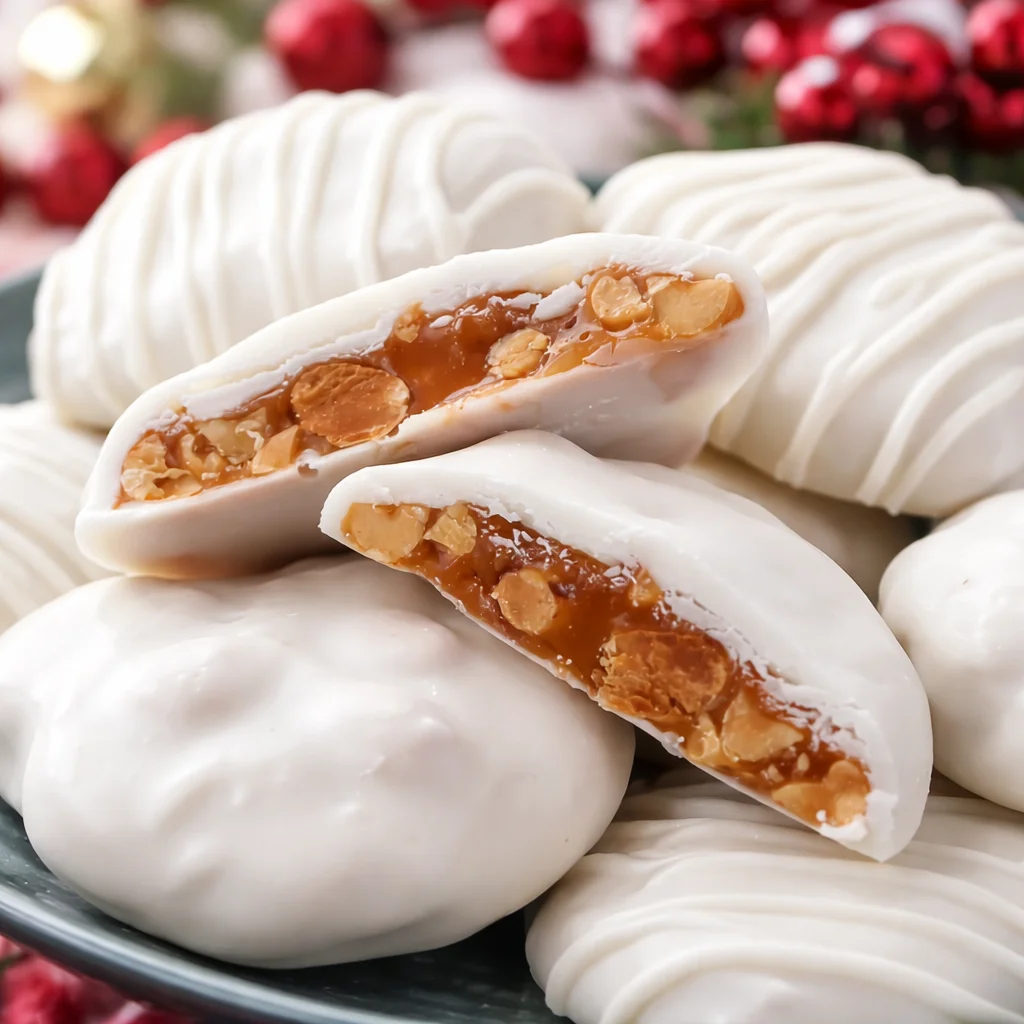
Let me paint the picture: a soft, creamy center that tastes like a vanilla caramel fudge hybrid, dipped in **milk chocolate**, then finished with **whole pecans** that look like little paw prints. That is the whole charm of Polar Bear Paws Candy. They are sweet, rich, and the pecans keep it from being one note sugary.
I started making these because I needed a homemade gift that did not feel homemade in a messy way. They hold their shape, they travel well, and people always ask where you bought them. I love packing them in a little tin with parchment between layers. If you are building a holiday candy box, you can pair these with something playful like this gummy bear drink for a party table moment, or balance them with a minty treat like a candy cane dessert on the side.
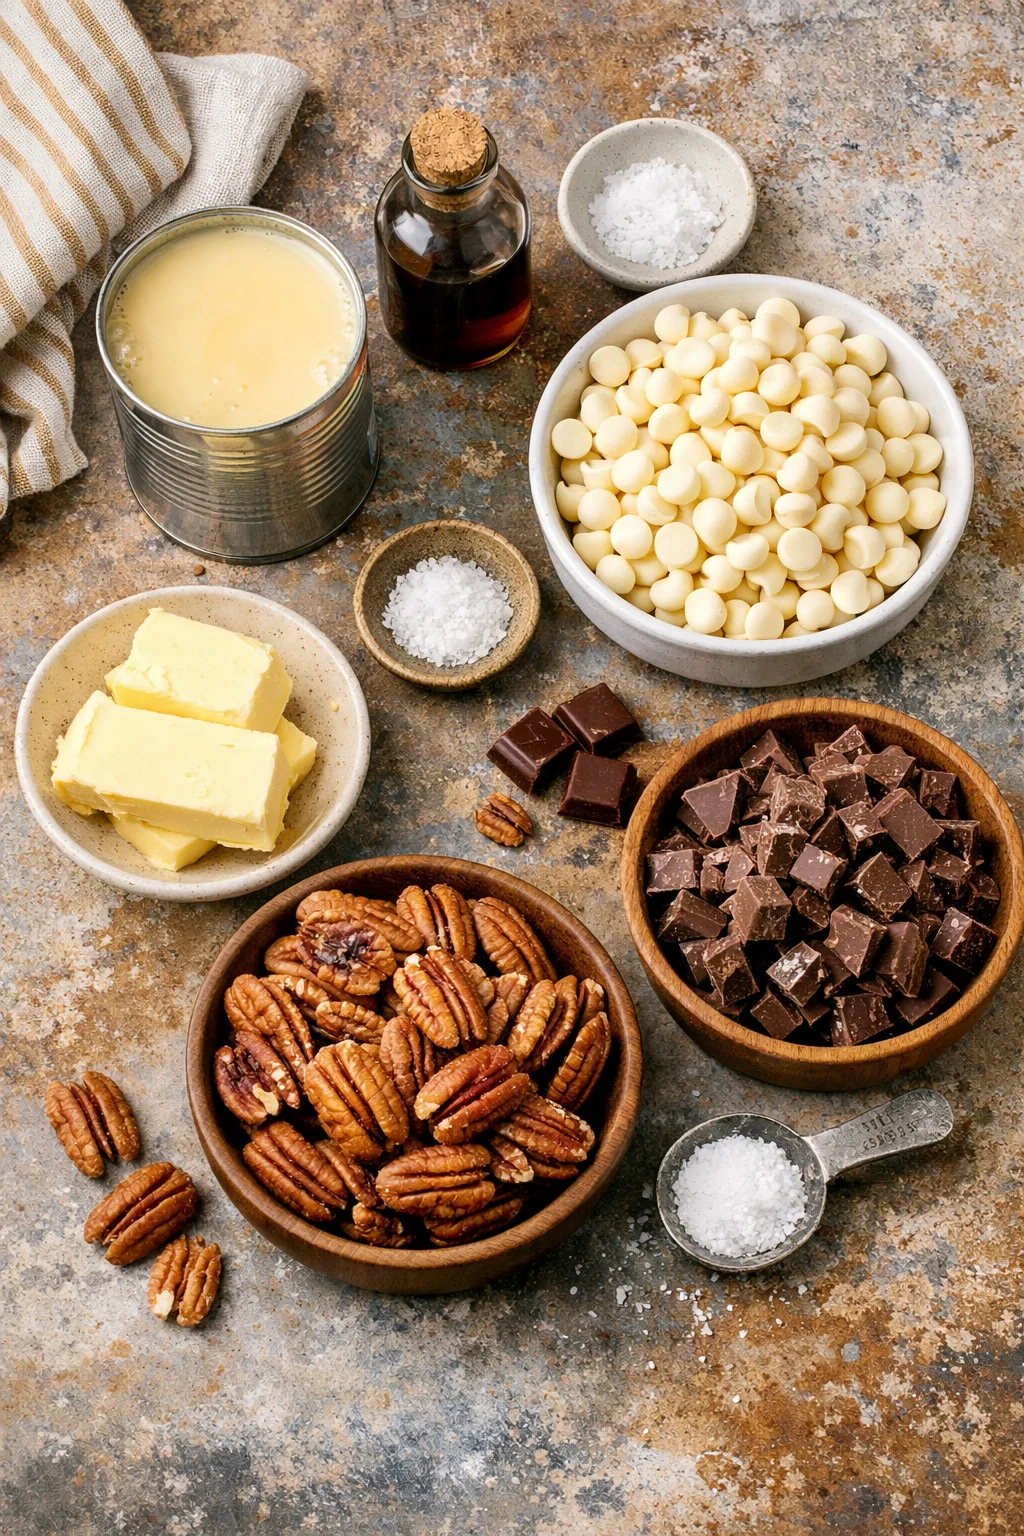
Here is what you will need to make my batch. Nothing complicated, and you can grab it all at a regular grocery store.
Ingredients and what each one does
- Sweetened condensed milk: makes the center creamy and thick without cooking sugar
- White chocolate chips: helps the center set and adds that smooth sweetness
- Butter: a little richness and a softer bite
- Vanilla extract: makes the flavor taste like candy shop vanilla
- Pinch of salt: keeps the sweetness in check
- Milk chocolate or semi sweet chocolate: for dipping
- Pecan halves: the “paws” on top
If you are sensitive to super sweet candy, go with semi sweet chocolate for dipping. If you want the closest classic vibe, milk chocolate is the way.
How To Make Polar Bear Paws Step By Step
This is the part I love because it is basically stir, chill, scoop, dip, decorate. I usually do it in the evening while something is on TV. The only time you need patience is chilling, because warm candy centers are impossible to dip neatly.
Step by step directions
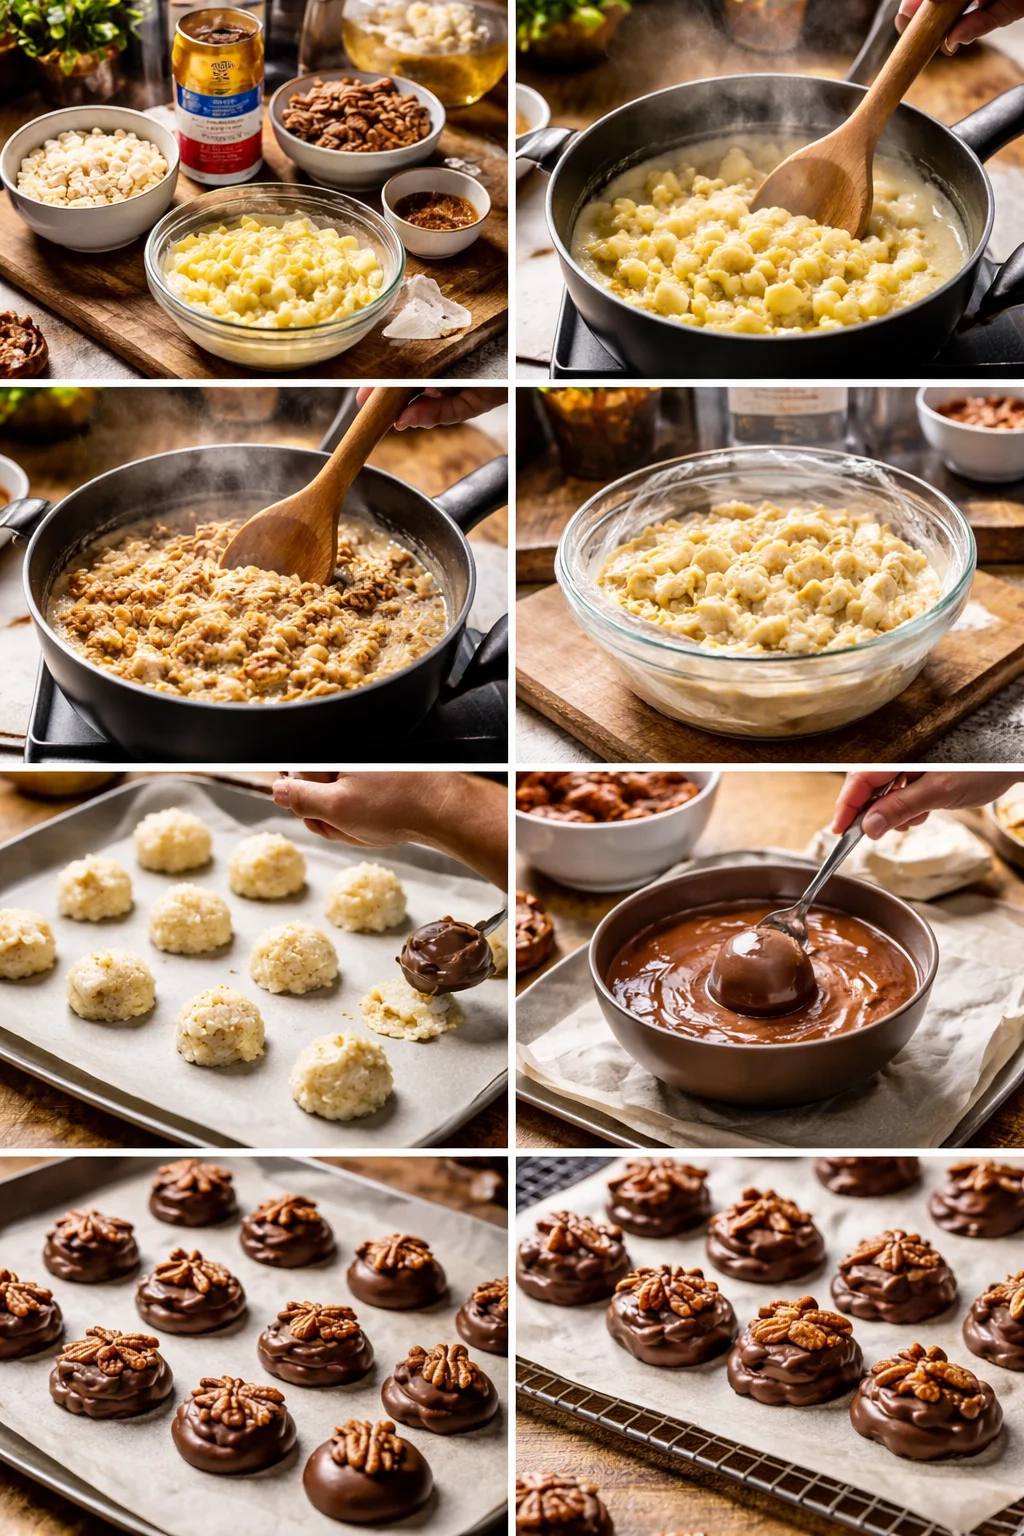
- Make the center mixture: In a saucepan on low heat, add sweetened condensed milk, white chocolate chips, and butter. Stir constantly until it looks smooth and glossy. Do not rush the heat. Low and slow prevents grainy texture.
- Flavor it: Remove from heat and stir in vanilla and a pinch of salt. The salt is small but it matters.
- Chill: Pour the mixture into a parchment lined pan. Smooth the top, then refrigerate for about 2 hours or until firm enough to scoop.
- Scoop and shape: Use a small cookie scoop or spoon. Roll into little mounds, not perfect balls. Real Polar Bear Paws Candy looks a little rustic and that is part of the charm.
- Freeze briefly: Put the mounds on a parchment lined tray and freeze 15 to 20 minutes so dipping is easier.
- Melt the chocolate: Melt milk or semi sweet chocolate in the microwave in short bursts, stirring between. If it feels thick, stir in a tiny bit of coconut oil or shortening.
- Dip: Dip each mound, let extra drip off, then place back on parchment.
- Add the paws: Press 3 to 4 pecan halves on top right away so they stick before the chocolate sets.
After dipping, let them set at room temp if your kitchen is cool, or pop them in the fridge for 10 minutes. Then you are done. If you are making a big holiday tray, I sometimes do another no fuss candy like crockpot candy while these chill, because it feels like you are magically producing sweets nonstop.
“I made these for my office cookie swap and they were the first thing gone. People thought they came from a candy shop. The pecans on top really make them.”
Helpful Tips & Variations
Once you make Polar Bear Paws Candy the first time, you will start adjusting them to your own taste. Here are the little tricks that keep them looking nice and tasting great.
My best practical tips
Keep the heat low when melting the center. If you crank it up, you risk scorching the white chocolate and it can turn gritty. Also, chill longer than you think you need. Firm centers make clean dips, and clean dips make pretty candy.
Do not skip the pinch of salt. It is not enough to make it salty, it just keeps the sweetness from feeling flat.
Use dry pecans. If your pecans are oily or stale, it shows. I like to buy a fresh bag and keep them sealed until I am ready.
Now for variations, because this is where you can have fun:
Chocolate swap: Dark chocolate makes them taste more grown up. Milk chocolate keeps them classic.
Nut swap: If you cannot do pecans, try almonds or cashews, but pecans really do give the best paw look.
Extra flavor: A tiny splash of almond extract with the vanilla is so good. Start small since it is strong.
If you love candies that are easy to customize, you might also like Cool Whip candy because it is one of those recipes you can flavor a bunch of ways without getting complicated.
Proper Storage
Polar Bear Paws Candy stores better than a lot of homemade treats, which is one reason I keep coming back to it for gifting. Once the chocolate is fully set, move them to an airtight container.
Room temperature: If your house is cool, they can sit out for about 3 to 5 days. Keep them away from sunlight or a warm stove area.
Refrigerator: This is my usual choice. They stay fresh about 2 weeks. Let them sit out 10 minutes before serving so the center is not too firm.
Freezer: Yes, you can freeze them. Place in layers with parchment between, then freeze up to 2 months. Thaw in the fridge overnight so the chocolate does not sweat too much.
One small heads up: if you put them in the fridge uncovered, they can pick up random fridge smells. Nobody wants candy that tastes faintly like onions, so airtight is key.
More Candy Recipes
If you are already in candy mode, I fully support leaning into it. I usually do one chocolate dipped candy, one crunchy candy, and one nostalgic soft candy for variety. For crunch, try something like crispy churro cracker candy. It is sweet, snacky, and totally addictive in that “just one more piece” way.
If you want an old school, cozy option that feels like something a grandma would make in the best possible way, take a look at Irish potato candy. It is simple and surprisingly fun to roll and coat.
And if you are building a gift box and want something with a little elegance, Martha Washington candy is a great add on. It makes the whole box feel extra special.
Common Questions
1) Why is my center too soft to dip?
It probably needs more chill time. Refrigerate longer, or freeze the scooped mounds 20 minutes before dipping.
2) Can I use white chocolate bars instead of chips?
Yes. Chop them up so they melt evenly. Chips are just easier and more consistent.
3) What chocolate is easiest for dipping?
Melting wafers work great, but regular chocolate chips are fine too. If it feels thick, stir in a tiny bit of coconut oil to smooth it out.
4) How do I make the pecans stick?
Add them right after dipping while the chocolate is still wet. If the chocolate sets, the nuts will slide off.
5) Can I make Polar Bear Paws Candy ahead for a party?
Absolutely. I like making them 2 to 3 days ahead and keeping them chilled in a sealed container.
A sweet little send off
If you have been craving that candy shop vibe at home, Polar Bear Paws Candy is one of the easiest ways to get it without stressing yourself out. You get the creamy center, the chocolate snap, and those pecan paws that make everyone smile. If you want to compare approaches, I found great inspiration in Polar Bear Paws See’s Candies Copycat – Garnish & Glaze and also this solid walkthrough from Polar Bear Paws Recipe See’s Candies Copycat. Make a batch, stash a few for yourself, then wrap the rest like a gift and watch how fast they disappear. You have got this, and your kitchen is about to smell like a chocolate dream.
Polar Bear Paws Candy
Ingredients
Method
- In a saucepan on low heat, add sweetened condensed milk, white chocolate chips, and butter. Stir constantly until smooth and glossy.
- Remove from heat and stir in vanilla and a pinch of salt.
- Pour the mixture into a parchment lined pan and refrigerate for about 2 hours or until firm enough to scoop.
- Use a small cookie scoop or spoon to roll the chilled mixture into mounds.
- Place the mounds on a parchment lined tray and freeze for 15 to 20 minutes.
- Melt milk or semi-sweet chocolate in the microwave in short bursts, stirring in between.
- Dip each mound in chocolate, letting the excess drip off, and place them back on parchment.
- Immediately press 3 to 4 pecan halves on top before the chocolate sets.
- Let the dipped candies set at room temperature if the kitchen is cool, or refrigerate for 10 minutes.
- Store in an airtight container: at room temperature for 3-5 days, in the refrigerator for up to 2 weeks, or freeze for up to 2 months.