


No-Bake Buckeye Cheesecake Bars are the answer to those days when you want a knockout dessert but do not want to turn on the oven. You know those moments when a chocolate craving hits at 8 pm and patience is not on the menu? This hits the spot without fuss. Think creamy peanut butter cheesecake over a chocolate cookie crust, then a silky chocolate topping that sets up like a dream. It is sweet, rich, and chilled so every bite is pure comfort. If you love classic buckeye candies, these bars will make you ridiculously happy.
The Story Behind This Recipe
From my kitchen to yours—No-Bake Buckeye Cheesecake Bars mixes a little nostalgia with a buttery finish. Tested, tasted, and ready for your table. No-Bake Buckeye Cheesecake Bars are the answer to those days when you want a knockout dessert but do not want to turn on the oven. You…
Why You’ll Love This Buckeye Cheesecake Bars
I am a peanut butter fan through and through, and these bars scratch that itch without being fussy. The layers are simple but satisfying: a crisp chocolate base, a fluffier peanut butter cheesecake center, and a glossy chocolate top. Every bite feels like the best part of a buckeye candy but with cheesecake vibes. And since it is no-bake, the texture stays cool and creamy, even on warm days.
They are also a party favorite. You can cut them into bigger squares for a dinner dessert or into tiny bites for a crowd. The bars hold well, slice cleanly, and travel like champs. I have brought them to potlucks, birthdays, and game nights. They disappear fast. Want to pair them with another fun no-bake treat? Try these no-bake buckeye graham crackers for a double peanut butter party.
“I made these for our game night and people kept coming back for another square. Creamy, chocolatey, and honestly easier than I expected. Keeper.”
Also nice, the ingredients are pantry friendly and affordable. No special tools, no water bath, no stress. If you are new to no-bake cheesecakes, this is a great place to start. And if you already love chilled desserts, take a peek at these colorful cherry pistachio cheesecake bars for another fun twist. 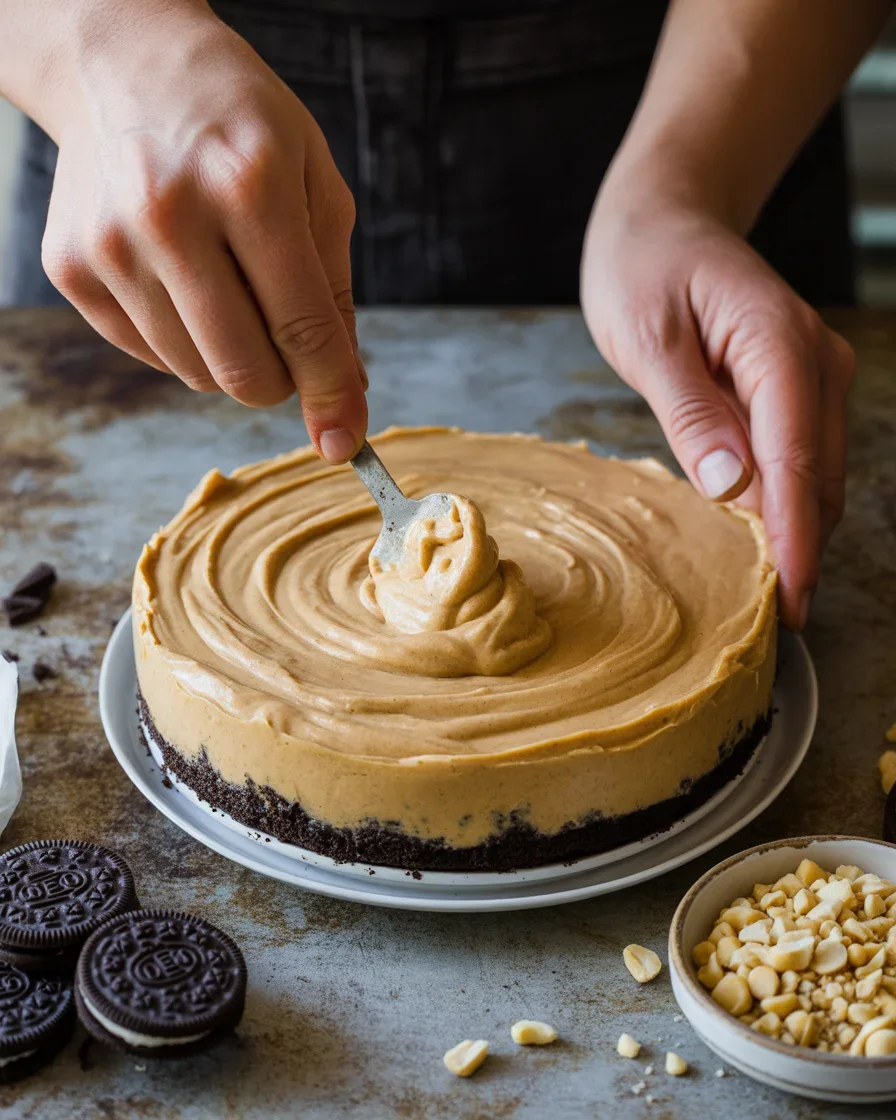
Ingredients Needed
Here is what you need to make a pan of creamy, chocolate-topped bars. Very basic, very doable. Keep a few of these on hand and you can throw a batch together any time.
- Chocolate sandwich cookies: For the crust. You can use chocolate grahams if you prefer a lighter crunch.
- Unsalted butter: Melted, to bind the crust.
- Cream cheese: Full fat is best for that dreamy texture. Soften it so it mixes smoothly.
- Peanut butter: Creamy, shelf-stable style. Natural peanut butter can work, but make sure it is well-stirred and not oily.
- Powdered sugar: Sweetens and firms the filling without grit.
- Heavy cream: Whipped into the filling for body and lift.
- Vanilla extract: For warmth and balance.
- Chocolate chips: Semi-sweet or dark for the topping.
- More heavy cream for the ganache: Just a splash to melt the chocolate smooth.
- Pinch of salt: A tiny bit makes the chocolate and peanut butter taste brighter.
If you love playful no-bake ideas, I think you will also enjoy these no-bake peanut butter cheesecake balls. They use a similar flavor combo and are perfect for gifting. For a fruity detour, try this cool and creamy no-bake blueberry cheesecake too. 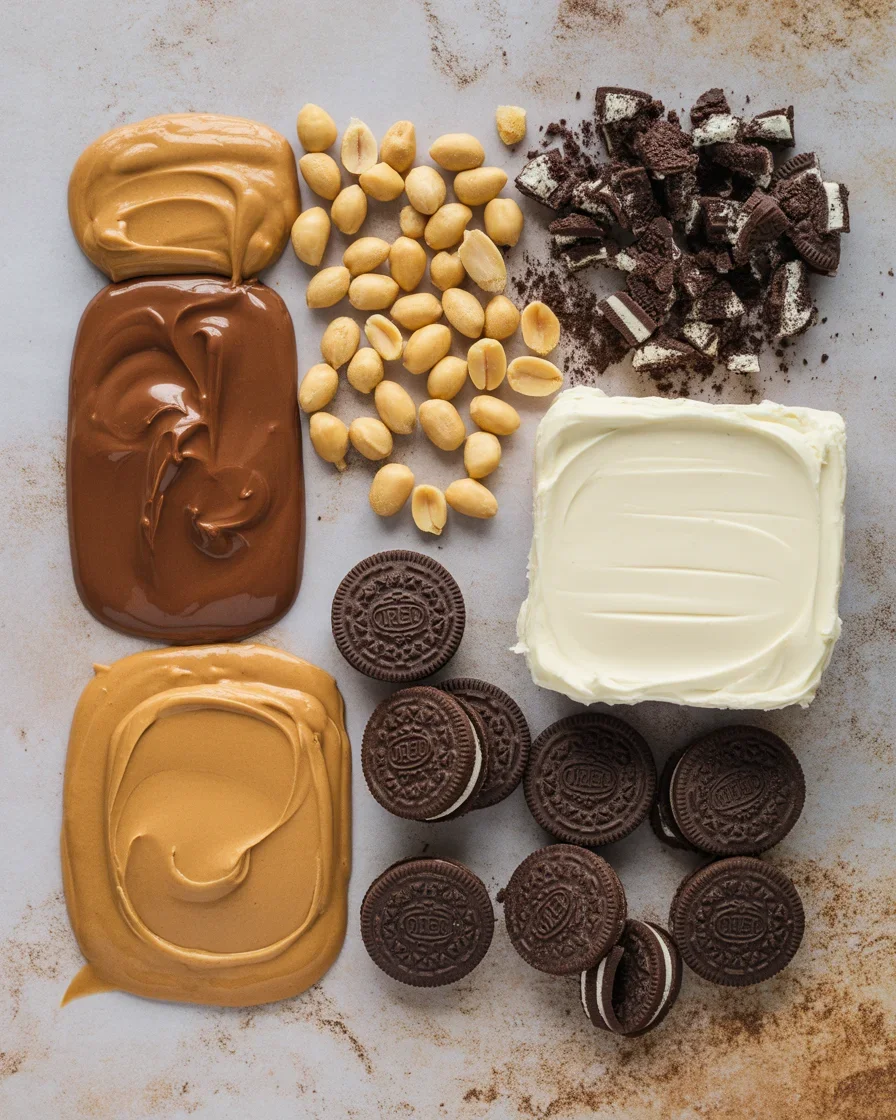
How To Make Buckeye Cheesecake Bars
Make the crust
Crush the cookies into fine crumbs. You can use a food processor or a zip-top bag and a rolling pin. Stir in melted butter until the crumbs feel like wet sand. Press firmly into a parchment-lined 8 or 9 inch square pan. I like to run the back of a measuring cup across the surface to get it even and compact. Chill while you make the filling.
Peanut butter cheesecake layer
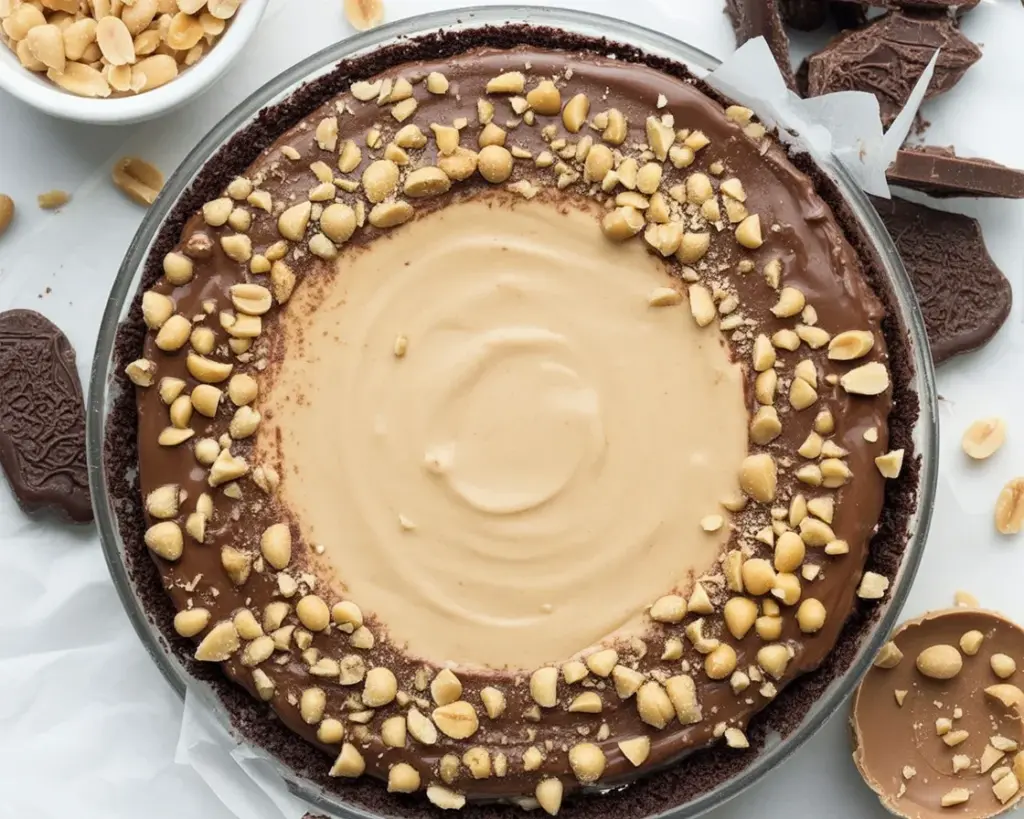
Beat softened cream cheese until smooth and fluffy. Mix in peanut butter, powdered sugar, vanilla, and a pinch of salt. In a separate bowl, whip the heavy cream to soft peaks. Fold the whipped cream into the peanut butter mixture in two gentle additions. Spread the filling over the crust and smooth the top. Chill the pan for at least 20 minutes so the filling sets a bit before the chocolate goes on.
Chocolate topping
Heat cream until it is steaming, then pour over chocolate chips. Let it sit a minute, then stir slowly until glossy and smooth. If it looks too thick, add another teaspoon of warm cream. Pour the chocolate over the chilled filling and tilt the pan to coat. Chill until set. For neat cuts, chill at least 6 hours or overnight.
That is it. Easy, rich, and it slices like a dream once chilled. If you are in a mood for layers and cups instead of bars, these no-bake brownie cheesecake parfait cups are a fun, spoonable option.
If You’re Making Buckeye Cheesecake Bars, a Few Tips
Use room temperature cream cheese. It is not glamorous, but this is the single best way to avoid lumps. If your cream cheese is cold, microwave it in 10 second bursts until just soft to the touch. Do not let it melt.
Fold gently. When you add whipped cream, use a light hand so the filling stays airy. Think of it like scooping and turning, not heavy stirring.
Let the pan chill long enough. I know it is tempting to slice early, but patience pays off. The chocolate needs time to set fully and the cheesecake layer firms up beautifully by the 6 hour mark. Overnight is ideal for clean edges.
Warm your knife. Run a sharp knife under hot water, wipe dry, and slice. Clean and repeat for each cut. This gives you bakery-style squares with smooth sides.
Dial in the sweetness. The balance of chocolate, peanut butter, and sugar is classic, but you can use dark chocolate to dial back sweetness or add a pinch of flaky salt on top. If you like a nutty finish, sprinkle chopped peanuts before the chocolate sets.
For a citrusy change of pace, I love the tangy surprise in these lemon lime cherry pistachio cheesecake bars. Total mood shift, same easy format.
How To Store No-Bake Buckeye Cheesecake
Keep your pan covered in the fridge. The bars are best within 3 to 4 days. I like to slice the whole batch, then tuck parchment between layers if I am stacking them in a container. That way the chocolate tops stay smooth.
For longer storage, freeze the bars on a sheet pan until firm, then wrap individually. They keep well for about 2 months. Thaw in the fridge before serving. The texture stays creamy and the crust holds up well. If you are planning a dessert table, these thawed bars pair nicely with a bright, chilled slice of no-bake pineapple heaven cheesecake dessert too.
By the way, if you have extra filling or just want another chilled treat for later, these cute blueberry cheesecake parfait cups are easy to batch-prep and stash in the fridge.
Common Questions
Can I use natural peanut butter?
You can, but make sure it is well-stirred and thick, not oily. If it is runny, add a little more powdered sugar to stabilize the filling.
What pan size works best?
An 8 inch square pan gives taller bars, a 9 inch pan makes them a bit thinner. Both work. Line with parchment for easy lifting.
How do I fix a grainy filling?
Beat the cream cheese fully before adding sugar and peanut butter. If it is still grainy, your cream cheese might have been too cold. Let the mixture rest 5 minutes and beat again.
Can I make them ahead?
Yes. These bars are perfect make-ahead desserts. Chill overnight and slice right before serving. They will be even neater on day two.
What can I use instead of sandwich cookies?
Chocolate graham crackers work well. You can also use regular grahams for a lighter flavor, or even an Oreo crust with the cream left in for extra richness.
A Sweet, Chilled Finish
These No-Bake Buckeye Cheesecake Bars are my kind of dessert: fast to assemble, big on flavor, and always a crowd-pleaser. You get the classic buckeye pairing of peanut butter and chocolate with the cool creaminess of cheesecake, all in tidy little squares. If you want more ideas or a slightly different spin, I enjoyed reading this take from Peanut Butter Buckeye Cheesecake Bars – Boston Girl Bakes, and the step-by-step guide in Buckeye Cheesecake Bars Recipe | The Kitchn is super helpful too. Now grab your mixing bowl, chill that pan, and treat yourself to a square tonight. You are going to love it.
No-Bake Buckeye Cheesecake Bars
Ingredients
Method
- Crush the cookies into fine crumbs using a food processor or a zip-top bag and a rolling pin.
- Stir in melted butter until the crumbs feel like wet sand.
- Press firmly into a parchment-lined 8 or 9 inch square pan. Chill while you make the filling.
- Beat softened cream cheese until smooth and fluffy.
- Mix in peanut butter, powdered sugar, vanilla, and a pinch of salt.
- In a separate bowl, whip the heavy cream to soft peaks.
- Fold the whipped cream into the peanut butter mixture in two gentle additions.
- Spread the filling over the crust and smooth the top.
- Chill the pan for at least 20 minutes to allow the filling to set.
- Heat cream until it is steaming, then pour it over the chocolate chips.
- Let it sit for a minute, then stir slowly until glossy and smooth.
- Pour the chocolate over the chilled filling and tilt the pan to coat.
- Chill until set, ideally at least 6 hours or overnight for neat cuts.