
EASTER JELLO CUPS are my go to answer for that moment when you need a cute Easter dessert fast, but you still want it to look like you planned ahead. You know the scenario: you volunteered to bring something, the kids are already hyped on candy, and you do not want to bake a whole cake at 10 pm. These little cups save the day because they are colorful, portioned out, and honestly kind of fun to make. Plus, everyone loves picking their favorite color layer like it is a personality test. 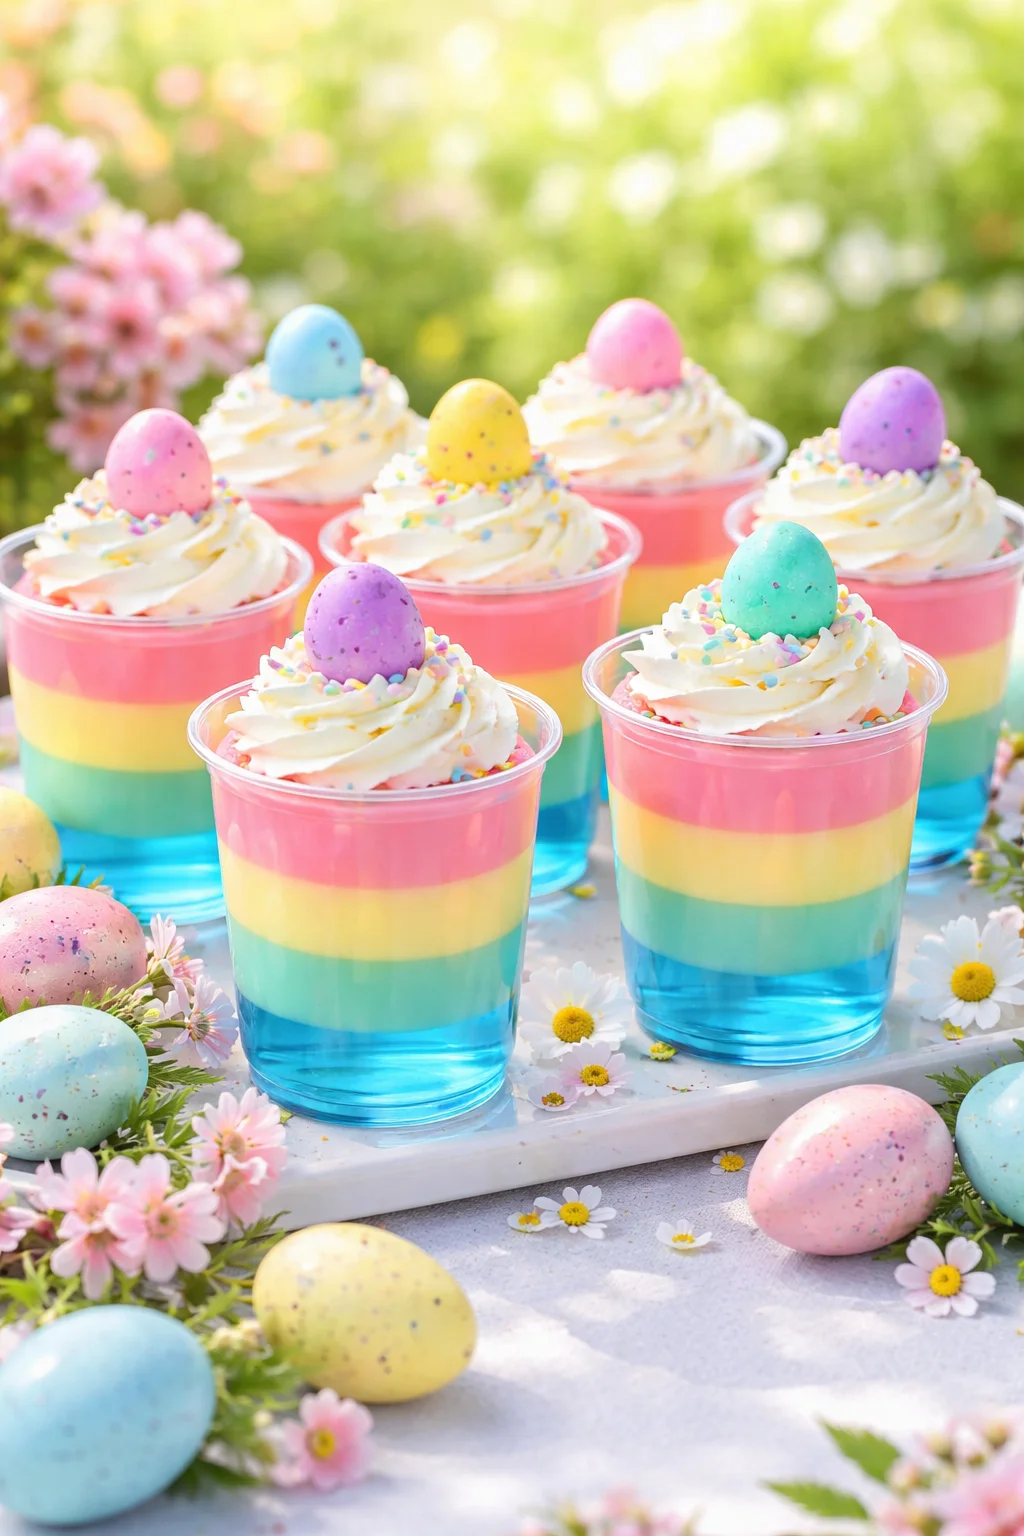
The Story Behind This Recipe
I’ve spent years testing recipes for Midd Leeast Sector, and this EASTER JELLO CUPS is a keeper: crowd-pleasing with no weird tricks. EASTER JELLO CUPS are my go to answer for that moment when you need a cute Easter dessert fast, but you still want it to look…
Pastel Rainbow Jello Recipe
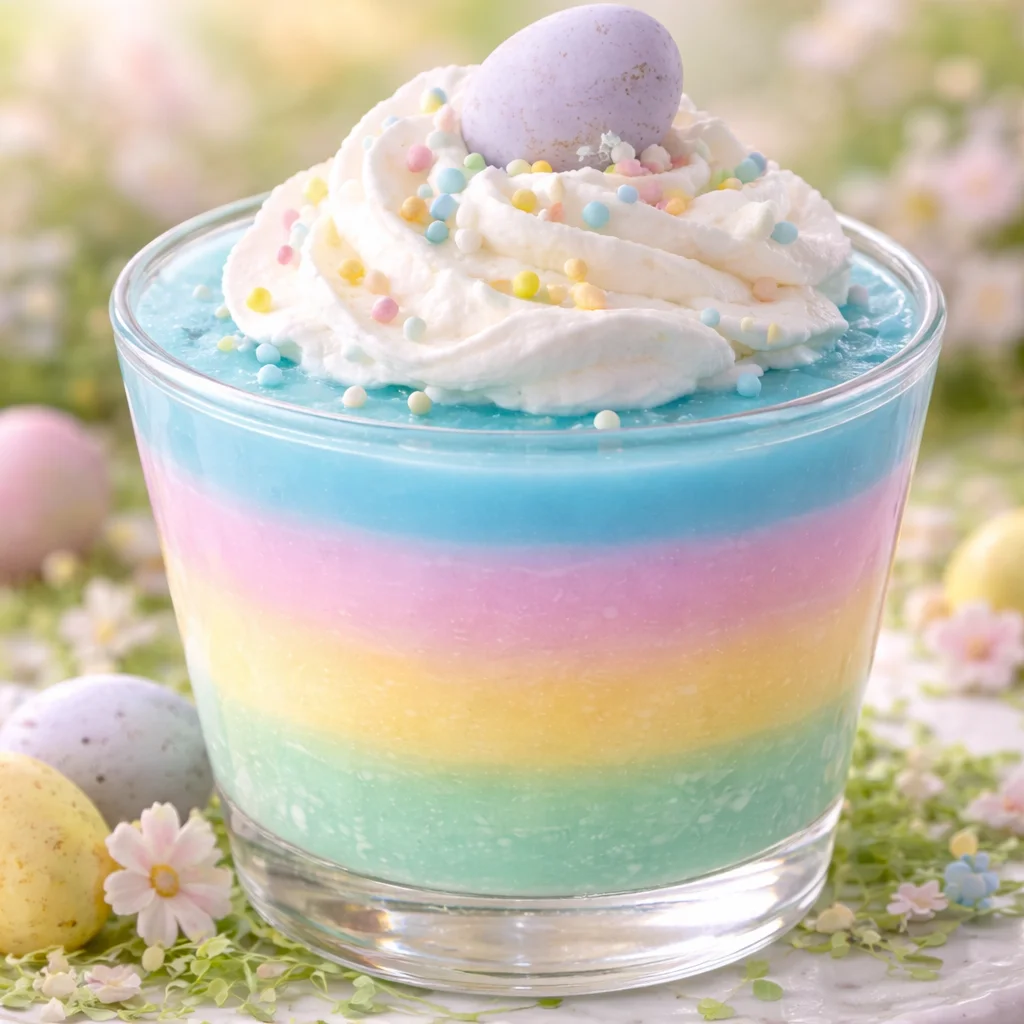
This is the version I make most often because it gives you that soft rainbow look without being neon. It feels springy and cheerful on the table, especially next to all the chocolate bunnies. The trick is using lighter shades and letting each layer set enough so the colors stay clean.
What you will need
- Clear plastic cups (5 to 9 oz) or small glass cups
- 4 to 5 small boxes of flavored gelatin in different colors
- Unflavored gelatin (optional but helps layers stay firm)
- Sweetened condensed milk or vanilla yogurt for a creamy layer
- Cool whip or whipped cream for topping
- Sprinkles, mini marshmallows, or Peeps for decorating
I usually do pink, purple, blue, and green. Yellow is cute too, but it can disappear next to whipped cream unless you make it a little stronger. If you love little desserts in cups as much as I do, you should also check out these Oreo dessert cups for another easy crowd pleaser.

Key Ingredients & Why They Work
Let’s talk about why this recipe works so well, even if you do not consider yourself a “dessert person.” Gelatin is forgiving, the layers are basically built in portion control, and you can make them ahead without them getting weird like some frosted desserts do.
Flavored gelatin is the color and flavor engine here. Each box gives you a bright, clean taste that kids recognize immediately. I use the regular kind, not sugar free, because it sets more reliably and tastes better in layered desserts.
Sweetened condensed milk is my secret for that pretty, cloudy pastel layer. When you mix a little prepared gelatin with condensed milk, it turns into this creamy, soft looking stripe that breaks up the rainbow. It also gives a mild vanilla sweetness that balances the tangy fruit flavors.
Cold water and ice are not just “extras.” They help bring the temperature down quickly so each layer sets faster. That means you are not stuck waiting forever between layers.
Whipped topping makes it look finished. Even if your layers are not perfect, a little swirl on top and a sprinkle of something cute makes people go, “Oh wow.” If you like playful Easter snacks that look festive with almost no effort, this bunny bait Easter snack mix is another fun one to put out on the table.
I made these for my daughter’s class party and the kids were obsessed. The layers stayed neat, and the cups were gone before the crafts even started. I am officially bringing them every year.
;
How to Make Easter Jell-O Cups
When people ask me how I get the layers to behave, I always say the same thing: slow down for five minutes between pours. That is really it. You do not need fancy tools, but you do need a little patience so the colors do not blend together.
Simple step by step directions
- Pick your cups and set them on a tray that fits in your fridge. A baking sheet is perfect.
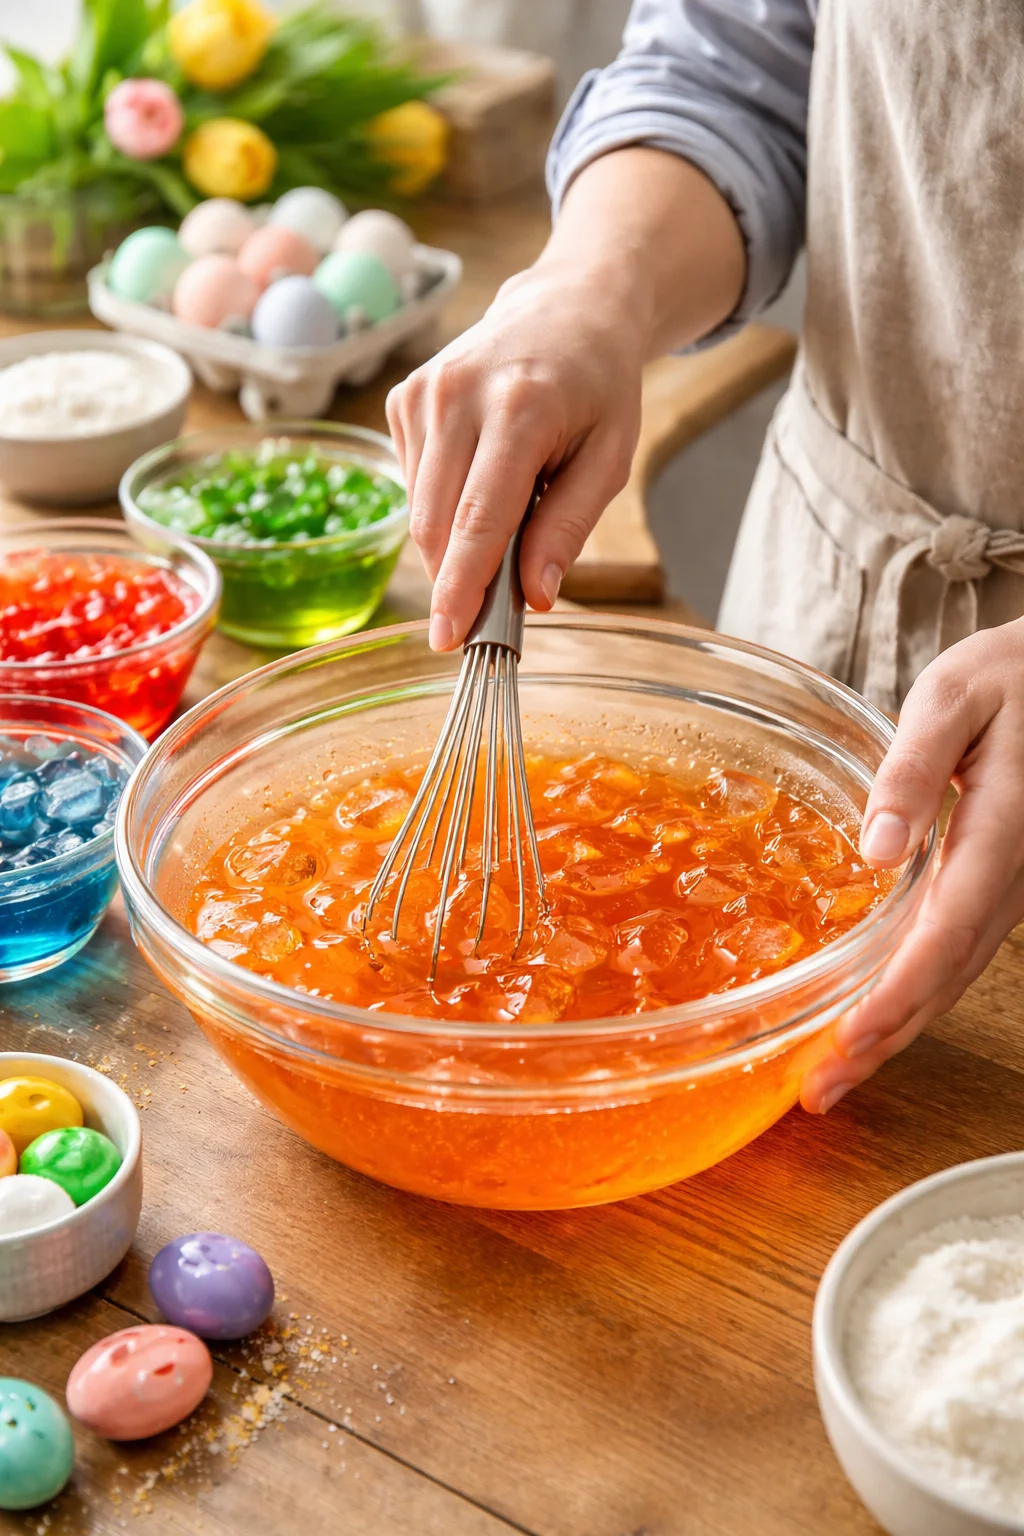
- Make your first gelatin flavor: dissolve the powder in boiling water (follow the box), then add cold water to cool it down.
- Pour a small amount into each cup, about 1 to 2 inches deep.
- Chill for 20 to 30 minutes until the surface feels set when you lightly tap the cup.
- Repeat with the next color. If you want creamy pastel layers, mix a portion of the prepared gelatin with sweetened condensed milk before pouring.
- Once all layers are set, top with whipped cream and decorate right before serving.
I keep the layers fairly thin so you can actually finish a cup without feeling like you just ate a brick of dessert. Also, thin layers set faster, which keeps this from becoming an all afternoon project.
One more practical note: if your kitchen is warm, let your mixed gelatin cool for a few minutes before pouring. If you pour it hot onto a set layer, it can melt that layer and you will get a blurry line. Still tasty, just not as crisp looking.
If you are already in a “cute desserts in cups” mood, you might also like these banana pudding cups. Totally different vibe, but just as easy to serve at a party.
Recipe Tips
I have made EASTER JELLO CUPS enough times to mess them up in every possible way, so here are the tips that actually matter. These are the little fixes that keep you from getting stressed while you are assembling them.
Use a measuring cup with a spout. It makes pouring clean and helps you keep the layers even. If you do not have one, a ladle works fine, just go slowly.
Do not rush the set. If the layer is only “almost” set, the next color will sink in and you will get that tie dye look. Again, tie dye is not the end of the world, but if you want crisp stripes, wait the extra 10 minutes.
Chill on a flat surface. If your fridge shelf is slanted, your layers will be slanted too. I learned that one the hard way at a family gathering, and yes, my aunt noticed.
Make them the day before. They hold up great. I just wait to add whipped cream and toppings until the day of, so it stays fluffy.
Keep the cups covered. A loose piece of plastic wrap over the tray helps prevent that fridge smell from sneaking in. Gelatin can pick up odors, especially if you have onions or strong leftovers nearby.
Also, if you are setting up a dessert table and want something richer next to your jello, these Boston cream pie cookie cups are a fun contrast. Creamy and chocolatey next to fruity and light is a nice mix.
Substitutions & Variations
This is where you can make EASTER JELLO CUPS fit your life, your fridge, and your people. You do not have to follow my exact combo for it to work.
Easy swaps and fun ideas
Swap condensed milk for yogurt. Vanilla yogurt makes a tangier creamy layer. It is not quite as silky, but it is still delicious and gives that pastel look.
Use clear juice instead of cold water. If you want a more natural fruit flavor, you can replace some of the cold water with apple juice or white grape juice. Keep it light colored so it does not muddy the shades.
Try “garden” cups. Add crushed cookies at the bottom to look like dirt, then put a little green layer on top and stick in a candy flower or bunny. Kids love this.
Make them sparkle. A tiny pinch of edible glitter or sanding sugar on the whipped cream makes them look extra festive without changing the flavor much.
Turn them into “egg hunt” cups. Mix mini chocolate eggs into the whipped cream topping. Just do it right before serving so the colors do not bleed.
If your family is really into peanut butter and chocolate at Easter, I also have to mention these chocolate Easter eggs peanut butter for a totally different homemade treat. I like having one fruity option and one chocolate option so everyone wins.
Common Questions
How long do EASTER JELLO CUPS take to set?
Plan on about 20 to 30 minutes per layer in the fridge, depending on how thick you pour. Thin layers go faster, and a colder fridge helps a lot.
Can I make them two days ahead?
Yes. The jello holds up well for 2 days. Just cover them and wait to add whipped cream and toppings until serving day.
Why did my layers mix together?
Usually the layer underneath was not fully set, or the new gelatin was still too warm. Next time, chill a little longer and let the mixed gelatin cool before pouring.
What is the best cup size?
I like 5 to 7 oz cups for parties. They look cute and people actually finish them. Bigger cups are fine, but they can feel like a lot after a big holiday meal.
Can I make these without dairy?
Absolutely. Skip the condensed milk layers and do all clear layers, or use a dairy free whipped topping. They will still be colorful and festive.
A sweet Easter treat you can actually pull off
If you want a dessert that looks bright and happy without turning your kitchen into chaos, EASTER JELLO CUPS are it. Keep the layers thin, let each one set, and decorate right before serving for the best look. If you want more inspiration, I love browsing Pastel Rainbow Gelatin Cups – SugarHero for extra color ideas, and these Swimming Peeps Jello Cups – easy Easter treat! are adorable if you are serving kids. Put on some music, clear a little fridge space, and give it a try. You might end up making them every Easter like I do.
Easter Jello Cups
Ingredients
Method
- Pick your cups and set them on a tray that fits in your fridge.
- Dissolve the first gelatin flavor in boiling water according to package instructions, then add cold water to cool it down.
- Pour a small amount into each cup, about 1 to 2 inches deep.
- Chill for 20 to 30 minutes until the surface feels set when tapped.
- Repeat with the next color, mixing a portion of prepared gelatin with sweetened condensed milk for creamy layers.
- Once all layers are set, top with whipped cream and decorate just before serving.