


Crispy Vegetable Spring Rolls are my go to fix for those nights when I want something snacky and satisfying, but I still want to feel like I ate actual vegetables. You know the vibe: you open the fridge, see a sad cabbage and a couple of carrots, and suddenly takeout seems way too tempting. This is the recipe I make when I want crunch, a little spice, and that fun dipping sauce moment without leaving the house. They’re simple, friendly for beginners, and honestly kind of soothing to assemble once you get going. Let’s make a batch that actually stays crispy, not soggy and sad. 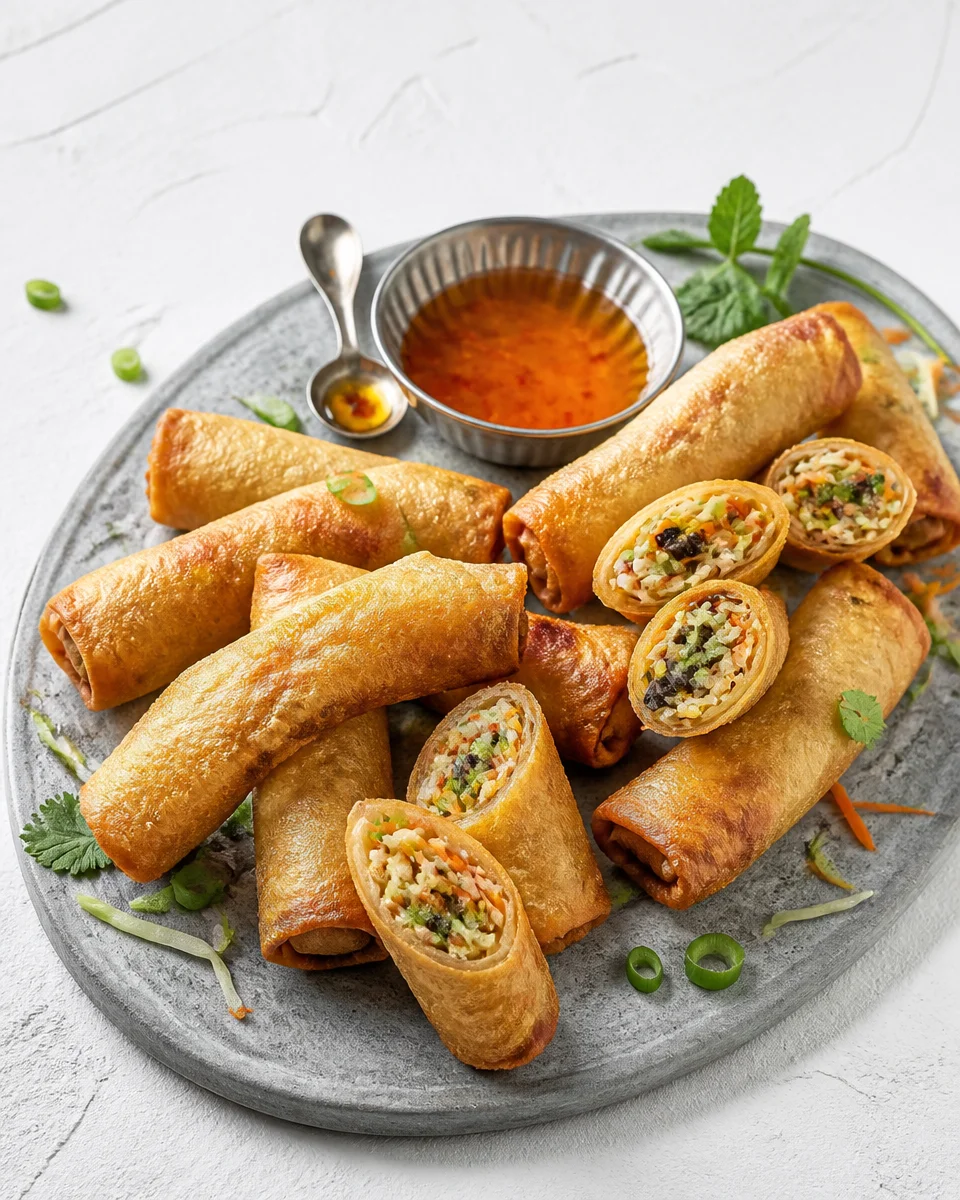
The Story Behind This Recipe
I’ve spent years testing recipes for Middle East Sector, and this Crispy Vegetable Spring Rolls is a keeper: crowd-pleasing with no weird tricks. Crispy Vegetable Spring Rolls are my go to fix for those nights when I want something snacky and satisfying, but I still want to feel like…
Key Benefits and Outcomes
First, let’s talk about why I keep coming back to these. Crispy Vegetable Spring Rolls hit that sweet spot between snack and real food. They’re crunchy on the outside, packed on the inside, and they’re super flexible with whatever vegetables you have.
Here’s what you get out of making them at home:
1) Serious crunch you can control. When you fry or bake them fresh, you decide how crispy you want them. No lukewarm delivery situation.
2) A clean out the fridge win. Cabbage, carrots, bell peppers, mushrooms, even leftover cooked green beans. It all works.
3) They’re budget friendly. A pack of wrappers plus basic veggies makes a big batch. And if you’re into growing your own produce, you’ll appreciate this kind of recipe. I read this fun piece on growing vegetables as a small act of rebellion, and it totally made me want to use up every homegrown carrot I can get.
4) Meal prep magic. You can prep the filling ahead, roll them when you’re ready, and freeze extras.
5) Crowd pleasing energy. Put a plate of Crispy Vegetable Spring Rolls on the table and people magically appear in your kitchen asking, “Are those done yet?”
One more unexpected benefit: if spring pollen is messing with you and you’re staying indoors more, cooking something like this feels like a tiny comfort project. If that’s you, this article on early signs your body is affected by spring pollen is a quick read and weirdly relatable.

Common Misconceptions
I used to think spring rolls were fussy. Like, restaurant only food. Nope. A few small tricks make them very doable.
Misconception 1: You need fancy ingredients.
You really don’t. The core is shredded veggies, a little seasoning, and wrappers. I’ll list my favorite combo, but you can swap what you have.
Misconception 2: The filling should be wet and saucy.
This is how you get soggy rolls that split. The filling should be flavorful but mostly dry. I cook it just until the veggies soften slightly, then let it cool.
Misconception 3: More filling is better.
Overstuffing is the fastest way to ripping. Think modest little bundle, not burrito.
Misconception 4: All wrappers behave the same.
Spring roll wrappers (the thin wheat ones) are what you want for that shattery crunch. Rice paper is a different thing and cooks differently.
Misconception 5: You must deep fry.
Deep frying gives the classic result, yes, but you can also air fry or bake. If you’re already in an air fryer phase, you’ll probably enjoy these fun air fryer snacks too: air fryer pizza rolls and air fryer crispy tortellini. They scratch the same crunchy snack itch.
“Made these for my family movie night and everyone fought over the last two. I followed the tip to keep the filling dry and it made all the difference.”
Tools and Resources for Success
Nothing complicated here. But having the right basics makes the whole Crispy Vegetable Spring Rolls experience smoother.
What you will need (simple but important)
- Large skillet or wok for cooking the filling
- Sharp knife or a grater for quick shredding
- Clean kitchen towel to cover wrappers so they do not dry out
- Small bowl of water to seal the wrappers
- Tongs for frying and turning
- Paper towels or a rack for draining
- Thermometer (optional) but helpful for steady frying
Wrappers matter, so I buy a brand that looks fresh and pliable, not cracked. If they feel stiff, let them sit at room temp for a bit before you start rolling.
And let’s talk oil quickly. I use a neutral oil like sunflower, canola, or vegetable oil. You want something that can handle heat without smoking.
If you want a dessert version of the rolled and crispy concept (which is kind of adorable), check out air fryer cherry cheesecake egg rolls. Not the same, obviously, but the technique crossover is real.
Step-by-Step Guide to Implementation
This is how I make my favorite batch. I’ll keep it practical, because the goal is for you to actually do it, not just read about it.
Ingredients for the filling and sealing
- 2 cups shredded cabbage (green or napa)
- 1 cup shredded carrots
- 1 cup thin sliced bell pepper or bean sprouts (or half and half)
- 1 cup chopped mushrooms (optional but really good)
- 3 cloves garlic, minced
- 1 tablespoon grated ginger (or 1 teaspoon ginger powder in a pinch)
- 2 to 3 tablespoons soy sauce
- 1 teaspoon sesame oil (optional, but adds that takeout aroma)
- Salt and black pepper to taste
- 1 tablespoon cornstarch mixed with 2 tablespoons water (optional, helps bind moisture)
- 10 to 14 spring roll wrappers
- Water for sealing
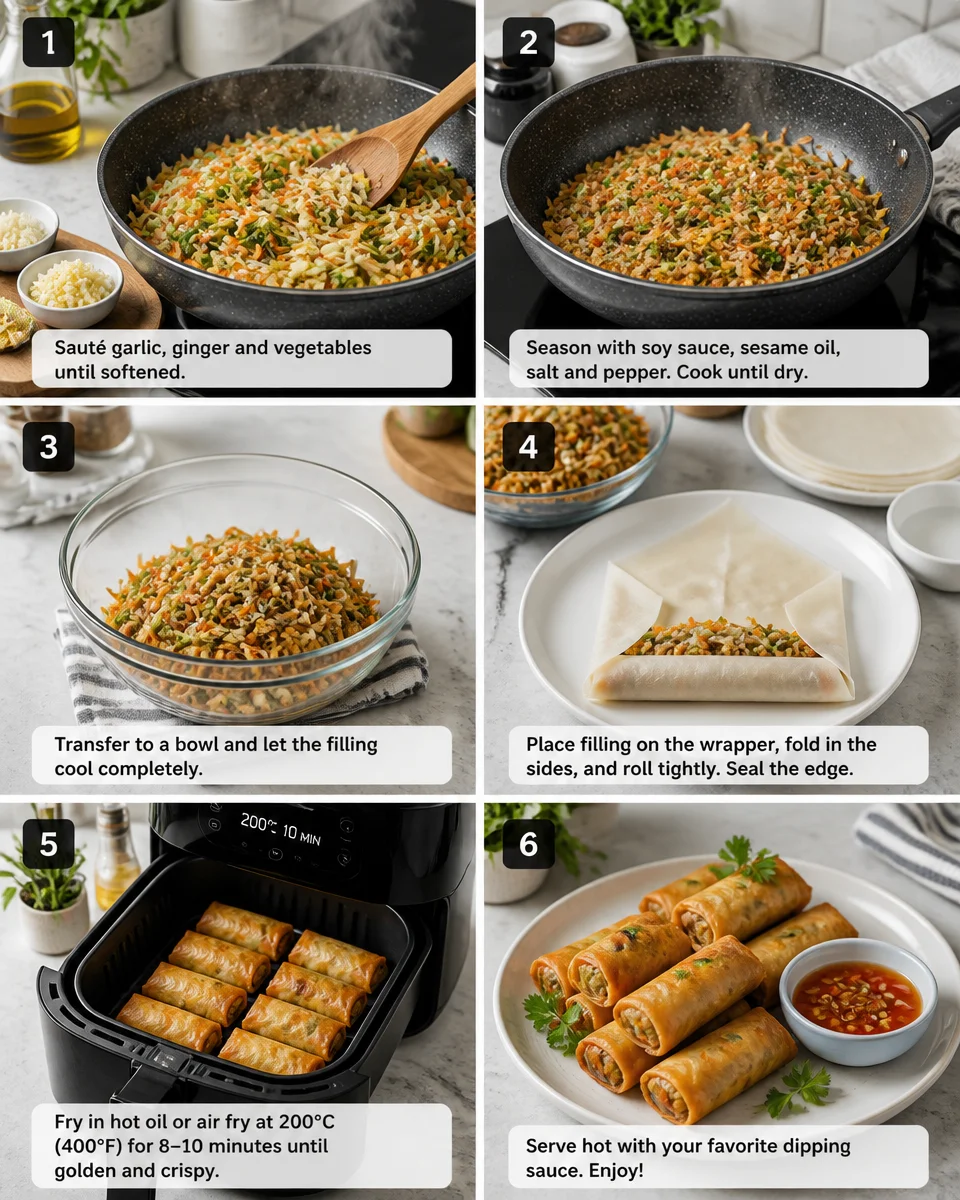
Step 1: Cook the filling.
Heat a skillet on medium high with a small splash of oil. Add garlic and ginger, stir for about 20 seconds so it smells amazing. Toss in mushrooms if using, then add cabbage, carrots, and peppers. Stir fry for 3 to 5 minutes. You want it softened but not mushy.
Step 2: Season and dry it out.
Add soy sauce, a few twists of pepper, and a tiny drizzle of sesame oil. Keep cooking another minute. If the pan looks watery, keep stirring until the moisture cooks off. This is the make or break moment for Crispy Vegetable Spring Rolls. If you want extra insurance, stir in the cornstarch slurry and cook 30 seconds until it looks glossy, not wet.
Step 3: Cool the filling.
Spread it on a plate. Let it cool so it does not steam inside the wrapper.
Step 4: Roll.
Lay a wrapper like a diamond shape in front of you. Put 2 to 3 tablespoons filling near the bottom corner. Fold the bottom corner up over the filling, tuck it in snug, fold the sides in, then roll upward. Dab a little water on the top corner to seal.
Step 5: Fry (my favorite) or air fry.
For frying: heat oil in a pot or deep skillet, about 350 F if you have a thermometer. Fry in small batches, turning until golden and crisp, about 3 to 5 minutes total. Drain on paper towels or a rack.
For air fryer: brush or spray the rolls lightly with oil. Air fry around 380 F for 10 to 14 minutes, turning halfway, until crisp and browned.
Step 6: Dip and enjoy.
My quick dip is sweet chili sauce. If I want something more savory, I mix soy sauce, rice vinegar, a little honey, and chili flakes.
Once you nail the method, you’ll realize Crispy Vegetable Spring Rolls are more of a rhythm than a recipe. Roll, fry, snack, repeat.
Expert Tips and Best Practices
I’m not a professional chef, but I’ve made enough batches to learn what actually helps.
Keep wrappers covered. They dry out fast and then they crack. I cover the stack with a slightly damp towel.
Do not overfill. I know I said it already, but it’s worth repeating. Overfilling causes splits, and then oil gets in, and the vibe is ruined.
Seal well. Water works, but if your kitchen is warm and humid, a tiny cornstarch and water paste seals like glue.
Fry in batches. Crowding drops the oil temp and makes them greasy instead of crisp.
Freeze the extras the smart way. Freeze on a tray first so they do not stick together, then move to a bag. Fry or air fry from frozen, just add a few extra minutes.
Serving idea: I love these with a crunchy salad or simple noodles. If I’m hosting, I’ll put out two dips so people feel like they’re at a restaurant.
Common Questions
1) Can I bake them instead of frying?
Yes. Brush with oil, bake around 425 F for 15 to 20 minutes, flipping once. They will be crisp, just a little less bubbly than fried.
2) How do I keep them from getting soggy?
Cook the filling until it is mostly dry, cool it before rolling, and drain cooked rolls on a rack if you have one.
3) Can I make Crispy Vegetable Spring Rolls ahead of time?
You can prep filling a day ahead. For rolled uncooked spring rolls, I prefer freezing them if it will be more than a couple of hours so they do not soften.
4) What vegetables work best?
Cabbage and carrots are the base. Add mushrooms, bell pepper, bean sprouts, or chopped spinach. Just keep the overall mix not too wet.
5) What dipping sauce goes with them?
Sweet chili sauce is easiest. For a tangy dip, do soy sauce plus vinegar plus a pinch of sugar and chili.
A happy crunchy finish
If you take one thing from this post, let it be this: keep the filling dry and don’t overstuff, and your Crispy Vegetable Spring Rolls will come out crunchy and golden every time. Once you’ve made them once, the second batch feels way easier and kind of fun, like a little kitchen craft project you can eat. If you want more reference points, I’ve leaned on guides like Veg Spring Rolls Recipe – Swasthi’s Recipes and Vegetable Spring Rolls [Step-by-step guide] – Kitchen Sanctuary when I’m trying a new method. Now go grab those wrappers, turn on some music, and make a batch you’ll be proud to crunch into.

Crispy Vegetable Spring Rolls
Ingredients
Method
- Heat a skillet on medium high with a small splash of oil. Add garlic and ginger, stir for about 20 seconds.
- Toss in mushrooms if using, then add cabbage, carrots, and peppers. Stir fry for 3 to 5 minutes until softened but not mushy.
- Add soy sauce, a few twists of pepper, and a tiny drizzle of sesame oil. Cook for another minute.
- If the pan looks watery, keep stirring until the moisture cooks off. Optionally, stir in the cornstarch slurry and cook for 30 seconds.
- Spread the filling on a plate to cool so it does not steam inside the wrapper.
- Lay a wrapper like a diamond shape and put 2 to 3 tablespoons of filling near the bottom corner.
- Fold the bottom corner up over the filling, tuck it in snug, fold the sides in, then roll upward. Dab a little water on the top corner to seal.
- For frying: Heat oil in a pot or deep skillet to about 350 F. Fry in small batches until golden and crisp, about 3 to 5 minutes. Drain on paper towels.
- For air frying: Brush or spray the rolls lightly with oil. Air fry at 380 F for 10 to 14 minutes, turning halfway, until crisp and browned.
- Serve with sweet chili sauce or a mixture of soy sauce, rice vinegar, honey, and chili flakes.