


Bacon Wrapped Stuffed Onion Bombs are my go to party trick when I need something that feels fun, filling, and a little bit over the top in the best way. You know those days when you want to grill or bake something that makes people wander into the kitchen asking, what is that smell? This recipe is exactly for that moment. It looks impressive, but it is honestly pretty simple once you get the hang of the onion layers. Plus, you can customize the filling based on what you have in the fridge. 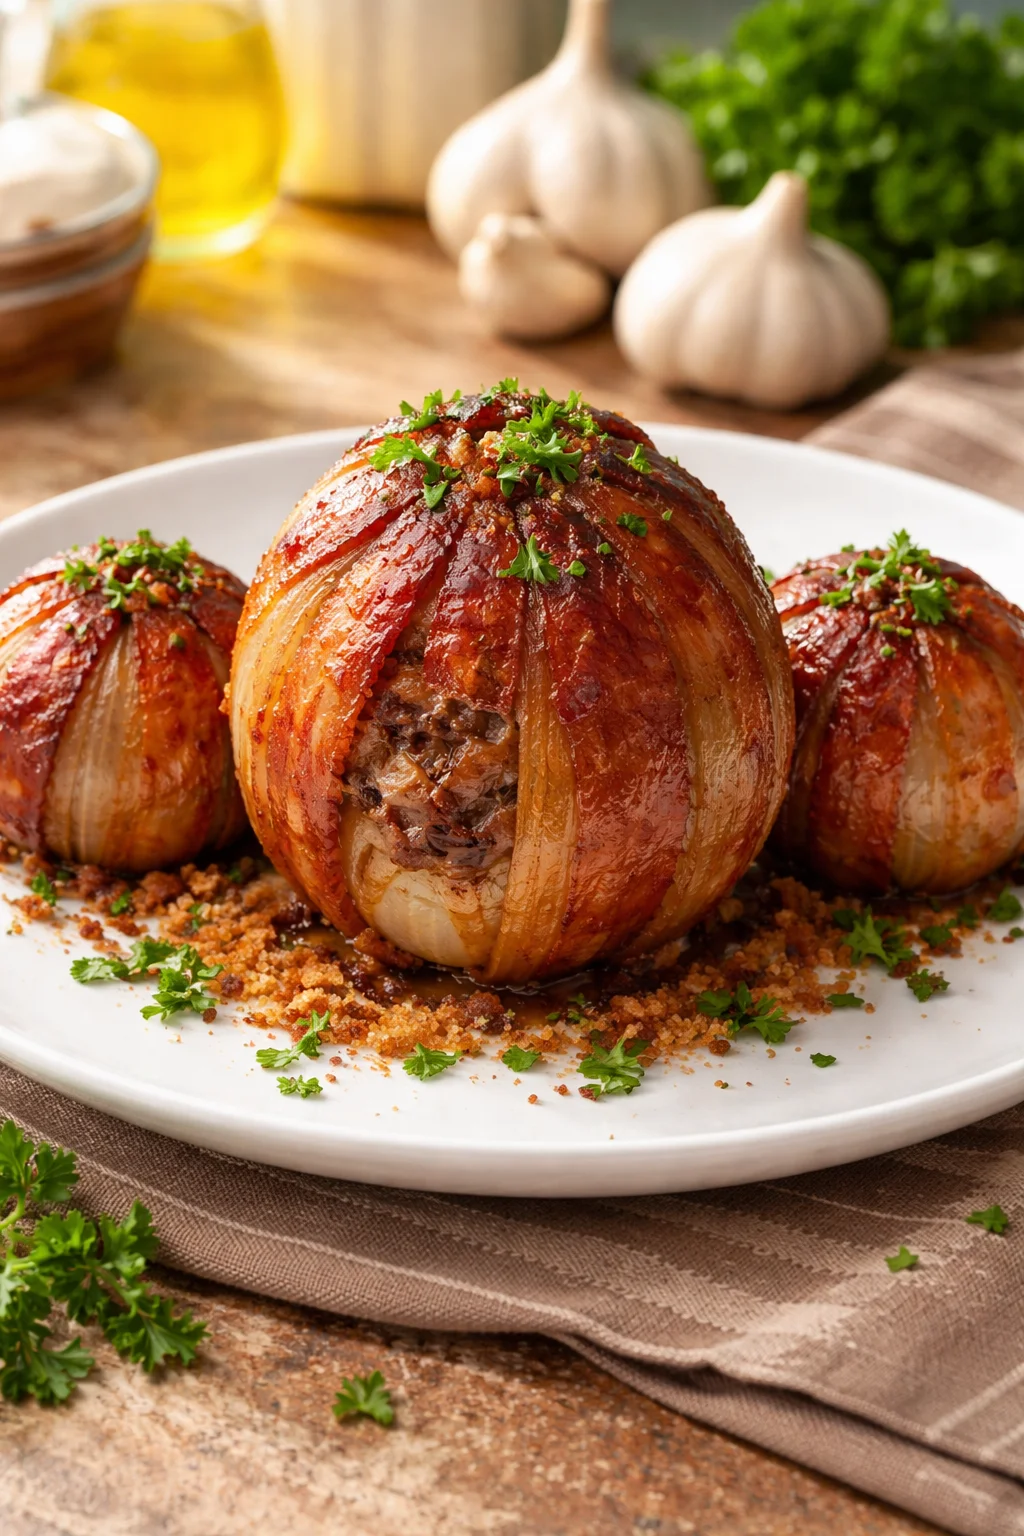
The Story Behind This Recipe
Here’s why I love this Bacon Wrapped Stuffed Onion Bombs: it uses pantry staples and it tastes like a weekend dinner. Bacon Wrapped Stuffed Onion Bombs are my go to party trick when I need something that feels fun, filling, and a little bit over the top…
Helpful Items For This Recipe
I have made these enough times to learn that a few tools make the whole thing way easier, especially when the onions want to slide around and the bacon wants to unravel.
What you will want nearby:
- Sharp knife for trimming the onion and slicing it cleanly in half
- Small spoon to help separate onion layers without tearing them
- Mixing bowl for the meat and seasoning
- Rimmed baking sheet with foil, or a grill safe pan if you are grilling
- Instant read thermometer so you do not have to guess
- Toothpicks to pin the bacon in place
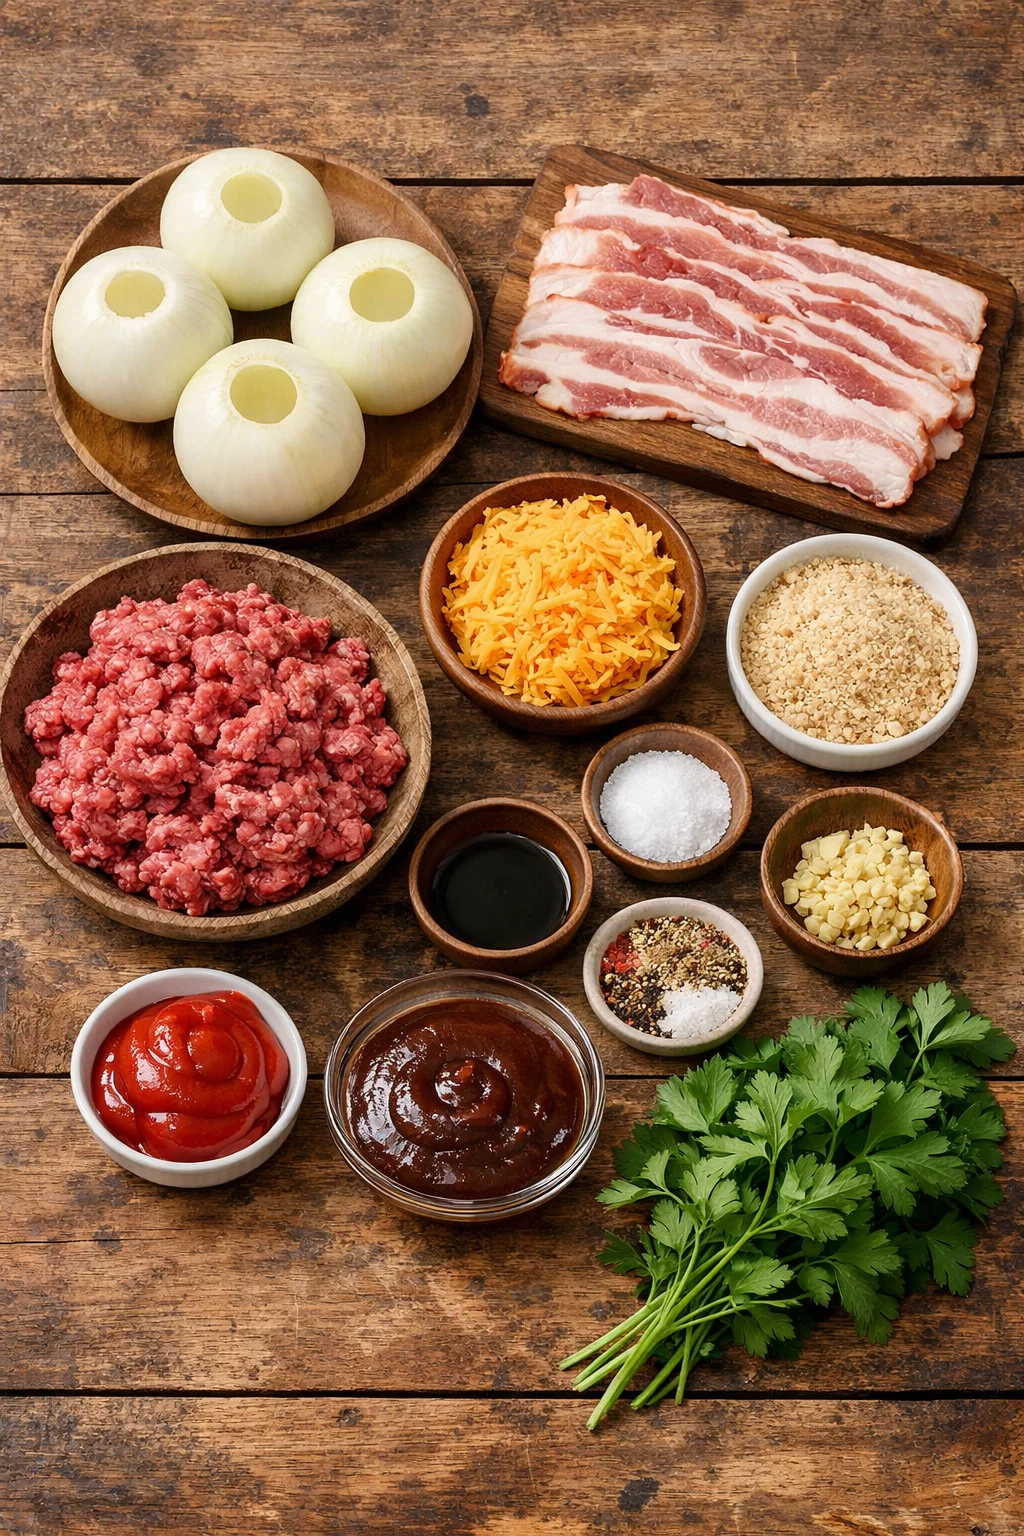
Ingredient wise, keep it simple. I usually use ground beef, shredded cheese, a little BBQ sauce, and basic seasonings. If you are in a bacon mood, you might also like this French onion soup recipe on colder nights because it hits that same cozy onion flavor note.
;
How Do You Make Bacon Wrapped Onion Bombs? {video_youtube}
This is the part that sounds tricky until you do it once. The onion is basically your edible bowl, the filling goes inside, and the bacon is the crispy jacket.
Step by step, the simple way
1. Pick the right onions. Go for large yellow onions. You want big layers that can hold filling. Peel them and trim off the ends so they sit flat.
2. Par cook if you want them softer. If you like a softer onion, you can microwave whole onions for about 2 to 3 minutes, or simmer them for 5 minutes, then cool. This makes separating layers less frustrating.
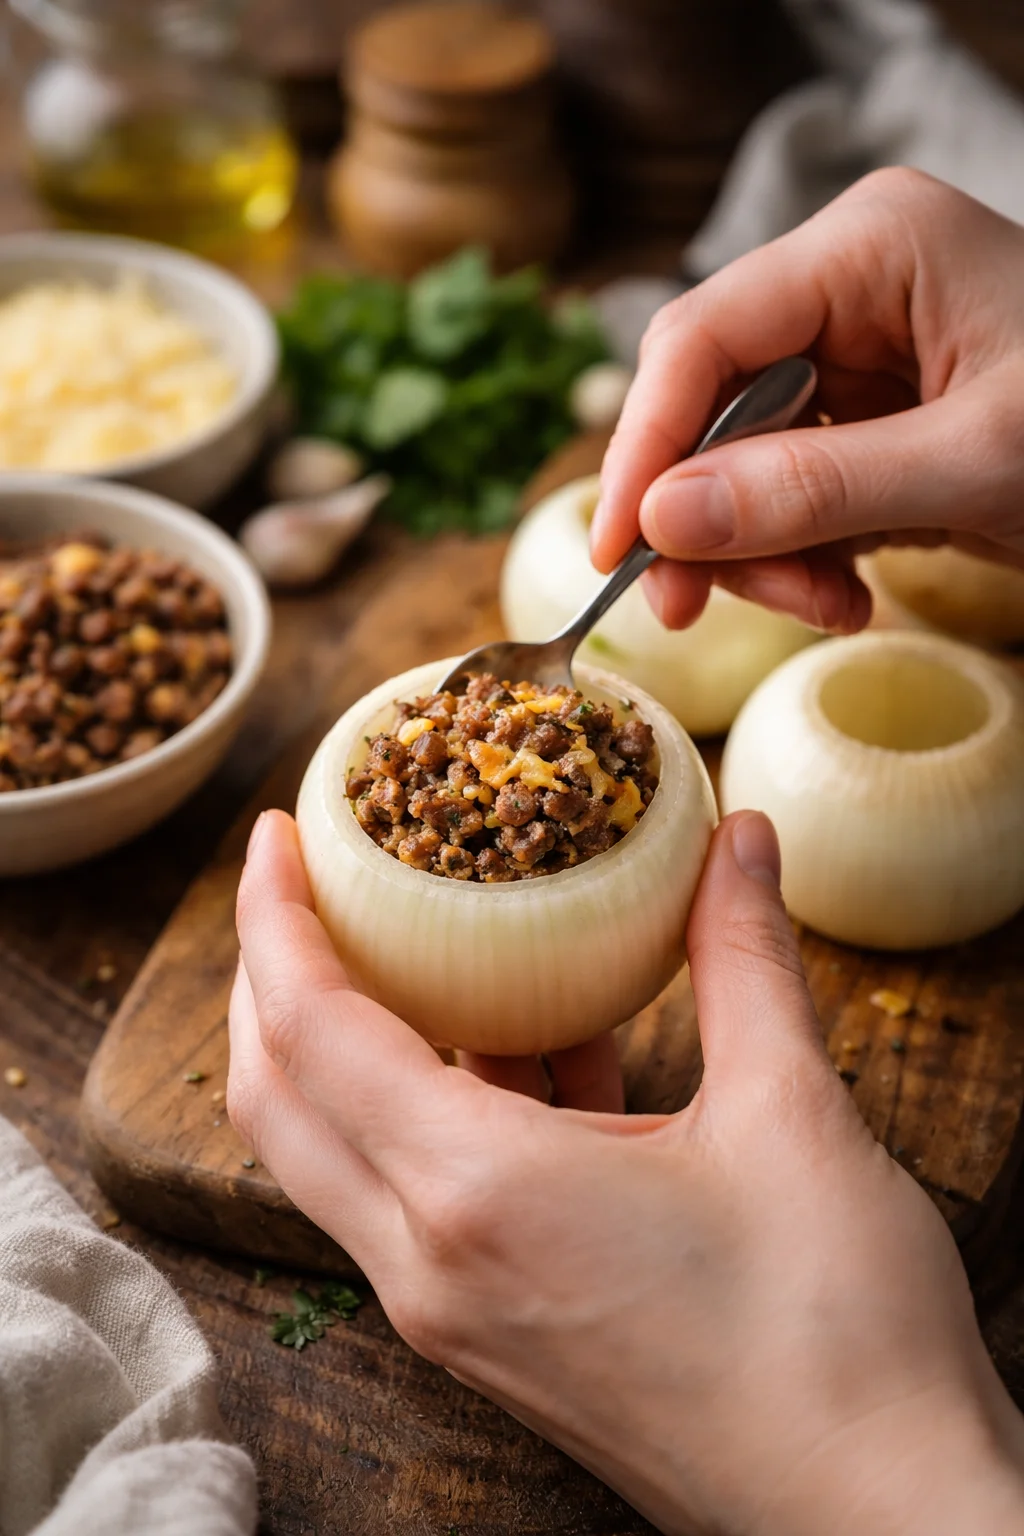
3. Split and separate. Cut each onion in half from top to bottom. Then gently pull apart the layers. You are looking for pairs of similar sized layers that can nest together like a little shell. I usually use two or three layers per bomb.
4. Mix your filling. In a bowl, combine ground beef with salt, pepper, garlic powder, and a little smoked paprika. Add shredded cheddar or pepper jack. If you like that sweet and tangy vibe, mix in a spoon or two of BBQ sauce.
5. Stuff the onions. Press a little meat mixture into one onion layer, then cap it with another layer to form a ball shape. Do not overstuff or it will squeeze out while cooking.
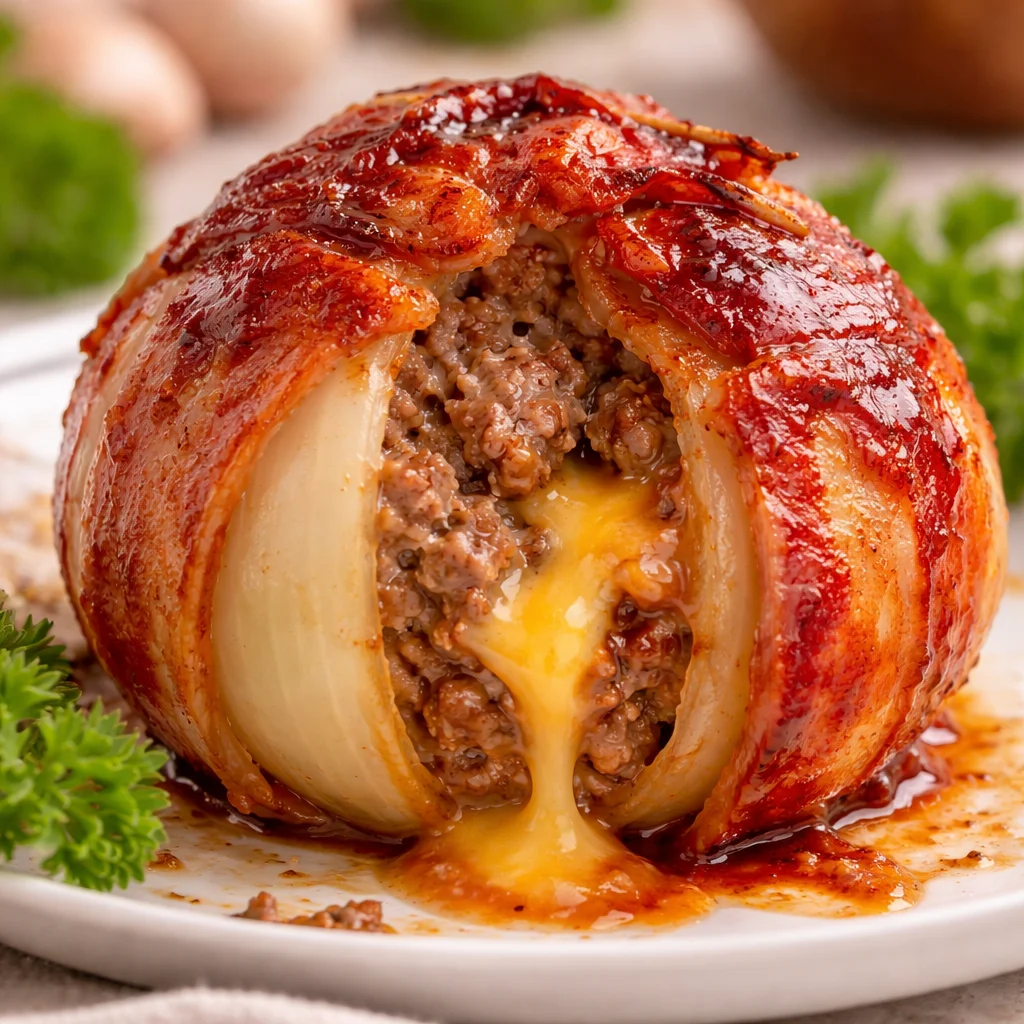
6. Wrap with bacon. Wrap each stuffed onion ball with 2 to 3 strips of bacon, depending on size. Overlap the ends and secure with toothpicks. If your bacon is super thick, it might need more time to crisp.
7. Season the outside. I sprinkle a little BBQ rub or just pepper on the bacon. Some days I brush with BBQ sauce near the end, but not too early or it can burn.
8. Cook. Bake at 400 F until the bacon is crisp and the meat is cooked through, usually 35 to 50 minutes depending on size. On a grill, use indirect heat and close the lid. Add sauce in the last 10 minutes if you want that sticky finish.
When I am making these for game day, I usually put out a couple of other bacon snacks too. Bacon wrapped smokies are basically guaranteed to disappear first, so I make extra and accept my fate.
“I brought these to a family cookout and my brother literally stood by the tray waiting for the next batch. The onion gets sweet, the bacon gets crisp, and the cheesy meat center is unreal.”
Can you Freeze BBQ Bacon Wrapped Onion Bombs?
Yes, and this is one of my favorite things about them. Bacon Wrapped Stuffed Onion Bombs are a lifesaver when you want to prep ahead for a busy weekend. The trick is freezing them the right way so the bacon does not get weird and the onions do not turn mushy.
Best way to freeze them (before cooking)
Assemble the bombs fully, including the bacon wrap. Then:
1. Place them on a parchment lined tray and freeze for 1 to 2 hours until firm.
2. Move them into a freezer bag or airtight container. Label with the date.
3. Freeze up to 2 months for best taste.
Cooking from frozen: I recommend thawing overnight in the fridge so the onion and meat cook evenly. If you cook straight from frozen, you can do it, but you will need more time and the bacon can overbrown before the center is done. If you are in a meal prep phase, you might also like cheese stuffed meatballs since they freeze nicely too and feel just as comforting.
How to See if These are Done?
This is the part I take seriously because nobody wants undercooked ground beef. Also, onions can look browned on the outside but still be too firm if they are huge.
Use these doneness checks:
1. Temperature is king. Stick an instant read thermometer into the meat center. You want 160 F for ground beef.
2. Bacon crispness. The bacon should be deep golden and look set, not pale and floppy. If the meat is done but bacon needs crisping, pop them under the broiler for 1 to 2 minutes and watch closely.
3. Onion texture. Poke the onion with a fork. It should slide in with a little resistance, not feel raw and crunchy.
4. Rest time. Let them rest 5 minutes. The juices settle and they hold together better when you bite in.
One more thing. If you brushed on BBQ sauce, you will see it bubbling and thickening near the end. That is when the kitchen starts smelling like a backyard cookout, even if you are baking indoors.
Like this recipe?
If Bacon Wrapped Stuffed Onion Bombs made your snack plans easier, I would honestly love to know. I am always tweaking fillings depending on the mood, like adding diced jalapeno, swapping in turkey, or using mozzarella for extra pull. If you want another cozy dinner with big flavor, bacon cheeseburger pie is a fun one when you want something hearty without standing over the stove all night.
Quick serving ideas: I serve these with extra BBQ sauce, ranch, or a simple slaw. And if you are doing a whole spread, add something fresh and crunchy on the side so the plate does not feel too heavy.
Common Questions
Do I have to cook them on a grill?
Nope. Oven baking works great. You still get crisp bacon, especially if you finish with a short broil at the end.
What kind of ground meat works best?
I usually use 80 20 ground beef for flavor. Ground turkey works too, just add a little extra seasoning and maybe a bit of cheese to keep it juicy.
Can I make them less spicy for kids?
Absolutely. Skip spicy rubs and jalapenos. Use mild cheddar and a sweeter BBQ sauce.
Why is my bacon not crisping?
Sometimes the bacon is too thick, or the bombs are sitting in too much grease. Use a rack on a baking sheet if you can, and finish with a quick broil.
Do I need toothpicks?
They help a lot, especially if your bacon strips are short. Just remember to remove them before serving, or warn everyone like I do.
Send These to Your Next Cookout
Once you get the hang of the onion layers, Bacon Wrapped Stuffed Onion Bombs become one of those recipes you can make without thinking too hard. You can prep them ahead, freeze a batch, and bake them whenever cravings hit. If you want more inspiration, I have bookmarked BBQ Bacon Wrapped Onion Bombs – Noshing With The Nolands and Bacon Onion Bombs – Low Carb with Jennifer because it is always fun seeing other seasoning ideas. Try them once, play with the fillings, and do not be surprised when people ask you to make them again next weekend.
Bacon Wrapped Stuffed Onion Bombs
Ingredients
Method
- Pick the right onions. Go for large yellow onions. Peel them and trim off the ends so they sit flat.
- Par cook if you want them softer by microwaving whole onions for about 2-3 minutes, or simmering them for 5 minutes, then cool.
- Cut each onion in half from top to bottom and gently pull apart the layers, looking for pairs of similar sized layers.
- In a bowl, combine ground beef, salt, pepper, garlic powder, and smoked paprika. Add shredded cheddar or pepper jack and BBQ sauce if desired.
- Press a little meat mixture into one onion layer, then cap it with another layer to form a ball shape.
- Wrap each stuffed onion ball with 2-3 strips of bacon, overlapping the ends and securing with toothpicks.
- Bake at 400°F (200°C) until the bacon is crisp and the meat is cooked through, usually 35-50 minutes depending on size.
- Alternatively, grill using indirect heat and close the lid. Add sauce in the last 10 minutes for a sticky finish.