
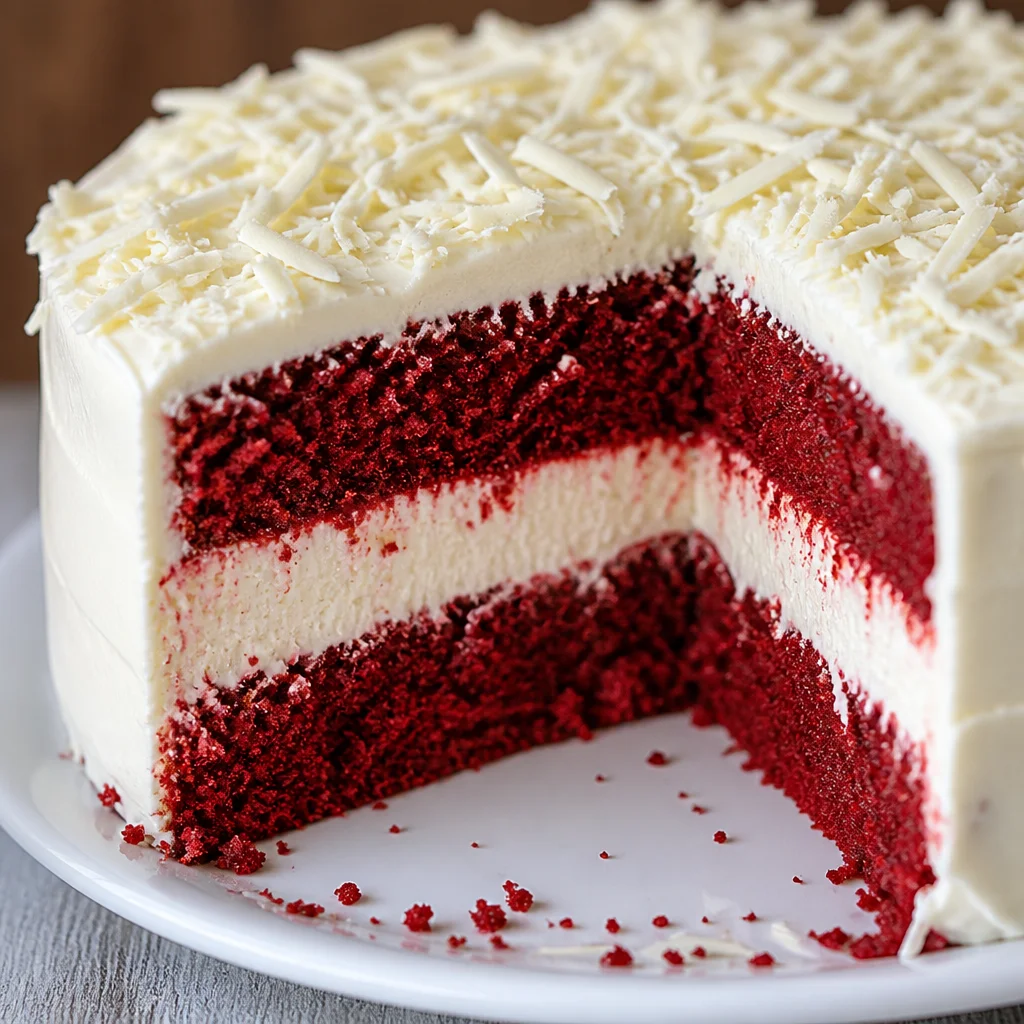
Copycat Cheesecake Factory Red Velvet Cheesecake is the dessert I make when I want that wow moment at home, but I do not want to pay restaurant prices or wait for a table. Maybe you have had that same situation where you are craving a thick slice of red velvet cake and creamy cheesecake, and nothing else will do. I have been there, standing in front of the fridge, hoping something magical appears. This recipe is my cozy solution, and it is honestly easier than it looks if you take it step by step. You will end up with bold red velvet flavor, a tangy cheesecake layer, and a frosting that makes people hover around your kitchen. 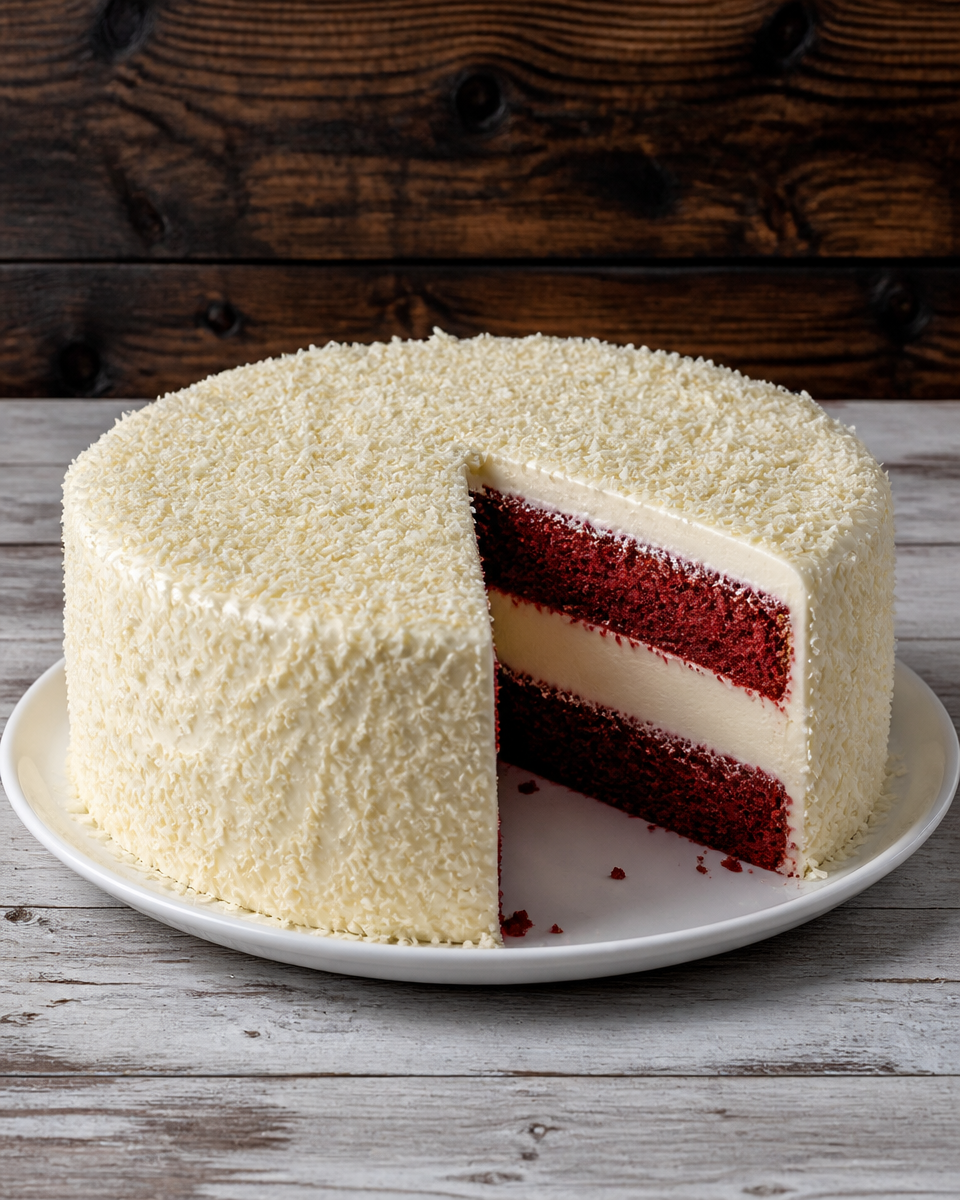
How to Make A Red Velvet Cheesecake Cake
This is the part where I tell you not to panic. The “fancy” look comes from stacking and chilling, not from complicated skills. I like to make the cheesecake layer first, chill it, then bake the red velvet cake layers while the cheesecake is setting up.
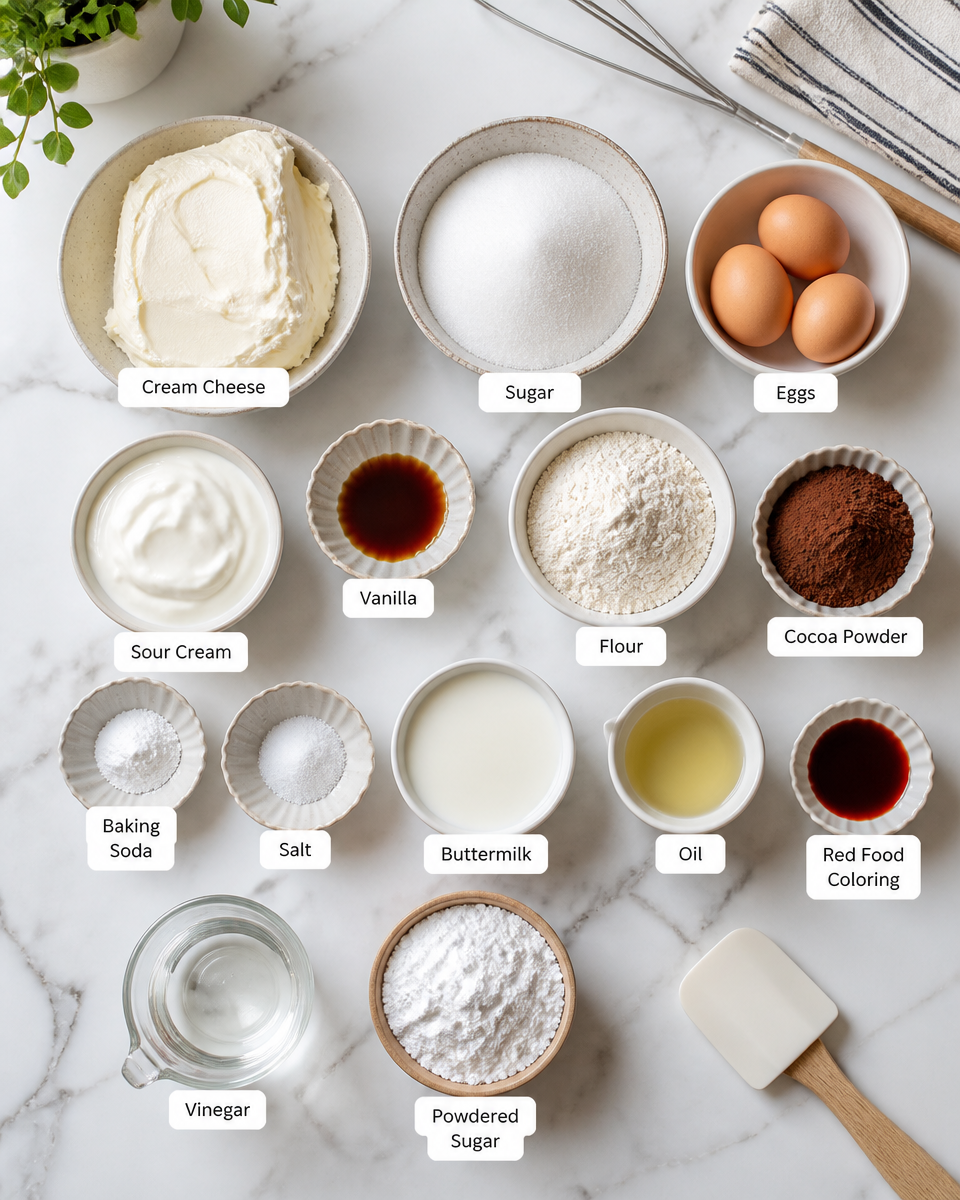
What you will need
Here is the simple breakdown. Try to use full fat ingredients for the cheesecake because it sets better and tastes richer. Also, **room temperature cream cheese** is non negotiable if you want a smooth filling.
- For the cheesecake layer: cream cheese, sugar, eggs, sour cream, vanilla
- For the red velvet cake: flour, sugar, cocoa powder, baking soda, salt, buttermilk, oil, eggs, vanilla, red food coloring, vinegar
- For the frosting: cream cheese, butter, powdered sugar, vanilla, a pinch of salt
If you love red velvet mashups, you might also want to peek at this fun one later: Red Velvet Cookie Dough Cheesecake. It is a different vibe, but still hits that sweet spot.
Step by step directions
I am going to explain it the way I do it in my own kitchen, including the little pauses that make it less stressful.
1) Bake the cheesecake layer
Preheat your oven to 325 F. Line the bottom of a springform pan with parchment and lightly grease the sides. Beat the cream cheese and sugar until smooth, then mix in eggs one at a time. Stir in sour cream and vanilla. Pour it in the pan. Bake until the center has a slight jiggle, usually 35 to 45 minutes. Cool it fully, then chill it for at least 4 hours, or overnight if you can.
2) Bake the red velvet cake layers
Preheat oven to 350 F. Grease and line two 8 inch or 9 inch round pans. Mix your dry ingredients in one bowl. In another bowl mix sugar, oil, eggs, vanilla, buttermilk, and red coloring. Stir dry into wet until just combined, then stir in vinegar. Split batter between pans and bake until a toothpick comes out clean, about 25 to 35 minutes depending on your pans. Cool completely.
3) Make the frosting
Beat cream cheese and butter until smooth. Add powdered sugar in batches, then vanilla and a pinch of salt. Chill 15 minutes if it feels too soft.
4) Assemble like a pro, even if you are not feeling like one
Place one red velvet layer on a plate. Spread a thin layer of frosting. Add the chilled cheesecake layer (I flip it out carefully using the parchment to help). Add another thin layer of frosting, then top with the second red velvet layer. Frost the top and sides. Chill at least 1 hour before slicing so it cuts clean.
When I am making Copycat Cheesecake Factory Red Velvet Cheesecake for a birthday, I will sometimes add cake crumbs around the edges for a cute finish. No pressure though. It still looks impressive even with simple swirls.
Expert Tips
I have made this enough times to know where people get tripped up, so here are my honest tips that save the day.
Chill, chill, chill
The cheesecake layer needs time in the fridge. If you try to stack it warm or even slightly soft, it can slide around and crack. Cold cheesecake is your best friend.
Do not overmix the cake batter
Once the flour is in, stir just until you do not see dry pockets. Overmixing can make the cake a little tough, and we want that soft, bakery style bite.
Use a serrated knife for clean slices
Wipe the blade between cuts. It sounds extra, but it makes those pretty layers show up like a menu photo.
Make ahead is actually easier
This dessert is better the next day because the layers settle and the flavors meld. I usually bake the cheesecake the night before, then bake cake layers in the morning, assemble in the afternoon.
I made this for my sister’s birthday and everyone said it tasted like the real Cheesecake Factory slice. The best part was how clean the layers looked after chilling overnight. I am officially the dessert person now.
If you ever want a cheesecake shortcut night, this fluffy one is surprisingly simple: 2 Ingredient Japanese Cheesecake. Totally different texture, but such a fun trick.

Related Recipes
Once you get hooked on this style of dessert, you start noticing other layered and red velvet treats everywhere. These are some recipes I bookmark when I want something similar, or when I want to switch it up.
If you like the red velvet plus creamy combo, you might enjoy this twisty bake: Layered Red Velvet Cheesecake Bundt Cake. It is great when you want something easier to slice for a crowd.
When I want chocolatey and chewy instead of creamy, I go for these: Cookies and Cream Red Velvet Brownies. They are a huge hit at potlucks because you can just grab and go.
And yes, I know this is a dessert post, but sometimes you need a cozy dinner first. If pasta night is calling, this is my favorite comfort move: Copycat Olive Garden Alfredo Sauce. Then you bring out the cheesecake and suddenly it is a whole restaurant experience at home.
I make Copycat Cheesecake Factory Red Velvet Cheesecake most often for celebrations, but honestly it is also a nice weekend baking project when you want something satisfying to do.
Dietary Guide
This dessert is indulgent, no way around it, but you can still make smart swaps depending on what you need. Here is a practical guide so you know what will work and what might change the texture.
Gluten free
Use a 1 to 1 gluten free flour blend in the cake layers. The cheesecake layer is already naturally gluten free, just make sure any vanilla or other add ins are certified if you are sensitive.
Lower sugar
You can reduce sugar slightly in the cheesecake and frosting, but do not cut it too aggressively or it can impact set and taste. I have had good results reducing powdered sugar in the frosting by about 1 cup and adding a pinch more salt and vanilla to balance.
Dairy free
This is the hardest version to swap because cheesecake relies on dairy. There are plant based cream cheese options, but results vary a lot. If you try it, chill longer and expect a softer set.
Portion tips
This is rich. I cut smaller slices than you would for regular cake. People can always go back for another sliver, and they usually do.
Copycat Cheesecake Factory Red Velvet Cheesecake keeps well in the fridge for up to 5 days in a covered container. You can also freeze slices. Wrap them tightly, then thaw overnight in the fridge.
A Red Velvet Cake with a Cheesecake Layer
This combo works because each part pulls its weight. The red velvet cake is soft with that light cocoa flavor, and the cheesecake layer adds tang and creaminess so the whole slice feels balanced. The frosting ties it together, and if you keep it chilled, you get that classic, clean bite where every layer stays in place.
When someone asks me what makes it taste like the restaurant version, I think it is the simple stuff. Use buttermilk, do not skimp on chilling time, and make sure your cream cheese is smooth before you add anything else. The rest is just stacking and patience.
I also love how forgiving it is. If the cake layers dome a bit, just level them. If the frosting looks messy, cover it with crumbs. This is the kind of dessert that still gets applause even when it is not perfect.
Common Questions
1) Can I make Copycat Cheesecake Factory Red Velvet Cheesecake in advance?
Yes, and it is actually better. Make it the day before and keep it chilled so the layers set and slicing is easier.
2) What if I do not have buttermilk?
Mix 1 tablespoon lemon juice or vinegar with 1 cup milk and let it sit 5 minutes. It is not exactly the same, but it works well in red velvet cake.
3) Why did my cheesecake crack?
Usually it is from overbaking or cooling too fast. The good news is that this is a layered cake, so even if it cracks, it will be hidden inside and still taste great.
4) How do I keep the layers from sliding?
Chill the cheesecake layer until firm, use a thin frosting layer as glue, then chill the fully assembled cake before serving.
5) Can I use a boxed red velvet cake mix?
You can. It will still be tasty and it saves time. I prefer homemade when I have the energy, but there is no shame in using a mix for busy weeks.
Your next baking win
If you have been craving that iconic slice, this Copycat Cheesecake Factory Red Velvet Cheesecake is totally doable at home with a little planning and a good chill. Focus on the order, cheesecake first, cake second, stack when cold, and you will get those pretty layers. If you want to compare approaches, I also like reading versions like Red Velvet Cheesecake Cake – Recipe Girl and Copycat Cheesecake Factory Red Velvet Cake Cheesecake because they can spark new ideas for decorating and timing. Now go clear a little fridge space, put on a playlist, and make it happen. You are going to love that first chilled bite.
Red Velvet Cheesecake
Ingredients
Method
- Preheat your oven to 325°F (165°C). Line the bottom of a springform pan with parchment and lightly grease the sides.
- Beat cream cheese and sugar until smooth.
- Mix in eggs one at a time, then stir in sour cream and vanilla.
- Pour mixture into the prepared pan and bake until the center has a slight jiggle, about 35 to 45 minutes.
- Cool fully, then chill for at least 4 hours, preferably overnight.
- Preheat oven to 350°F (175°C) and grease and line two 8-inch or 9-inch round pans.
- In one bowl, mix your dry ingredients: flour, sugar, cocoa powder, baking soda, and salt.
- In another bowl, mix sugar, oil, eggs, vanilla, buttermilk, and red food coloring.
- Stir in dry ingredients until just combined and then stir in vinegar.
- Split the batter between pans and bake until a toothpick comes out clean, about 25 to 35 minutes.
- Cool completely.
- Beat cream cheese and butter until smooth.
- Add powdered sugar in batches, then stir in vanilla and a pinch of salt.
- Chill for 15 minutes if too soft.
- Place one red velvet layer on a plate and spread a thin layer of frosting.
- Add the chilled cheesecake layer, then another thin layer of frosting.
- Top with the second red velvet layer and frost the top and sides.
- Chill for at least 1 hour before slicing.
