


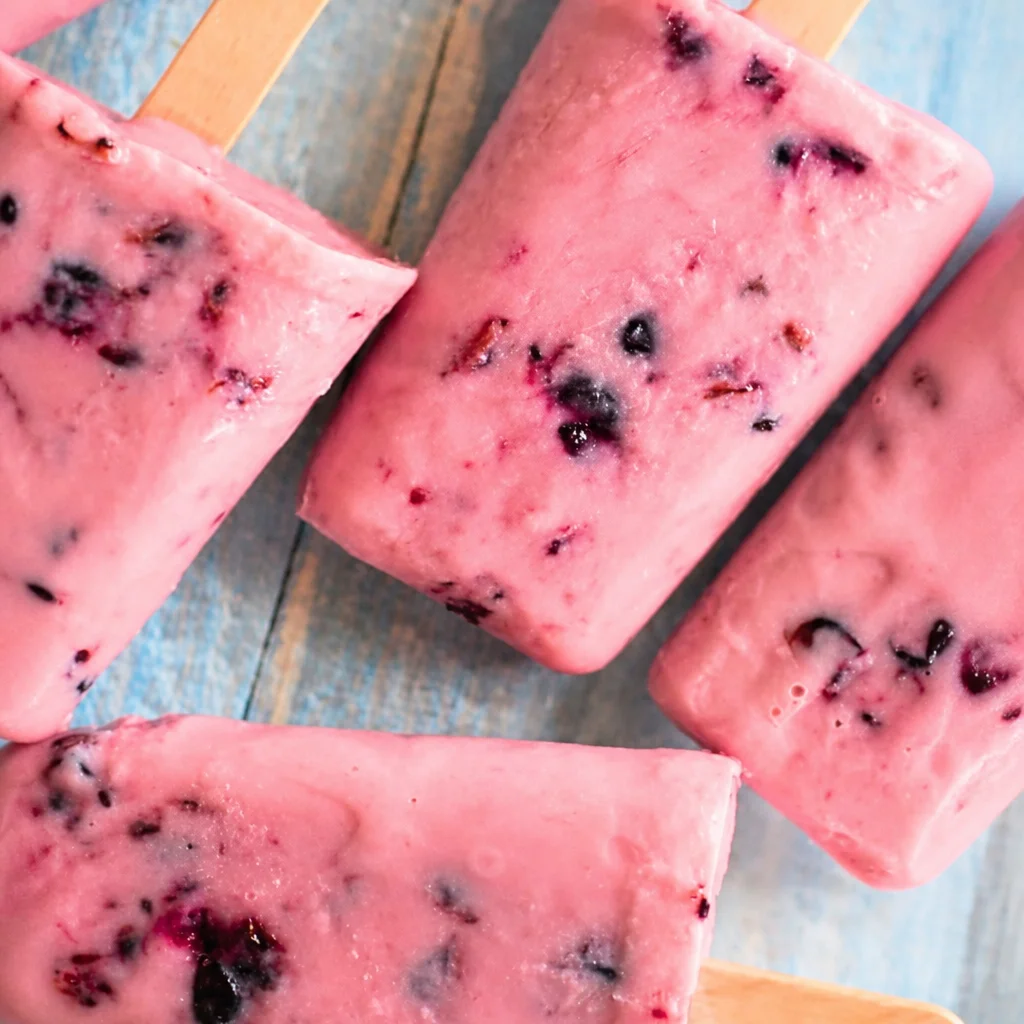
Greek Yogurt Popsicles are my go to fix for those afternoons when it is too hot to bake, too late for coffee, and I still want something sweet. If you have ever stood in front of the freezer door hoping ice cream will magically feel “light,” I get it. I started making these because store bought pops can be weirdly icy, overly sweet, or full of stuff I cannot pronounce. This recipe is creamy, tangy, and honestly kind of addictive in the best way. Plus, it is the sort of snack that makes you feel like you have your life together, even if your sink says otherwise. 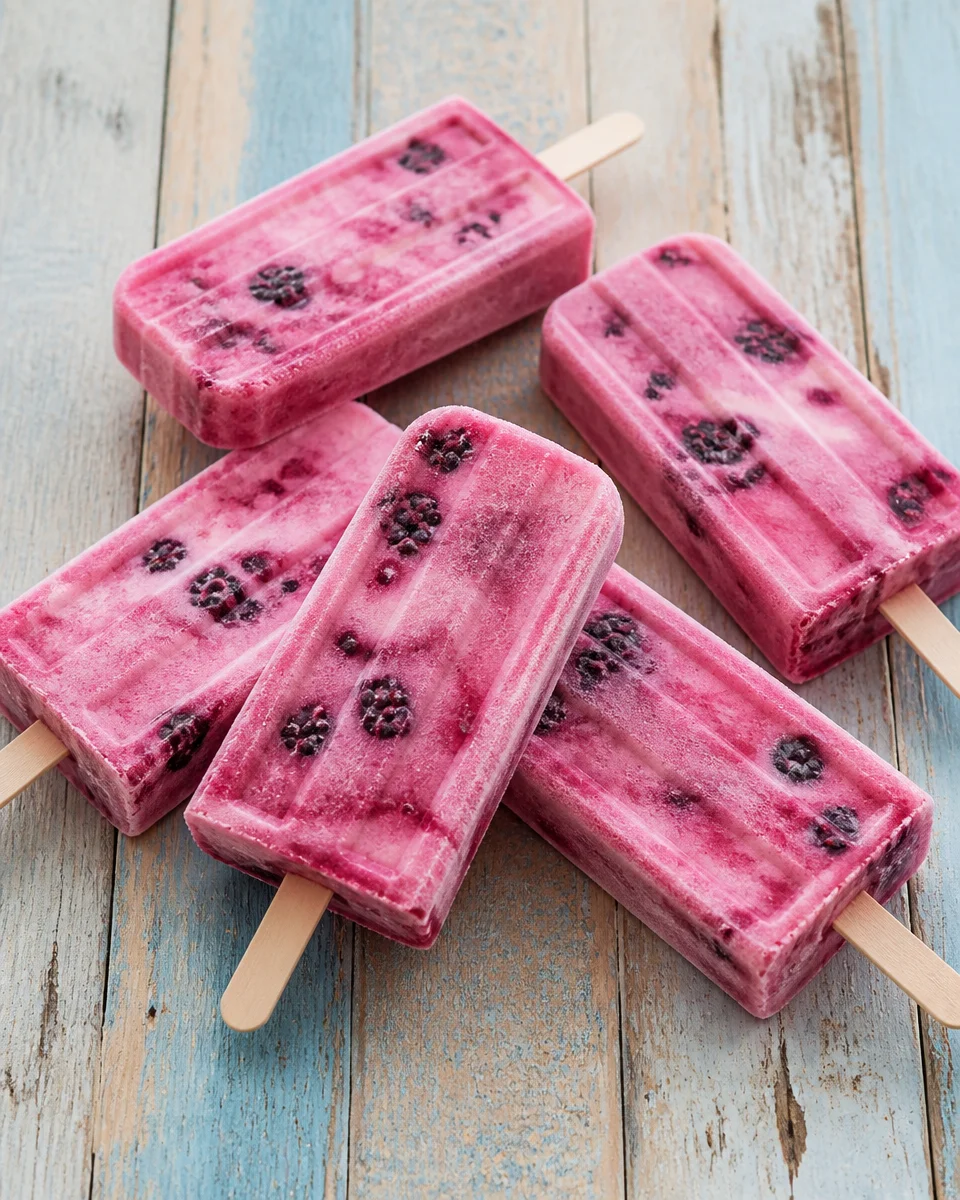
The Story Behind This Recipe
Hey, I’m Alexandraa! This Greek Yogurt Popsicles was built for family tables: simple steps, reliable results, and flavor that makes people ask for seconds. Greek Yogurt Popsicles are my go to fix for those afternoons when it is too hot to bake, too late for coffee, and I still want…
Key Benefits of Greek Yogurt Popsicles
The biggest win with Greek Yogurt Popsicles is the texture. You get that creamy bite without needing heavy cream or fancy techniques. Greek yogurt brings natural tang, and when you pair it with fruit and a little sweetener, it tastes like a real treat, not “diet food pretending to be dessert.”
Here are a few reasons I keep these in my freezer all summer:
- Protein and staying power: Greek yogurt has more protein than regular yogurt, so these feel like a snack that actually holds you over.
- Easy on the sugar: You control the sweetness, so you can keep it light or go a little more dessert like.
- Endless flavors: Berries, mango, cocoa, peanut butter, lemon, vanilla, even a swirl of jam.
- Kid and adult friendly: Kids love the “popsicle” factor, adults love that it tastes fresh.
When I am planning a casual summer menu, I like pairing these with something savory and simple. If you are doing a backyard dinner, check out Greek souvlaki skewers. Something about grilled, herby food plus a cold yogurt pop afterwards just works.
Common Misconceptions About Greek Yogurt Popsicles
Let’s clear up a few things, because I used to believe some of these too.
Misconception 1: They always turn out icy.
They can, but it is usually because the mixture is too watery. Using thick Greek yogurt, not adding too much juice, and mixing in a little honey or maple syrup helps keep them creamy.
Misconception 2: You need a blender and fancy molds.
A blender is nice if you want super smooth pops, but you can also just mash fruit with a fork and stir it in. And if you do not have molds, small paper cups and popsicle sticks work fine. I have done this more times than I can count.
Misconception 3: They taste sour.
Greek yogurt has tang, yes, but once you add fruit and a bit of sweetener, it balances out. If you are sensitive to tang, add a splash of vanilla and a little extra honey.
Misconception 4: They are only for “healthy eating” days.
Nope. You can make them feel indulgent with chocolate chips, crushed cookies, or a peanut butter swirl. If you like that vibe, you will probably love frozen greek yogurt peanut butter bites too. Same freezer snack energy, different format.
“I made a batch with strawberries and honey, and my kids ate them for breakfast two days in a row. I tried one and ended up making a second batch the same night.”
Step-by-Step Guide to Greek Yogurt Popsicles
This is the part where you realize how little effort it takes. The base is simple, and once you have it, you can riff on flavors all week.
What you will need and basic ingredients
I am listing my favorite “starter” version, then you can mix and match.
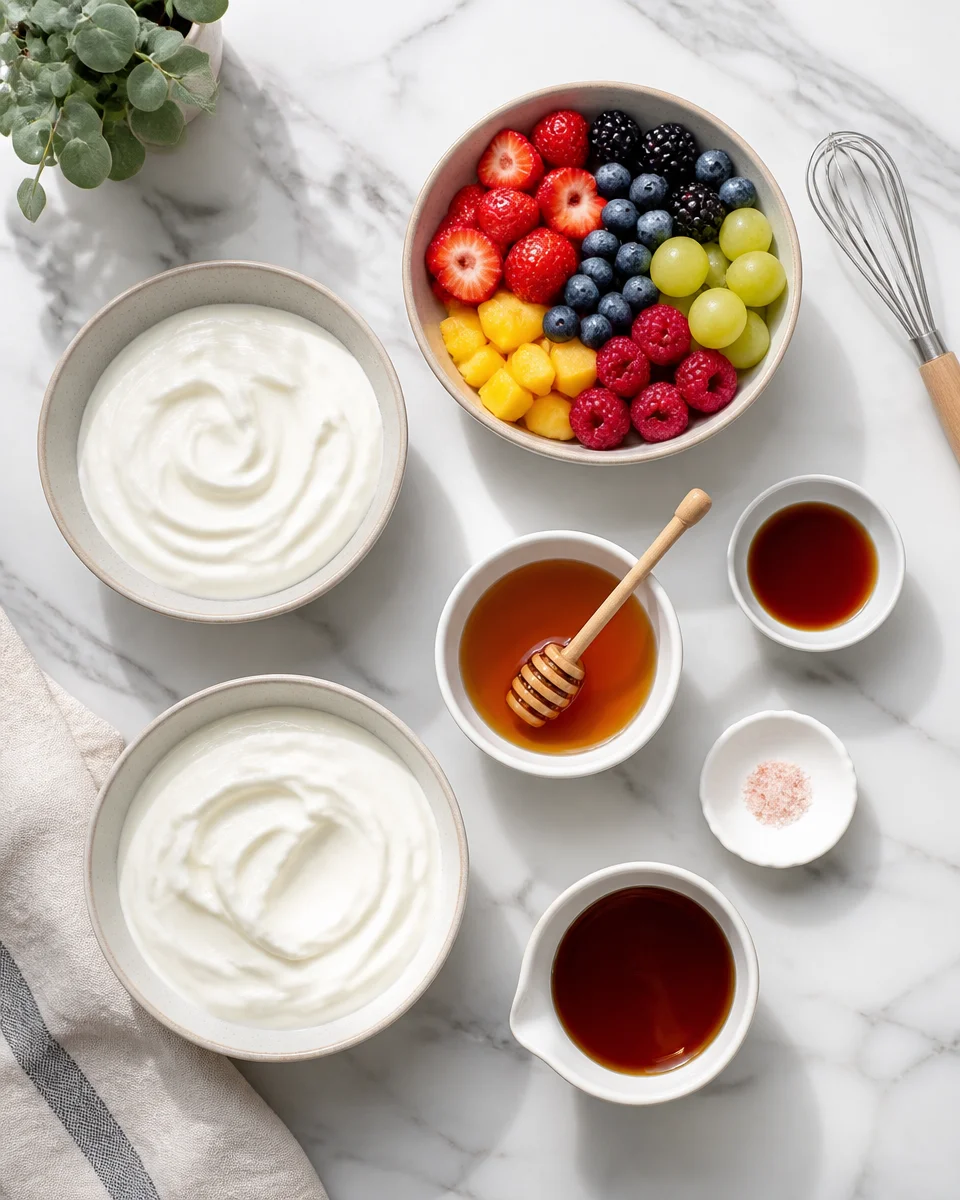
- 2 cups plain Greek yogurt (full fat is creamiest, but low fat works)
- 1 to 2 cups fruit (berries, mango, peaches, bananas, or a mix)
- 2 to 4 tablespoons honey or maple syrup (to taste)
- 1 teaspoon vanilla (optional but highly recommended)
- Pinch of salt (optional, helps the flavor pop)
Tools are simple too: popsicle molds or small cups, sticks, and a spoon. A blender is optional.
Mixing and filling the molds
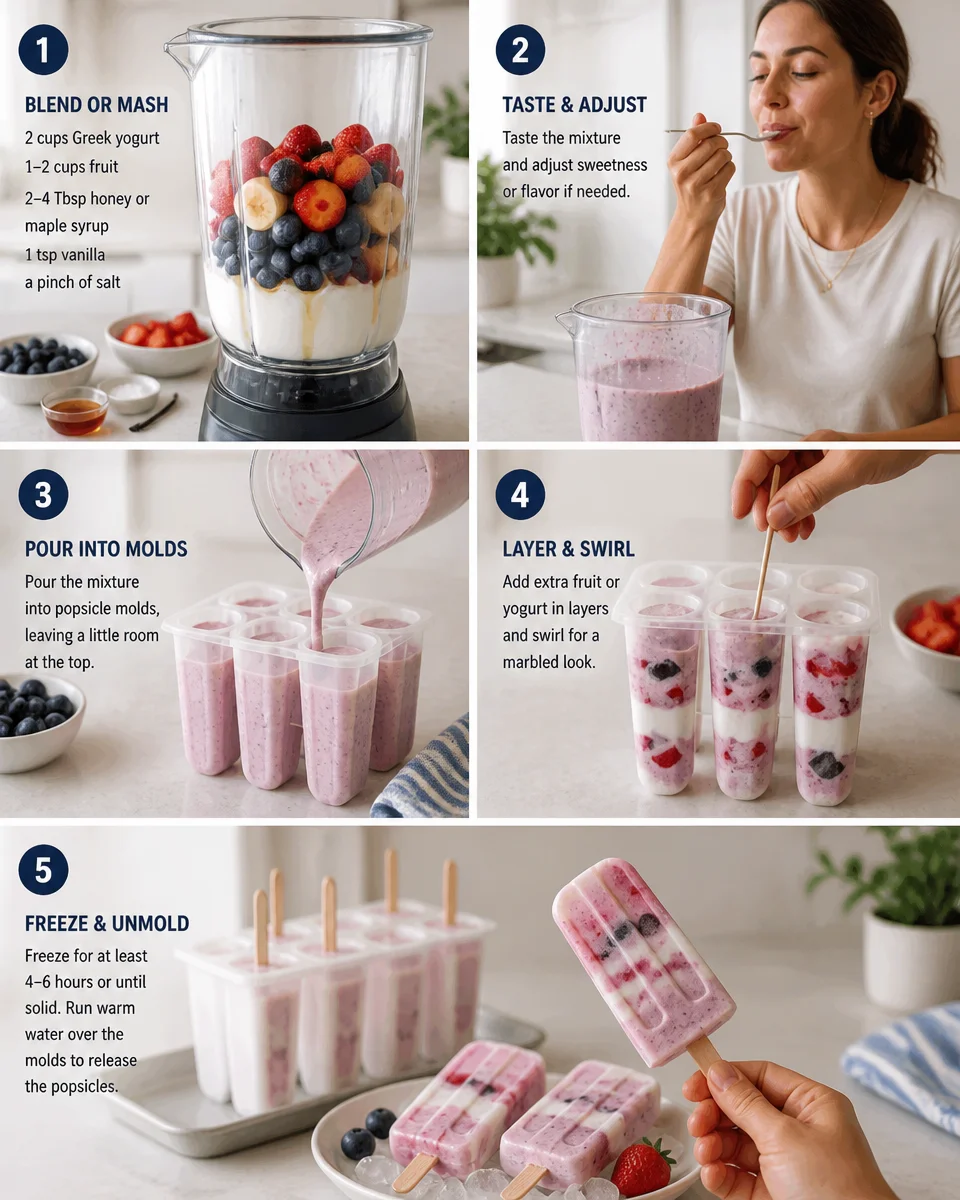
1) If you want smooth pops, blend the yogurt, fruit, sweetener, vanilla, and salt until creamy. If you want texture, mash the fruit and stir it into the yogurt instead.
2) Taste the mix. This is important. Cold things taste less sweet once frozen, so make it slightly sweeter than you think you want.
3) Spoon or pour into molds. Tap them gently on the counter to remove air pockets.
4) If you want a cute layered look, do yogurt first, then fruit, then swirl with a butter knife. It does not have to be perfect. Mine never is.
Freezing and unmolding without frustration
Freeze for at least 5 to 6 hours, overnight is safest. To unmold, run the outside under warm water for about 10 to 20 seconds, then pull gently. If they fight you, warm water again. Do not yank, that is how sticks come out and your popsicle stays trapped like a tiny frozen prison.
While these are freezing, it is a good moment to think about what else you might want to serve with them. If you are meal prepping for the week, I rotate them with savory bowls like greek chicken bowls for lunches, then something cold and sweet later feels extra satisfying.
Best Practices for Greek Yogurt Popsicles
This is where a few small habits make a big difference. I am not saying you need to be precise, but these tips save you from disappointment.
Choose thick yogurt. If your Greek yogurt looks a little runny, strain it for 20 to 30 minutes in a fine mesh strainer or cheesecloth. Thicker yogurt equals creamier pops.
Sweeten a little more than you think. Freezing dulls sweetness. I always taste and adjust before pouring into molds.
Balance watery fruit. Super juicy fruit can make pops icy. If you are using watermelon or lots of citrus, combine it with banana or thicker fruit, or just use less juice.
Add mix ins at the end. Chocolate chips, chopped strawberries, granola bits, or coconut look and taste best when stirred in after blending.
Cover the molds. If your molds do not have lids, a little foil on top helps prevent freezer smells. Also, it keeps things from spilling if your freezer drawer is chaotic like mine.
If you want a dessert style version for guests, try a berry swirl and then slice a little cake on the side. This blackberry greek yogurt cake is a really nice match when you want something fruity but still cozy.
Frequently Encountered Challenges with Greek Yogurt Popsicles
Even easy recipes have a few “why did this happen” moments. Here are the ones I hear about the most, plus what I do.
Problem: The popsicles are too icy.
This usually means too much liquid or not enough fat. Use thicker yogurt, add a little mashed banana, or reduce watery fruit. A tablespoon or two of honey also helps with texture.
Problem: They taste bland after freezing.
Add more vanilla, a pinch of salt, or more sweetener next time. If you used very mild fruit, try adding lemon zest or using riper fruit.
Problem: Fruit sinks to the bottom.
If your base is thin, chunks will drop. Stir in chunks once the mixture is thicker, or freeze for 20 to 30 minutes, then stir gently and freeze again.
Problem: They will not release from the mold.
Warm water is your friend. Do not soak too long or they start melting. Short bursts of warm water, then wiggle and pull.
Problem: The stick comes out.
This happens if the mixture is not frozen enough or the stick was loose. If you are using cups, freeze for 45 minutes first, then insert sticks so they stand up better.
Common questions I get (and my real answers)
Can I use flavored Greek yogurt?
Yes. Just taste first and reduce extra honey so it does not get overly sweet.
How long do they keep in the freezer?
They are best in the first 2 to 3 weeks. After that they are still safe, but the texture can get a bit more icy.
Do I need full fat yogurt?
No, but full fat makes the creamiest Greek Yogurt Popsicles. Low fat still works, just expect a slightly lighter texture.
Can I make them dairy free?
You can try a thick plant based Greek style yogurt. Coconut based ones usually freeze creamier than almond based ones.
What is the best fruit to start with?
Banana and strawberries are the easiest, forgiving combo. Mango is also amazing if it is ripe.
If you are putting together a whole Greek inspired week, I also love having something simple like greek chicken orzo delight in the fridge. Then dessert can be as easy as grabbing a pop from the freezer.
A sweet little freezer habit worth keeping
If you take one thing from my rambling, let it be this: Greek Yogurt Popsicles are incredibly doable, and once you make one batch, you will start dreaming up your own flavors. Keep your base thick, taste before freezing, and do not stress the swirls. If you want more ideas from other cooks, I liked reading Greek Yogurt Popsicles (3 Ingredients) – Eating Bird Food and this helpful guide from The Frozen Summer Treat You’re Probably Not Making at Home … for extra tips on fruit combos and texture. Make a batch this week, stash them in the back of the freezer, and enjoy that tiny moment of joy when you remember they are there.
Greek Yogurt Popsicles
Ingredients
Method
- Blend the yogurt, fruit, sweetener, vanilla, and salt until creamy, or mash the fruit and stir it into the yogurt if you prefer texture.
- Taste the mixture. Cold things taste less sweet when frozen, so make it slightly sweeter than you think you want.
- Spoon or pour the mixture into molds and tap them gently on the counter to remove air pockets.
- For a cute layered look, layer yogurt first, then fruit, and swirl with a butter knife.
- Freeze for at least 5 to 6 hours, overnight is safest.
- To unmold, run the outside under warm water for 10 to 20 seconds, then pull gently. If they resist, run under warm water again.