


CARAMEL APPLE DESSERT CUPS are my go to fix when I want something cozy and sweet but I do not want to bake a whole pie. You know that feeling when guests are coming, the kitchen is already a mess, and you still want a dessert that looks like you tried. These little cups save me every time. They have that warm apple pie vibe, a buttery crunch, and a caramel drizzle that makes people hover near the fridge for seconds. Also, they are portioned out, so serving is basically stress free. 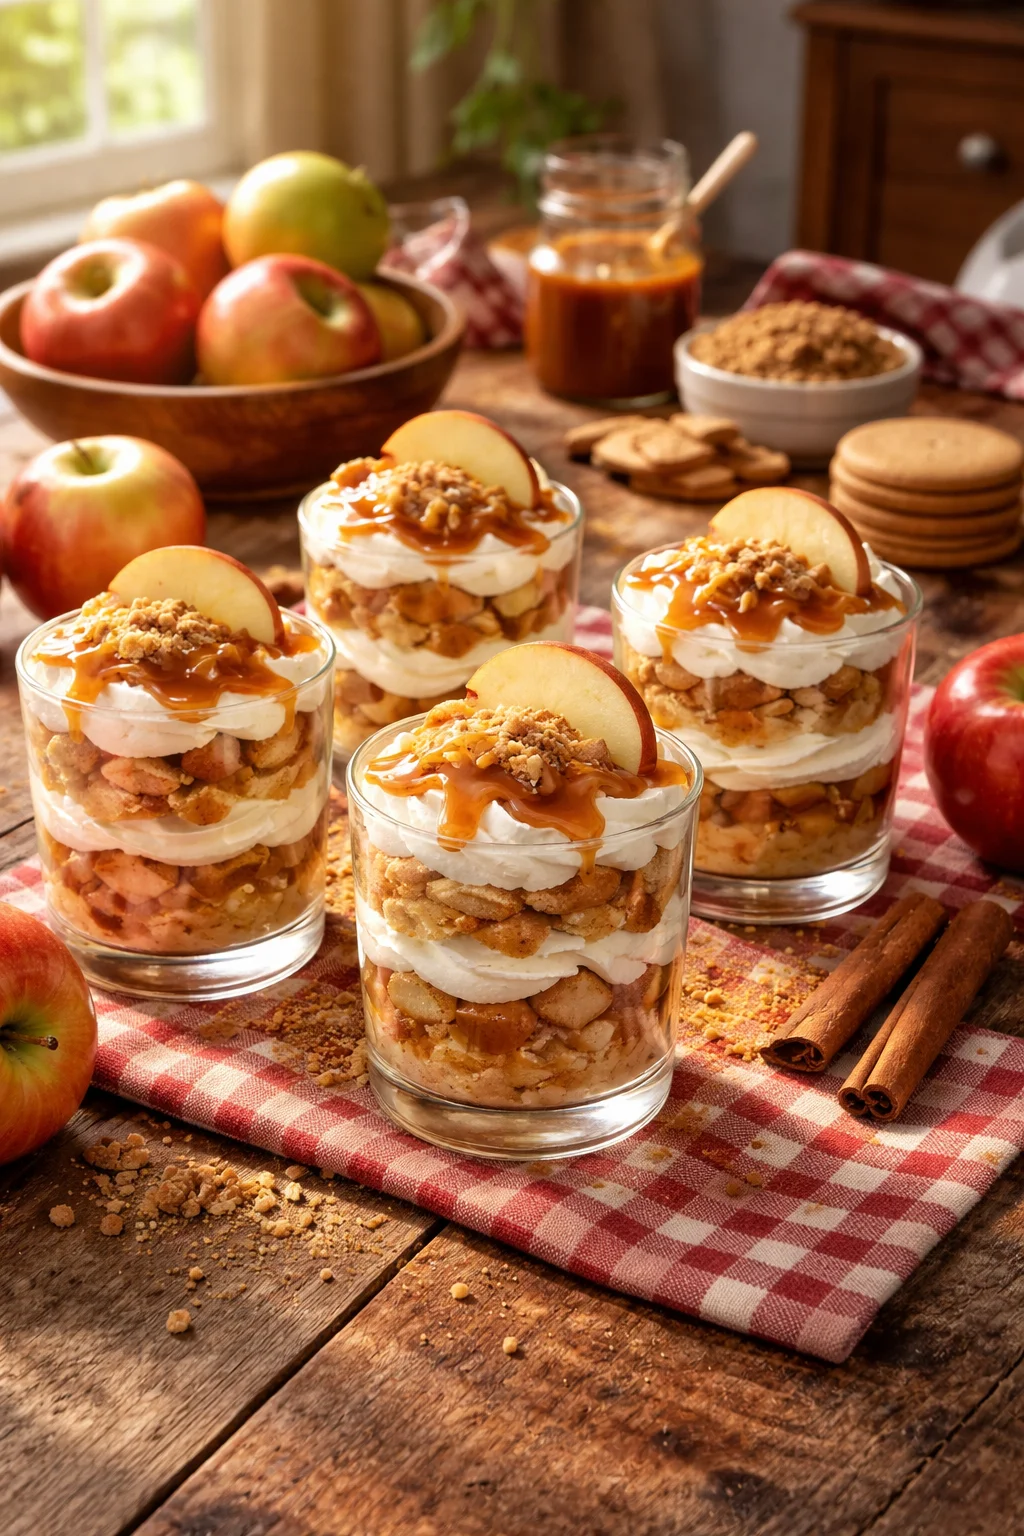
The Story Behind This Recipe
Here’s why I love this Caramel Apple Dessert Cups: it bakes up beautifully and it tastes like home. CARAMEL APPLE DESSERT CUPS are my go to fix when I want something cozy and sweet but I do not want to bake a whole pie.…
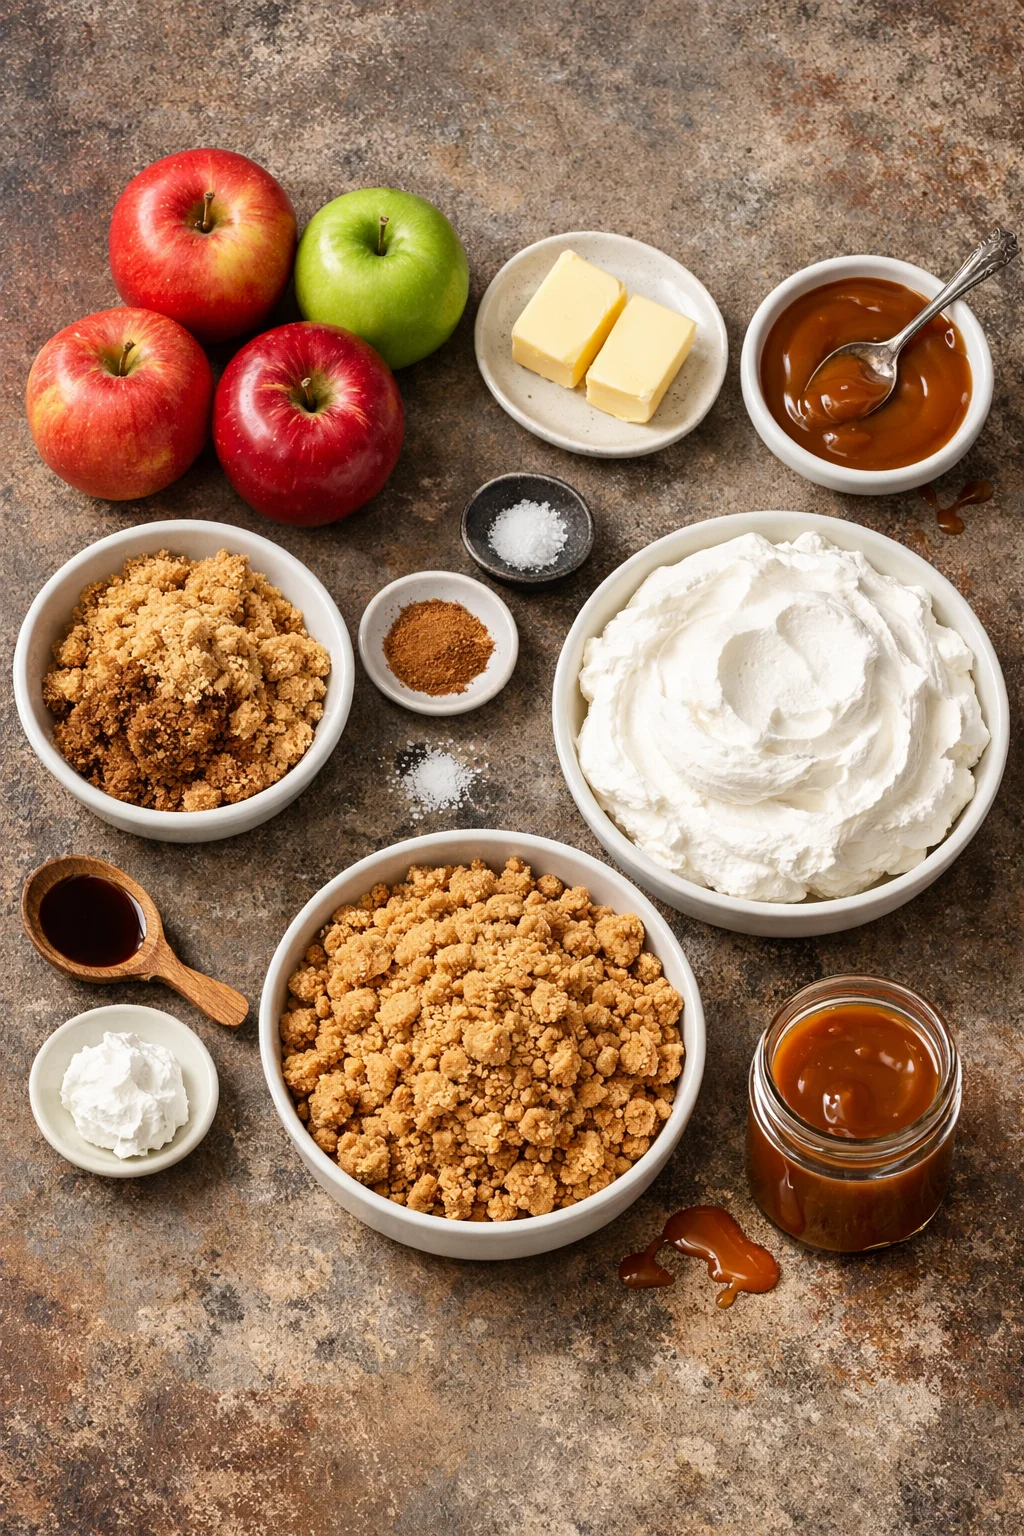
Ingredients for Caramel Apple Dessert Cups
I like to keep this recipe realistic, meaning I use ingredients I can find at any grocery store. You can make it more homemade if you want, but the basic version still tastes like something you would happily pay for at a cafe.
- Apples, 3 to 4 medium (I love Honeycrisp or Granny Smith for that tart bite)
- 2 tablespoons butter
- 2 to 3 tablespoons brown sugar
- 1 teaspoon cinnamon
- Pinch of salt
- 1 teaspoon vanilla (optional but so good)
- Whipped topping or whipped cream, about 2 cups
- Crushed cookies or graham crackers, about 1 and 1/2 cups
- Extra caramel sauce for drizzling (store bought or homemade)
- Optional add ins: chopped pecans, mini chocolate chips, a sprinkle of flaky salt
If you are in a major apple mood, you might also like my other caramel apple obsessions. This caramel apple bread is the kind of thing I slice “just a little piece” of, then somehow half the loaf is gone.
Tools & Supplies for Making Caramel Apple Dessert Cups
You do not need fancy gear here. I usually pull this together with whatever is clean in my kitchen, which is honestly part of the charm.
Here is what helps:
Clear cups are the big one because the layers look pretty with zero extra effort. I use 8 ounce plastic cups for parties, or small glass jars when I want to feel a little extra.
Grab these if you can:
- Skillet or medium pan for cooking the apples
- Cutting board and knife
- Mixing bowl for cookie crumbs (or just a zip bag and a rolling pin)
- Spoon for layering
- Piping bag or zip top bag (optional) if you want neat whipped layers
If you are into desserts that are already portioned like this, you should also peek at these oreo dessert cups. Same “easy but looks cute” energy.
How to Make Caramel Apple Dessert Cups
This is the part where you realize it is basically assembly with one quick apple cook. I usually make the apples first, let them cool a bit, then build the cups while I “taste test” the crumbs.
Step by step layering plan
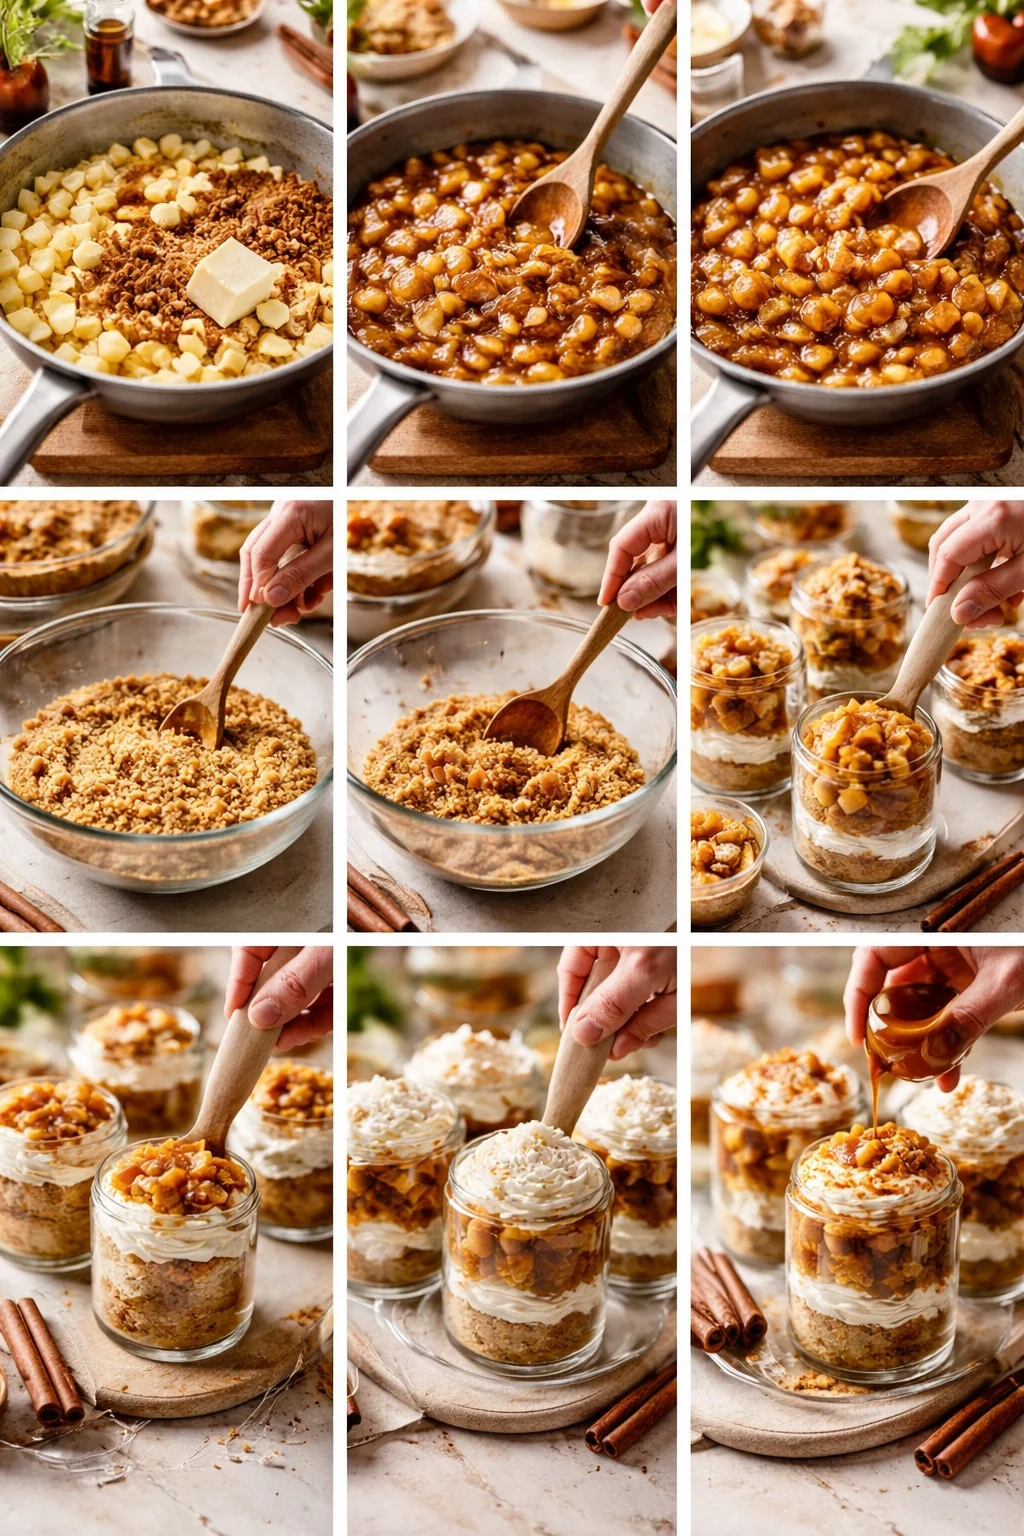
1. Cook the apples. Peel and chop your apples into small chunks. Add butter to a pan over medium heat, toss in the apples, brown sugar, cinnamon, and a pinch of salt. Stir every minute or so. After about 8 to 10 minutes, they should be soft but not mush. Turn off the heat and add vanilla if you are using it.
2. Make your crumb layer. Crush cookies or graham crackers until they are fine, like sandy with a few little bits. If you want it richer, mix in 1 tablespoon melted butter, but you do not have to.
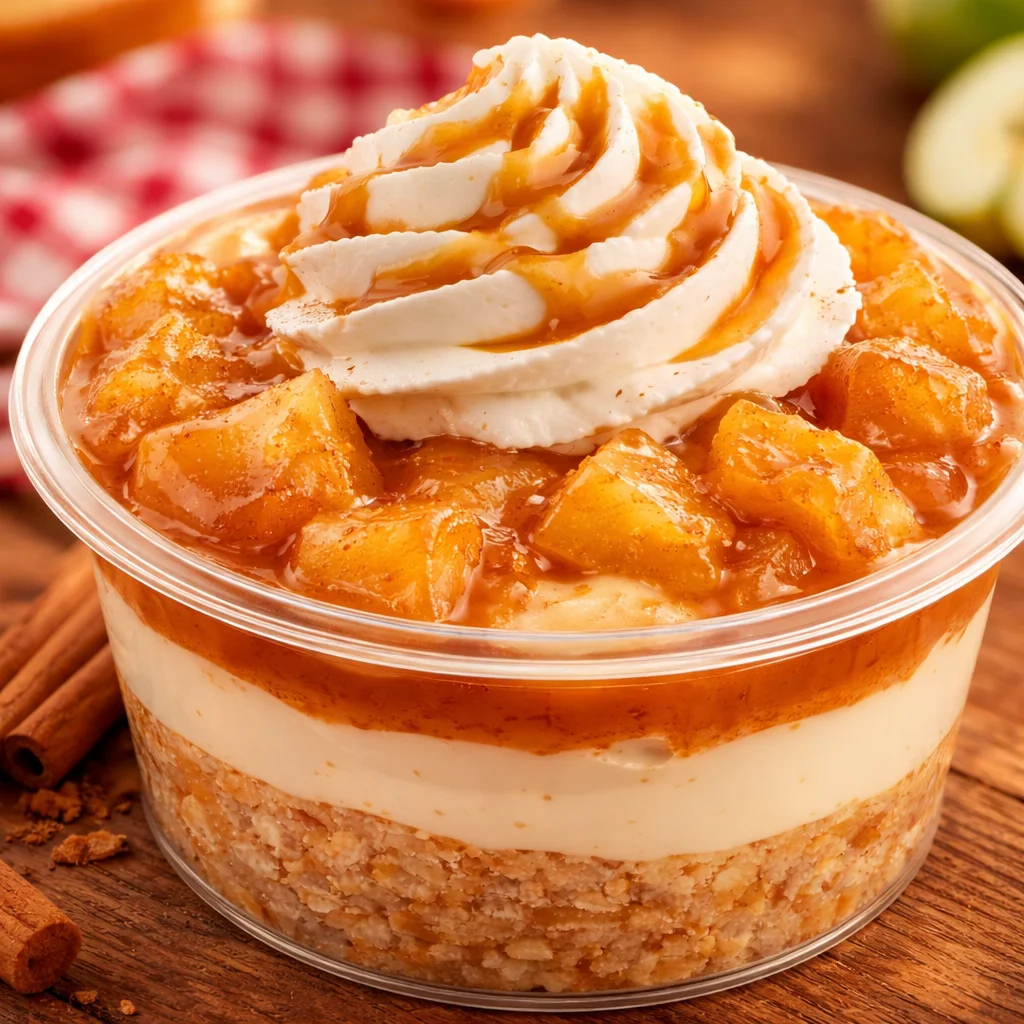
3. Build the cups. Add a spoonful of crumbs, then a spoonful of apples, then whipped topping. Repeat one more time if your cups are tall enough. Finish with caramel drizzle and any toppings you love.
4. Chill or serve. You can serve right away, but I like 30 minutes in the fridge so everything settles and the flavors hang out together.
When I am making these for a gathering, I set up a mini “dessert cup bar” on the counter and let people add their own toppings. It feels fun and it keeps me from micromanaging the whipped cream situation.
Also, if you are craving another caramel apple dessert that is super crowd friendly, this caramel apple eclair cake is dangerously easy to keep scooping.
I made these for a family movie night and everyone kept sneaking back for another cup. The apple layer tasted like warm pie filling, and the caramel on top made it feel like a treat from a bakery.
Make Your Own Salted Caramel Sauce
Store bought caramel is totally fine, especially when life is busy. But if you have an extra 10 minutes and you want that “wow” flavor, homemade salted caramel is worth it. It tastes deeper, less one note sweet, and it makes your CARAMEL APPLE DESSERT CUPS feel extra special.
Quick homemade salted caramel (simple version)
In a small saucepan over medium heat, melt 1/2 cup sugar. Stir gently and keep an eye on it because it goes from fine to too dark fast. Once it is melted and amber colored, add 3 tablespoons butter and stir until smooth. Slowly pour in 1/3 cup warm heavy cream while stirring. It will bubble up, so do not panic. Add a pinch of salt, let it cool for a few minutes, and you are done.
A couple of real life notes:
- If it gets grainy, keep it on low heat and stir gently until it smooths out.
- If it looks too thick after cooling, warm it for 10 seconds and stir.
- Start with a small pinch of salt, then taste and add more if you want that stronger salted caramel vibe.
I usually make a little extra because caramel has a way of disappearing from the jar, especially when apples are nearby.
Recipe Tips
These are the little things that make the difference between “pretty good” and “please send me the recipe right now.”
My best tips for great texture and flavor
Pick the right apples. If you like tart, go Granny Smith. If you like sweet but still firm, Honeycrisp is amazing. Soft apples can turn mushy and that is not what we want in layered cups.
Let the apples cool slightly. If you put piping hot apples directly on the whipped layer, it melts and gets messy. Still tasty, but not as pretty.
Do not overdo the crumbs. You want crunch, but you also want that creamy layer to shine. I aim for thin, even layers so every bite gets a little of everything.
Make them ahead the smart way. If you are prepping early, keep apples and crumbs separate. Assemble 1 to 3 hours before serving for the best texture. Overnight works too, but the crumb layer will soften more.
Easy flavor upgrades. Add toasted pecans, a tiny sprinkle of flaky salt on top, or even a few mini chocolate chips if you want that caramel apple candy vibe.
By the way, if you like apple desserts that feel like a full on celebration, this caramel apple cheesecake cake is the kind of thing you bring out when you want people to gasp a little.
Common Questions
Can I make CARAMEL APPLE DESSERT CUPS the day before?
Yes, but for the best texture, prep the parts the day before and assemble closer to serving. If they sit overnight fully assembled, the crumbs soften. Still delicious, just less crunchy.
What is the best cup size for serving?
I like 8 ounce cups for parties. For richer, more dessert like portions, 4 to 6 ounce cups are perfect and people still feel satisfied.
Can I use cool whip instead of homemade whipped cream?
Absolutely. I use it often because it holds up well, especially if the cups will sit in the fridge for a while.
Do I have to peel the apples?
Nope. I peel them when I want a softer, classic pie filling feel. If you like more texture and a little color, leave the peel on.
How do I keep the apples from getting watery?
Cook them until most of the liquid reduces and the apples look glossy, not soupy. If your apples release a lot of juice, keep the pan on for a couple extra minutes.
A sweet little send off
If you want a dessert that feels cozy, looks cute in a cup, and does not stress you out, CARAMEL APPLE DESSERT CUPS are it. You get warm spiced apples, creamy layers, and that caramel finish that makes people smile after the first bite. If you want to compare versions, I also enjoyed reading Caramel Apple Dessert Cups – Cake Me Home Tonight and the fun twist in Salted Caramel Apple Cups | The Girl Who Ate Everything. Now promise me you will drizzle the caramel generously and sneak a spoonful of apples while you build the layers. You have to do it, for quality control.
Caramel Apple Dessert Cups
Ingredients
Method
- Peel and chop apples into small chunks.
- In a pan over medium heat, melt butter and add apples, brown sugar, cinnamon, and a pinch of salt.
- Stir occasionally until apples are soft, about 8 to 10 minutes. Remove from heat and stir in vanilla, if using.
- Crush cookies or graham crackers until fine and sand-like.
- Optionally, mix in 1 tablespoon of melted butter for richness.
- In clear cups, add a spoonful of crumbs, followed by a spoonful of apples, and then a layer of whipped topping.
- Repeat layering as space allows, finishing with a caramel drizzle and any optional toppings.
- You can serve immediately, but chilling for 30 minutes helps flavors meld.