
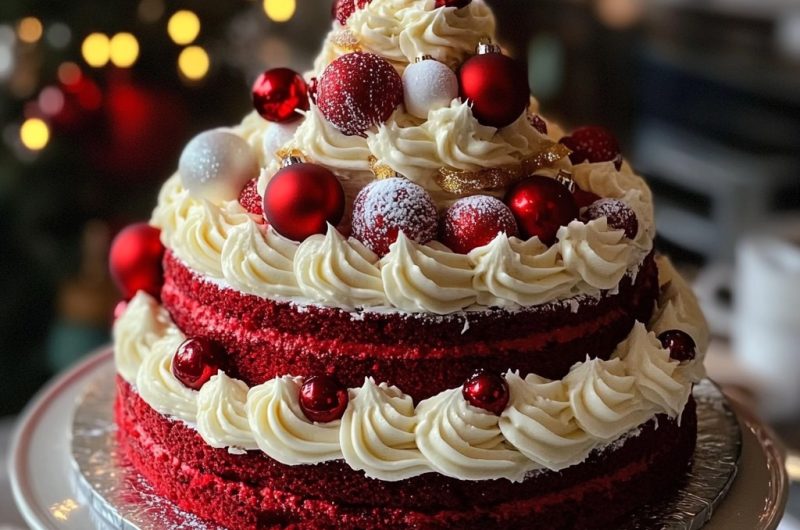
Bring the magic of the holidays to life with this stunning Red Velvet Christmas Tree Cake! With its vibrant red layers, creamy cream cheese frosting, and festive decorations, this cake is not just a dessert but a centerpiece for your holiday celebrations.
The rich, tender red velvet cake is flavored with a hint of cocoa and vanilla, layered with a luscious cream cheese frosting, and shaped into a charming Christmas tree design. Decorated with sprinkles, candies, and powdered sugar “snow,” this cake is a treat for both the eyes and the taste buds.
Resume
- Vibrant and Festive: A red velvet cake transformed into a beautiful Christmas tree.
- Rich and Moist: Tender cake layers paired with creamy frosting.
- Holiday Centerpiece: Stunning design perfect for parties and gatherings.
- Fun to Decorate: Get creative with sprinkles, candies, and edible glitter.
Exciting Story
The first time I made this Red Velvet Christmas Tree Cake, it was for a family holiday dinner. I wanted something that would dazzle everyone, not just with flavor but with presentation. As I stacked the layers into a towering tree shape and decorated it with festive sprinkles and candies, it truly felt like crafting edible art.
When I brought it to the table, the glowing faces of my family said it all. The bright red velvet layers, the creamy frosting, and the festive decorations made it the star of the evening. Now, this cake has become a family tradition, bringing joy and holiday spirit to every celebration.
Why This Red Velvet Christmas Tree Cake?
Why You’ll Love This Recipe:
- Showstopper Dessert: A gorgeous centerpiece that’s as delicious as it is beautiful.
- Rich and Decadent: Moist red velvet cake with tangy cream cheese frosting.
- Customizable Decorations: Decorate to match your holiday theme.
- Fun for All Ages: A baking project the whole family can enjoy.
What You Need for Red Velvet Christmas Tree Cake
For the Red Velvet Cake Layers:
- 2 1/2 cups all-purpose flour
- 1/4 cup unsweetened cocoa powder
- 1 teaspoon baking soda
- 1/2 teaspoon salt
- 1 cup unsalted butter, softened
- 2 cups granulated sugar
- 4 large eggs, at room temperature
- 1 cup buttermilk, at room temperature
- 2 teaspoons vanilla extract
- 1 teaspoon white vinegar
- 1 tablespoon red food coloring (gel preferred for vibrant color)
For the Cream Cheese Frosting:
- 8 oz cream cheese, softened
- 1/2 cup unsalted butter, softened
- 4 cups powdered sugar
- 2 teaspoons vanilla extract
For Decoration:
- Sprinkles, edible glitter, or sugar pearls
- Candies or chocolate stars
- Powdered sugar (for snow effect)
- Green food coloring (optional, for frosting or accents)

How to Make Red Velvet Christmas Tree Cake
Step 1: Prepare the Cake Layers
- Preheat your oven to 350°F (175°C). Grease and flour three 8-inch round cake pans or line them with parchment paper.
- In a medium bowl, whisk together the flour, cocoa powder, baking soda, and salt.
- In a large mixing bowl, cream the softened butter and sugar with an electric mixer until light and fluffy.
- Add the eggs one at a time, mixing well after each addition.
- Mix in the vanilla extract, vinegar, and red food coloring.
- Gradually add the dry ingredients to the wet ingredients, alternating with the buttermilk, starting and ending with the dry ingredients. Mix just until combined.
- Divide the batter evenly among the prepared pans. Bake for 25-30 minutes, or until a toothpick inserted in the center comes out clean.
- Let the cakes cool in the pans for 10 minutes, then transfer to a wire rack to cool completely.
Step 2: Make the Cream Cheese Frosting
- In a large bowl, beat the cream cheese and butter until smooth and creamy.
- Gradually add the powdered sugar, one cup at a time, mixing on low speed until incorporated.
- Mix in the vanilla extract. Beat on high speed for 1-2 minutes until fluffy.
Step 3: Assemble the Cake
- Trim the tops of the cake layers to make them level.
- Place the first layer on a cake board or serving plate. Spread a generous layer of cream cheese frosting on top.
- Repeat with the second and third layers, spreading frosting between each layer.
- Use the remaining frosting to cover the entire cake.
Step 4: Shape the Christmas Tree
- Gently carve the cake into a triangular tree shape using a serrated knife.
- If desired, tint some frosting with green food coloring and pipe it onto the tree for a festive look.
Step 5: Decorate the Cake
- Decorate with sprinkles, candies, and edible glitter to create ornaments.
- Dust powdered sugar over the cake for a snowy effect. Place a candy or chocolate star at the top.
Tips for Red Velvet Christmas Tree Cake
- Use Gel Food Coloring: Gel gives a vibrant red color without altering the batter consistency.
- Chill Before Shaping: Refrigerate the assembled cake for 30 minutes to make carving easier.
- Decorate Creatively: Use piping tips to create “garland” or “ornaments” on the tree.
Substitutions and Variations
- Dairy-Free: Use plant-based butter, cream cheese, and buttermilk.
- Alternative Colors: Swap red food coloring for green to make a green velvet tree.
- Filling Options: Add a layer of raspberry jam or chocolate ganache between the layers.
Make a Healthier Version
- Reduce Sugar: Use less powdered sugar in the frosting and a sugar substitute in the cake.
- Whole-Grain Flour: Replace half the all-purpose flour with whole wheat flour for added fiber.
- Natural Coloring: Use beet powder for a natural red hue.
Closing for Red Velvet Christmas Tree Cake
And there you have it—Red Velvet Christmas Tree Cake, a stunning and delicious centerpiece that will bring joy and holiday spirit to your table. Whether you’re baking for a party or creating new traditions with your loved ones, this cake is sure to impress and delight. Let your creativity shine as you decorate your edible Christmas tree, and enjoy every rich, festive bite.
Happy holidays, and happy baking! 🎄✨🍰
Frequently Asked Questions for Red Velvet Christmas Tree Cake
- Can I make this cake ahead of time?
Yes, you can bake the layers and freeze them for up to 1 month. Frost and decorate after thawing. - What’s the best way to store this cake?
Store it in an airtight container in the refrigerator for up to 5 days. Bring to room temperature before serving. - Can I use a boxed red velvet cake mix?
Yes, you can use a boxed mix for convenience, but homemade provides the best flavor and texture. - How do I keep the cake layers moist?
Avoid overbaking and brush the layers with simple syrup before frosting for extra moisture. - What if I don’t have buttermilk?
Make a substitute by mixing 1 cup of milk with 1 tablespoon of vinegar or lemon juice. - Can I make this cake gluten-free?
Use a 1:1 gluten-free baking flour as a substitute for the all-purpose flour. - What type of decorations work best?
Use sprinkles, sugar pearls, edible glitter, or fondant for detailed designs. - Can I make mini tree cakes?
Yes, use smaller pans or cupcake molds to create individual servings. - How do I prevent crumbs in the frosting?
Apply a thin crumb coat, chill the cake, then frost with a final layer. - Can I add a surprise filling?
Yes, hollow out the center and add candies or sprinkles for a fun surprise.
Enjoy baking this showstopping Red Velvet Christmas Tree Cake and making your holidays even sweeter! 🎅🎄✨
The Diabetes Cookbook
Instant Healthy Meals From Managing Diabetes

Red Velvet Christmas Tree Cake Recipe
4
servings30
minutes40
minutes300
kcal1
hour10
minutesKeep the screen of your device on
Ingredients
- For the Red Velvet Cake Layers:
2 1/2 cups all-purpose flour
1/4 cup unsweetened cocoa powder
1 teaspoon baking soda
1/2 teaspoon salt
1 cup unsalted butter, softened
2 cups granulated sugar
4 large eggs, at room temperature
1 cup buttermilk, at room temperature
2 teaspoons vanilla extract
1 teaspoon white vinegar
1 tablespoon red food coloring (gel preferred for vibrant color)
- For the Cream Cheese Frosting:
8 oz cream cheese, softened
1/2 cup unsalted butter, softened
4 cups powdered sugar
2 teaspoons vanilla extract
- For Decoration:
Sprinkles, edible glitter, or sugar pearls
Candies or chocolate stars
Powdered sugar (for snow effect)
Green food coloring (optional, for frosting or accents)
Directions
- Step 1: Prepare the Cake Layers
- Preheat your oven to 350°F (175°C). Grease and flour three 8-inch round cake pans or line them with parchment paper.
- In a medium bowl, whisk together the flour, cocoa powder, baking soda, and salt.
- In a large mixing bowl, cream the softened butter and sugar with an electric mixer until light and fluffy.
- Add the eggs one at a time, mixing well after each addition.
- Mix in the vanilla extract, vinegar, and red food coloring.
- Gradually add the dry ingredients to the wet ingredients, alternating with the buttermilk, starting and ending with the dry ingredients. Mix just until combined.
- Divide the batter evenly among the prepared pans. Bake for 25-30 minutes, or until a toothpick inserted in the center comes out clean.
- Let the cakes cool in the pans for 10 minutes, then transfer to a wire rack to cool completely.
- Step 2: Make the Cream Cheese Frosting
- In a large bowl, beat the cream cheese and butter until smooth and creamy.
- Gradually add the powdered sugar, one cup at a time, mixing on low speed until incorporated.
- Mix in the vanilla extract. Beat on high speed for 1-2 minutes until fluffy.
- Step 3: Assemble the Cake
- Trim the tops of the cake layers to make them level.
- Place the first layer on a cake board or serving plate. Spread a generous layer of cream cheese frosting on top.
- Repeat with the second and third layers, spreading frosting between each layer.
- Use the remaining frosting to cover the entire cake.
- Step 4: Shape the Christmas Tree
- Gently carve the cake into a triangular tree shape using a serrated knife.
- If desired, tint some frosting with green food coloring and pipe it onto the tree for a festive look.
- Step 5: Decorate the Cake
- Decorate with sprinkles, candies, and edible glitter to create ornaments.
- Dust powdered sugar over the cake for a snowy effect. Place a candy or chocolate star at the top.
Follow US on Pinterest
Follow @middleeastsector on Pinterest