
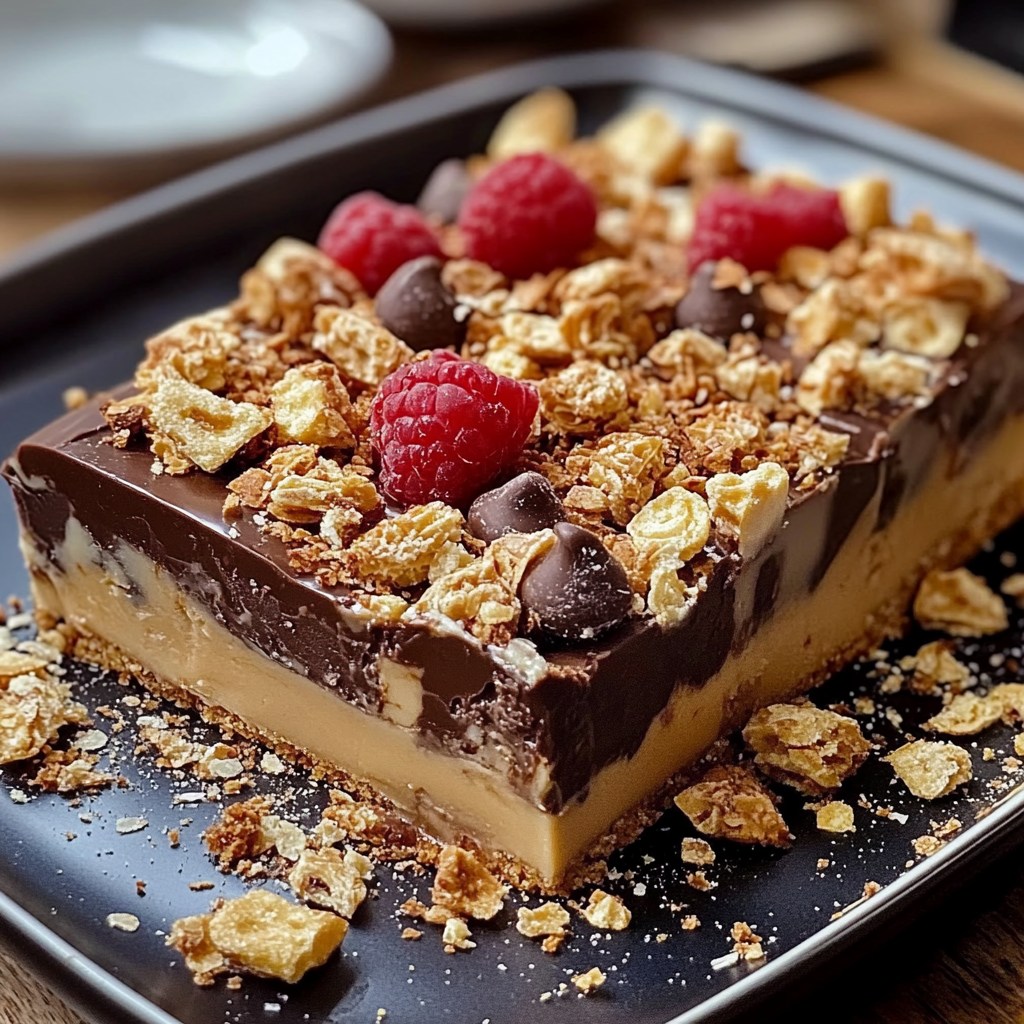
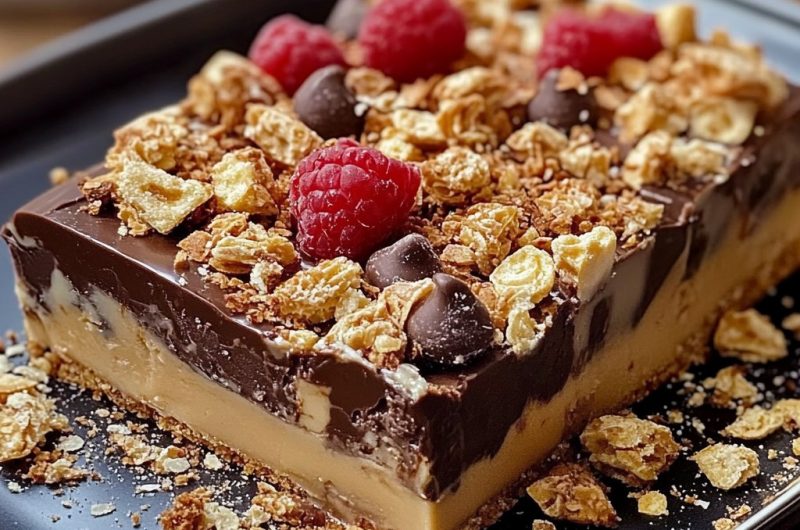
Sometimes, the best desserts are the simplest ones—like this Quick No-Bake Crunchie Slice. With just a handful of ingredients and minimal effort, you can create a deliciously crunchy, sweet slice that will be gone in no time. Whether you’re looking for an easy snack to satisfy your sweet tooth or a fun treat to serve at a gathering, this no-bake slice has got you covered. It’s the perfect combination of chocolate, crushed biscuits, and honeycomb, and it doesn’t require an oven!
The beauty of this Crunchie Slice lies in its simplicity. You don’t need to spend hours in the kitchen, and there’s no baking involved. All you need is a few key ingredients: crunchy biscuits, sweetened condensed milk, butter, and a generous amount of Crunchie bars (or honeycomb toffee). The result is a slice that’s indulgent, satisfying, and sure to please any crowd.
What’s even better is that this treat is incredibly versatile. You can switch up the type of biscuits or add in your favorite mix-ins to make it your own. If you love a bit of extra sweetness, throw in some chocolate chips or dried fruit for an added twist. No matter what, the Crunchie slices will always deliver on flavor and texture, making them a go-to dessert for any occasion.
The best part? You can prepare this slice in advance, let it chill in the fridge, and have a no-fuss, ready-to-serve dessert whenever you need it. It’s perfect for birthday parties, picnics, or even just a lazy afternoon snack. With a crunchy, toffee-like base and a smooth, chocolatey topping, this Quick No-Bake Crunchie Slice is a must-have treat in your recipe collection.
So next time you’re craving something sweet, why not try this easy, no-bake recipe? You’ll be amazed at how a few simple ingredients can come together to make such a deliciously addictive treat.
Resume:
This Quick No-Bake Crunchie Slice is the ultimate easy dessert. Made with crunchy biscuits, honeycomb, and a rich chocolate topping, it’s a simple, indulgent treat that comes together in minutes. The best part? There’s no baking required!
The slice is quick to prepare, perfect for busy days when you want something sweet without the hassle of an oven. Simply mix the ingredients, chill, and you’ve got a delicious dessert that will disappear as soon as it hits the table.
The Diabetes Cookbook
Instant Healthy Meals From Managing Diabetes

What makes this slice special is its balance of textures. The crunchy biscuits and honeycomb create the perfect contrast to the smooth, creamy chocolate topping, making each bite incredibly satisfying. It’s a treat that everyone will love, from kids to adults.
Whether you’re hosting a party, enjoying a quiet day at home, or need a last-minute dessert for guests, this Quick No-Bake Crunchie Slice is a crowd-pleaser. Easy to make, delightful to eat, and always a hit.
Exciting Story:
I remember the first time I made this Quick No-Bake Crunchie Slice. It was a busy week, and I was rushing to prepare a dessert for a family gathering. I had little time but needed something that would impress everyone—and that’s when this recipe came to the rescue. I had just enough ingredients at home, and it took no more than 20 minutes to prepare.
When I served it, the whole family was amazed at how delicious it was. My husband couldn’t stop raving about the honeycomb crunch, while my kids loved the smooth, chocolaty topping. It quickly became a favorite in our household, and now, whenever we have visitors, this slice is always on the menu. It’s one of those desserts that doesn’t look or taste like it’s been thrown together in a rush.
In fact, my friends now ask for the recipe every time I make it! It’s the perfect dessert to take to potlucks or picnics, and I love how everyone can easily customize it by adding their favorite mix-ins. Since that first batch, I’ve made it countless times, and it’s never failed to delight everyone who tries it.
Now, whenever I need something quick and sweet, I know I can rely on this simple recipe. And every time I make it, it brings back the memories of that first family gathering, where this slice became an instant favorite.
Why This Quick No-Bake Crunchie Slice:
- Easy and Quick: With just a few simple ingredients and no baking, this slice is perfect for busy days.
- Crunchy and Sweet: The combination of crunchy biscuits and honeycomb with a smooth chocolate topping makes every bite irresistible.
- Versatile: Feel free to add your favorite ingredients—chocolate chips, dried fruit, or nuts—to make it your own.
- Make-Ahead: Prepare it in advance and let it chill in the fridge for a hassle-free dessert.
- Crowd-Pleaser: Whether you’re serving it at a party or just for yourself, it’s always a hit with everyone.
What You Need For Quick No-Bake Crunchie Slice:
- 200g (7 oz) digestive biscuits or graham crackers, crushed
- 4 Crunchie bars, chopped (or honeycomb toffee)
- 1/2 cup unsalted butter
- 1/2 cup sweetened condensed milk
- 200g (7 oz) milk chocolate, chopped
- 1 tablespoon golden syrup (optional)
How to Make Quick No-Bake Crunchie Slice:
Start by crushing the digestive biscuits into rough crumbs. You can do this by placing them in a plastic bag and smashing them with a rolling pin or using a food processor.
In a saucepan, melt the butter and sweetened condensed milk together over low heat, stirring constantly. Once the butter has melted and the mixture is smooth, remove from the heat and stir in the golden syrup (if using).
Next, fold in the crushed biscuits and chopped Crunchie bars until everything is well combined. Press the mixture into a lined baking tin and refrigerate while you prepare the topping.
For the topping, melt the milk chocolate in a heatproof bowl over a pot of simmering water (double boiler method), or microwave in 30-second intervals, stirring until smooth. Pour the melted chocolate over the biscuit mixture, spreading it evenly to cover the top.
Refrigerate the slice for at least 2 hours to set. Once firm, slice it into squares or bars and enjoy!
Tips for Quick No-Bake Crunchie Slice:
- Crushing Biscuits: Don’t crush the biscuits too finely. Leave some bigger chunks for added texture.
- Chill Time: For the best results, let the slice chill in the fridge for at least 2 hours to allow the flavors to meld and the chocolate to set.
Substitutions and Variations:
- Different Biscuits: You can swap the digestive biscuits for any of your favorite biscuits or cookies, such as graham crackers or even Oreo cookies for a chocolate twist.
- Dark Chocolate: If you prefer a more intense chocolate flavor, substitute the milk chocolate for dark chocolate.
- Add-ins: You can mix in nuts, dried fruit, or even marshmallows for a more customized treat.
Make a Healthier Version:
- Lower Sugar: Use dark chocolate with a higher cocoa percentage and reduce the amount of golden syrup or replace it with a sugar substitute like honey.
- Gluten-Free: Use gluten-free biscuits or crackers to make this treat gluten-free.
- Less Fat: Swap the butter for a lighter version, such as coconut oil, to make this recipe slightly lighter.
Closing for Quick No-Bake Crunchie Slice:
And there you have it! This Quick No-Bake Crunchie Slice is the perfect dessert when you’re short on time but still want something delicious and crowd-pleasing. With minimal effort and just a few ingredients, you’ll have a sweet, satisfying treat that everyone will love. Let us know how your slice turns out, and be sure to check out some of our other easy dessert recipes for more inspiration!
Frequently Asked Questions For Quick No-Bake Crunchie Slice:
- Can I make this slice in advance?
Yes! It’s actually best if you make it ahead of time and let it chill for a couple of hours to set. - Can I use other types of chocolate?
Absolutely! Dark or white chocolate will work as well, depending on your preference. - How long can I store this slice?
It will keep in an airtight container in the fridge for up to 5 days. - Can I use different candy instead of Crunchie bars?
Yes! You can swap Crunchie bars with any honeycomb toffee or even try using crushed-up chocolate bars like Mars or Snickers. - Is this recipe gluten-free?
You can make it gluten-free by using gluten-free biscuits or crackers. - How do I cut the slice neatly?
Use a sharp knife and let the slice sit at room temperature for a few minutes to soften slightly before cutting. - Can I freeze this slice?
Yes, you can freeze it for up to 1 month. Just wrap it tightly and store it in an airtight container. - Can I add more Crunchie bars?
Of course! Feel free to add extra Crunchie bars for a more toffee-filled treat. - Can I use honey instead of golden syrup?
Yes, honey can be used as a substitute for golden syrup for a slightly different flavor. - Can I make it without chocolate?
You can, but the chocolate adds richness and sweetness. Consider using a glaze or icing if you prefer to skip the chocolate.
Quick No-Bake Crunchie Slice
4
servings30
minutes40
minutes300
kcal1
hour10
minutesKeep the screen of your device on
Ingredients
200 g (7 oz) digestive biscuits or graham crackers, crushed
4 Crunchie bars, chopped (or honeycomb toffee)
1/2 cup unsalted butter
1/2 cup sweetened condensed milk
200 g (7 oz) milk chocolate, chopped
1 tablespoon golden syrup (optional)
Directions
- Start by crushing the digestive biscuits into rough crumbs. You can do this by placing them in a plastic bag and smashing them with a rolling pin or using a food processor.
- In a saucepan, melt the butter and sweetened condensed milk together over low heat, stirring constantly. Once the butter has melted and the mixture is smooth, remove from the heat and stir in the golden syrup (if using).
- Next, fold in the crushed biscuits and chopped Crunchie bars until everything is well combined. Press the mixture into a lined baking tin and refrigerate while you prepare the topping.
- For the topping, melt the milk chocolate in a heatproof bowl over a pot of simmering water (double boiler method), or microwave in 30-second intervals, stirring until smooth. Pour the melted chocolate over the biscuit mixture, spreading it evenly to cover the top.
- Refrigerate the slice for at least 2 hours to set. Once firm, slice it into squares or bars and enjoy!
Follow US on Pinterest
Follow @middleeastsector on Pinterest